Portainer Setup Guide With Automatic HTTPS & OAuth SSO via Authelia
- Home Automation, Networking & Self-Hosting
- Published May 15, 2023 Updated Jan 25, 2025
This article explains how to set up Portainer with automatic HTTPS certificates (via Caddy) and OAuth single sign-on (via Authelia). This post is part of my series on home automation, networking & self-hosting that shows how to install, configure, and run a home server & network with dockerized or virtualized services.

What is Portainer?
Portainer is a Docker container management UI. It’s available in a free & open-source community edition (CE) as well as in a commercial business edition (BE). CE should be sufficient for home server use cases; however, there’s also a nice free offering of BE for up to five nodes. All the features used in this article are available with CE.
Portainer Installation
Preparation
I’m assuming that you’ve set up Docker, the Caddy container, and Authelia as described in the previous articles in this series. I’m also assuming that you’ve configured Authelia as OpenID Connect IdP as described in my ownCloud article.
Dockerized Portainer Directory Structure
This is what the directory structure will look like when we’re done:
rpool/
 └── encrypted/
     └── docker/
         └── portainer/
             ├── data/
             └── docker-compose.yml
We’re placing the configuration on the encrypted ZFS dataset (rpool/encrypted).
Create the directories:
mkdir -p /rpool/encrypted/docker/portainer/data
Portainer Docker Compose File
Create docker-compose.yml with the following content:
services:

  portainer:
    container_name: portainer
    hostname: portainer
    image: portainer/portainer-ce:latest
    restart: unless-stopped
    networks:
      - caddy_caddynet
    expose:
      - 9443
    volumes:
      - /var/run/docker.sock:/var/run/docker.sock  # required for API access
      - /etc/localtime:/etc/localtime:ro
      - ./data:/data

networks:
  caddy_caddynet:
    external: true
Note: The above YAML file references the CE image of Portainer. To use the BE image instead, simply replace portainer/portainer-ce:latest with portainer/portainer-ee:latest.
Start the Portainer Container
Navigate into the directory with docker-compose.yml and run:
docker compose up -d
Inspect the container logs for errors with the command docker compose logs --tail 30 --timestamps.
Let’s Encrypt Certificate for Portainer via Caddy
Caddyfile
Add the following to Caddyfile (details):
portainer.{$MY_DOMAIN} {
	reverse_proxy portainer:9443 {
		transport http {
			tls_insecure_skip_verify
		}
	}
	tls {
		dns cloudflare {env.CLOUDFLARE_API_TOKEN}
	}
}
DNS A Record
Add the following A record to your DNS domain:
portainer.home.yourdomain.com 192.168.0.4 # replace with your Docker host's IP address
Try to resolve the name on a machine in your network (e.g., nslookup portainer.home.yourdomain.com). If that fails, you might need to work around DNS rebind protection in your router.
Reload Caddy’s Configuration
Instruct Caddy to reload its configuration by running:
docker exec -w /etc/caddy caddy caddy reload
You should now be able to access the Portainer web interface at https://portainer.home.yourdomain.com without getting a certificate warning from your browser.
Initial Portainer Configuration
Open https://portainer.home.yourdomain.com in your browser. You’re asked to set a password for the user admin. Once in the Portainer UI, click Get Started. You should see information about your local Docker instance.
Create Your Portainer User Account
Create a dedicated user account for yourself by navigating to Settings > Users. Make sure to specify the same user name as configured in lldap (guide), and assign it the administrator role.
SSO to Portainer via OAuth Authentication to Authelia
This section describes how to set up single sign-on to Portainer via OpenID Connect authentication to Authelia. It is based on the Authelia Portainer integration guide.
Authelia: Configure OpenID Connect IdP
Client ID
Generate a random alphanumeric string to be used as client ID:
tr -cd '[:alnum:]' < /dev/urandom | fold -w "64" | head -n 1
Copy the generated string for later use in Authelia’s config file.
Client Secret
The shared secret between Portainer and Authelia is entered as plaintext in the Portainer UI, but as a hash of the plaintext in Authelia’s configuration. Create a new secret by running the following command (docs):
docker run authelia/authelia:latest authelia crypto hash generate pbkdf2 --random --random.length 32 --random.charset alphanumeric
The command’s output looks as follows:
Unable to find image 'authelia/authelia:latest' locally
latest: Pulling from authelia/authelia
Digest: sha256:25fc5423238b6f3a1fc967fda3f6a9212846aeb4a720327ef61c8ccff52dbbe2
Status: Downloaded newer image for authelia/authelia:latest
Random Password: v0e1zWJhvKQYud1lVUx4XhLibOwp0zyd
Digest: $pbkdf2-sha512$310000$vFbvgWgmhAIdZCbcLsrrXA$yRENW40rZpWLUP2ABQglEAhIHgpl7QAJ3eq8ZDEMmEHDL9Rro3eGwQ/4u05JsSLsEO5NIw.iAWVbo7EsiL8V1w
From the above output, the following two strings are required:
- Plaintext secret: v0e1zWJhvKQYud1lVUx4XhLibOwp0zyd
- Hashed secret: $pbkdf2-sha512$310000$vFbvgWgmhAIdZCbcLsrrXA$yRENW40rZpWLUP2ABQglEAhIHgpl7QAJ3eq8ZDEMmEHDL9Rro3eGwQ/4u05JsSLsEO5NIw.iAWVbo7EsiL8V1w
Note: do not use the above values. Create your own!
YAML Configuration File
Add the following to Authelia’s configuration file config/configuration.yml (details):
    clients:
      - client_id: lQ6vsAawaJYH53gSfiUSXKT5XxFYmVjt5o5iFSvOiIgz7wd3lyycNaQpXMo8VhgB  # Replace with your own random ID
        client_name: Portainer
        client_secret: '$pbkdf2-sha512$310000$vFbvgWgmhAIdZCbcLsrrXA$yRENW40rZpWLUP2ABQglEAhIHgpl7QAJ3eq8ZDEMmEHDL9Rro3eGwQ/4u05JsSLsEO5NIw.iAWVbo7EsiL8V1w'  # Replace with your own hashed secret
        redirect_uris:
          - https://portainer.home.yourdomain.com  # Replace with your own URL
        scopes:
          - openid
          - profile
          - groups
          - email
Restart Authelia
We changed the container’s environment, which makes it necessary to recreate the container (stopping and starting is not enough). Navigate into the authelia directory and run:
docker compose down
docker compose up -d
Inspect the container logs for errors with the command docker compose logs --tail 30 --timestamps.
Portainer: Enable OAuth Authentication
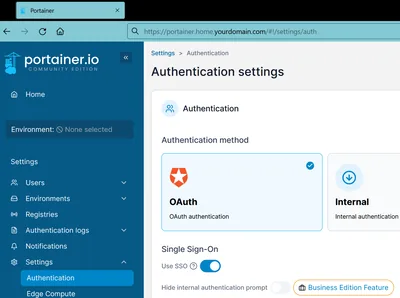
In Portainer’s UI, navigate to Settings > Authentication and select OAuth as the authentication method. Set the following values:
- Single Sign-On: enabled
- Automatic user provisioning: disabled (this is just my preference)
- Provider: custom
- Client ID: [paste the random ID you generated above]
- Client secret: [paste the plaintext secret you generated above]
- Authorization URL:
https://auth.home.yourdomain.com/api/oidc/authorization - Access token URL:
https://auth.home.yourdomain.com/api/oidc/token - Resource URL:
https://auth.home.yourdomain.com/api/oidc/userinfo - Redirect URL:
https://portainer.home.yourdomain.com - User identifier:
preferred_username - Scopes:
openid profile groups email
Note: Make sure to replace the dummy URLs above with your own.
Save the settings.
Log In via OAuth
In a different browser, access https://portainer.home.yourdomain.com. Click Login with OAuth. It should work without a hitch. After you logged in, inspect the Authelia container logs for errors with the command docker compose logs --tail 30 --timestamps.
Changelog
2024-04-14
- Removed the
versionfromdocker-compose.yml; a warning mentions that it’s obsolete.
2024-03-17
Updated Configuration for Authelia 4.38
The following Authelia settings need to be changed or updated:
- Rename
oidc.clients.idtooidc.clients.client_id. - Rename
oidc.clients.descriptiontooidc.clients.client_name. - Rename
oidc.clients.secrettooidc.clients.client_secret.


Comments