Firezone: WireGuard VPN With User Self-Service Portal & SSO
- Home Automation, Networking & Self-Hosting
- Published Jun 19, 2023 Updated Jan 25, 2025
This article explains how to set up Firezone with automatic HTTPS certificates (via Caddy) and OpenID Connect single sign-on (via Authelia). This post is part of my series on home automation, networking & self-hosting that shows how to install, configure, and run a home server & network with dockerized or virtualized services.
Why Firezone on Top of WireGuard?
Firezone addresses some of WireGuard’s shortcomings by adding features such as the following:
- Web portal for admins and users.
- SSO to the portal via OpenID Connect (OIDC).
- User self-generation of device config files in the portal (docs).
- Simplified client IP address management.
Network Setup
Dynamic DNS
You need a public DNS record that points to your machine’s IP address. Since home networks typically are behind a router whose IP address changes occasionally, you need to configure a dynamic DNS service. This yields a special DNS record that always points to your router’s current IP address.
As I’m using a Fritz!Box as router, the easiest dynamic DNS service to use for me is MyFritz. The setup is straightforward; I’ve described it here. Once configured, you’ll get a DNS address like CRYPTICSTRING.myfritz.net.
Friendly Public DNS Address
This step is not strictly necessary, but it hides the ugly, implementation-specific dynamic DNS address behind a friendly DNS address in any DNS domain of your choosing. Simply create a CNAME record like vpn.home.yourdomain.com that points to CRYPTICSTRING.myfritz.net.
Port Forwarding
In your router, forward the following ports to your Docker host:
443/tcp: HTTPS access to the portal.51820/udp: WireGuard VPN traffic.
Firezone Installation
Preparation
I’m assuming that you’ve set up Docker, the Caddy container, and Authelia as described in the previous articles in this series. I’m also assuming that you’ve configured Authelia as OpenID Connect IdP as described in my ownCloud article and Unbound as described in my DNS server article.
Dockerized Firezone Directory Structure
This is what the directory structure will look like when we’re done:
rpool/
 └── encrypted/
     └── docker/
         └── firezone/
             ├── data/
             ├── db/
             ├── container-vars.env
             ├── container-vars-postgres.env
             └── docker-compose.yml
We’re placing the configuration on the encrypted ZFS dataset (rpool/encrypted).
Create the directories:
$ mkdir -p /rpool/encrypted/docker/firezone/data
$ mkdir -p /rpool/encrypted/docker/firezone/db
Firezone Docker Compose File
Create docker-compose.yml with the following content (based on Firezone’s template):
services:

  firezone:
    container_name: firezone
    hostname: firezone
    image: firezone/firezone:latest
    restart: unless-stopped
    networks:
      backend:              # backend communications to DB
      caddy_caddynet:       # frontend communications (web UI)
    expose:
      - 13000               # Web UI
    ports:
      - "51820:51820/udp"   # WireGuard VPN
    env_file:
      - container-vars.env
    volumes:
      - /etc/localtime:/etc/localtime:ro
      - ./data:/var/firezone
    cap_add:
      - NET_ADMIN           # perform various network-related operations
      - SYS_MODULE          # load and unload kernel modules
    sysctls:
      # Needed for masquerading and NAT.
      - net.ipv6.conf.all.disable_ipv6=0
      - net.ipv4.ip_forward=1
      - net.ipv6.conf.all.forwarding=1
    depends_on:
      - firezone-postgres

  firezone-postgres:
    container_name: firezone-postgres
    hostname: firezone-postgres
    image: postgres:15
    restart: unless-stopped
    healthcheck:
      test: ["CMD-SHELL", "pg_isready -d $${POSTGRES_DB} -U $${POSTGRES_USER}"]
      start_period: 20s
      interval: 30s
      retries: 5
      timeout: 5s
    networks:
      - backend
    env_file:
      - container-vars-postgres.env
    volumes:
      - ./db:/var/lib/postgresql/data

networks:
  caddy_caddynet:
    external: true
  backend:
    driver: bridge
Generate a Default Environment File
Generate a default environment file default.env with various secrets (see manual install docs):
$ docker run --rm firezone/firezone bin/gen-env > default.env
We’ll use some of the values from default.env in our own configuration below.
Postgres Environment File
Edit container-vars-postgres.env so that it looks like the following:
POSTGRES_PASSWORD=YOUR_PASSWORD_HERE
POSTGRES_DB=firezone
POSTGRES_USER=postgres
Firezone Environment File
Edit container-vars.env so that it looks like the following (docs):
# Postgres
DATABASE_HOST=firezone-postgres
DATABASE_NAME=firezone
DATABASE_USER=postgres
DATABASE_PASSWORD=YOUR_PASSWORD_HERE      # same password as in container-vars-postgres.env

# Firezone web server
EXTERNAL_URL=https://vpn.home.yourdomain.com

# Firezone admin setup
DEFAULT_ADMIN_EMAIL=YOUR EMAIL HERE
DEFAULT_ADMIN_PASSWORD=YOUR ADMIN PASSWORD HERE

# Secrets
GUARDIAN_SECRET_KEY=COPY FROM default.env
DATABASE_ENCRYPTION_KEY=COPY FROM default.env
SECRET_KEY_BASE=COPY FROM default.env
LIVE_VIEW_SIGNING_SALT=COPY FROM default.env
COOKIE_SIGNING_SALT=COPY FROM default.env
COOKIE_ENCRYPTION_SALT=COPY FROM default.env

# Firezone misc.
TELEMETRY_ENABLED=false

# Email
OUTBOUND_EMAIL_FROM="Your Name <name@domain.com>"  # replace with your name/email
OUTBOUND_EMAIL_ADAPTER=Elixir.Swoosh.Adapters.Sendgrid
OUTBOUND_EMAIL_ADAPTER_OPTS={"api_key": "YOUR SENDGRID API KEY"}

# WireGuard network settings copied from default.env.
# Firezone recommends NOT changing these.
WIREGUARD_IPV4_NETWORK=100.64.0.0/10
WIREGUARD_IPV4_ADDRESS=100.64.0.1
WIREGUARD_IPV6_NETWORK=fd00::/106
WIREGUARD_IPV6_ADDRESS=fd00::1
Database & User Initialization
Migrate the database by running the following:
$ cd /rpool/encrypted/docker/firezone
$ docker compose run --rm firezone bin/migrate
Create the first user:
$ docker compose run --rm firezone bin/create-or-reset-admin
Delete the Default Environment File
We don’t need default.env anymore. Delete it:
$ rm default.env
Start the Firezone Container
Navigate into the directory with docker-compose.yml and run:
$ docker compose up -d
Inspect the container logs for errors with the command docker compose logs --tail 30 --timestamps.
Let’s Encrypt Certificate for Firezone via Caddy
Caddyfile
Add the following to Caddyfile (details):
vpn.{$MY_DOMAIN} {
	reverse_proxy firezone:13000
	tls {
		dns cloudflare {env.CLOUDFLARE_API_TOKEN}
	}
}
DNS A Record
Add the following A record to your internal DNS domain (docs):
vpn.home.yourdomain.com 192.168.0.4 # replace with your Docker host's IP address
Try to resolve the name on a machine in your network (e.g., nslookup vpn.home.yourdomain.com).
Reload Caddy’s Configuration
Instruct Caddy to reload its configuration by running:
docker exec -w /etc/caddy caddy caddy reload
You should now be able to access the Firezone web interface at https://vpn.home.yourdomain.com without getting a certificate warning from your browser.
Initial Configuration
Firezone
Log in to Firezone with the user credentials from container-vars.env (DEFAULT_ADMIN_EMAIL and DEFAULT_ADMIN_EMAIL).
Navigate to Defaults.
- Allowed IPs: you have two options:
- Specify
192.168.0.0/24to only route traffic to your home network through the VPN. Make sure the DNS server (see below) is covered by the netmask. This is what I’m using. - Leave at
0.0.0.0/0, ::/0to route all traffic through the VPN.
- Specify
- DNS Servers: Enter your internal DNS server’s IPv4 address (see my DNS article).
Internal DNS Server (Unbound)
If you’re using Unbound as your internal DNS server as in my guide, make sure to configure interface-automatic: yes, or Unbound silently ignores (drops) DNS requests from VPN clients.
Docker IPv6
In my case, IPv6 is not required on the VPN network, but if you’d like it enabled, follow Firezone’s docs.
Firewall Rule for WireGuard
See this earlier article for information on how to configure Proxmox’s firewall. Add a rule to allow WireGuard traffic:
- Direction:
in - Action:
ACCEPT - Protocol:
udp - Destination port:
51820 - Enable: checked
SSO to Firezone via OpenID Connect (OIDC) Authentication to Authelia
This section describes how to set up single sign-on to Firezone via OpenID Connect authentication to Authelia. It is based on the Authelia Firezone integration guide.
Authelia: Configure OpenID Connect IdP
Client ID
Generate a random alphanumeric string to be used as client ID:
$ tr -cd '[:alnum:]' < /dev/urandom | fold -w "64" | head -n 1
Copy the generated string for later use in Authelia’s config file.
Client Secret
The shared secret between Firezone and Authelia is entered as plaintext in the Firezone UI but as a hash of the plaintext in Authelia’s configuration. Create a new secret by running the following command (docs):
$ docker run authelia/authelia:latest authelia crypto hash generate pbkdf2 --random --random.length 32 --random.charset alphanumeric
The command’s relevant output looks as follows:
Random Password: v0e1zWJhvKQYud1lVUx4XhLibOwp0zyd
Digest: $pbkdf2-sha512$310000$vFbvgWgmhAIdZCbcLsrrXA$yRENW40rZpWLUP2ABQglEAhIHgpl7QAJ3eq8ZDEMmEHDL9Rro3eGwQ/4u05JsSLsEO5NIw.iAWVbo7EsiL8V1w
From the above output, the following two strings are required:
- Plaintext secret: v0e1zWJhvKQYud1lVUx4XhLibOwp0zyd
- Hashed secret: $pbkdf2-sha512$310000$vFbvgWgmhAIdZCbcLsrrXA$yRENW40rZpWLUP2ABQglEAhIHgpl7QAJ3eq8ZDEMmEHDL9Rro3eGwQ/4u05JsSLsEO5NIw.iAWVbo7EsiL8V1w
Note: do not use the above values. Create your own!
YAML Configuration File
Add the following to the oidc: section of Authelia’s configuration file config/configuration.yml (details):
    clients:
      - client_id: lQ6vsAawaJYH53gSfiUSXKT5XxFYmVjt5o5iFSvOiIgz7wd3lyycNaQpXMo8VhgB  # Replace with your own random ID
        client_name: Firezone
        client_secret: '$pbkdf2-sha512$310000$vFbvgWgmhAIdZCbcLsrrXA$yRENW40rZpWLUP2ABQglEAhIHgpl7QAJ3eq8ZDEMmEHDL9Rro3eGwQ/4u05JsSLsEO5NIw.iAWVbo7EsiL8V1w'  # Replace with your own hashed secret
        redirect_uris:
          - https://vpn.home.yourdomain.com/auth/oidc/authelia/callback  # Replace with your own URL
        scopes:
          - openid
          - profile
          - email
        token_endpoint_auth_method: client_secret_post
        userinfo_signed_response_alg: none
Restart Authelia
We changed the container’s environment, which makes it necessary to recreate the container (stopping and starting is not enough). Navigate into the authelia directory and run:
$ docker compose down
$ docker compose up -d
Inspect the container logs for errors with the command docker compose logs --tail 30 --timestamps.
Firezone: Enable OIDC Authentication
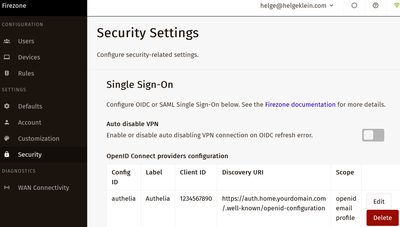
In Firezone’s UI, navigate to Settings > Security and click Add OpenID Connect Provider. Set the following values:
- Config ID:
authelia - Label:
Authelia - Scope:
openid email profile - Client ID: the ID you generated above. In the example config:
lQ6vsAawaJYH53gSfiUSXKT5XxFYmVjt5o5iFSvOiIgz7wd3lyycNaQpXMo8VhgB - Client secret: the plaintext secret you generated above. In the example config:
v0e1zWJhvKQYud1lVUx4XhLibOwp0zyd - Discovery Document URI:
https://auth.home.yourdomain.com/.well-known/openid-configuration - Redirect URI:
https://vpn.home.yourdomain.com/auth/oidc/authelia/callback - Auto-create users: disable unless you want every user defined in Authelia to automatically have access to Firezone, too.
Note: Make sure to replace the dummy URLs above with your own.
Save the settings.
Log In via OAuth
In a different browser, access https://vpn.home.yourdomain.com. Click Sign in with Authelia. It should work without a hitch. After you log in, inspect the Authelia container logs for errors with the command docker compose logs --tail 30 --timestamps.
Disable Local Authentication
Once you’re sure that OpenID Connect works as expected, disable local authentication by navigating to Settings > Security and disabling Local Auth.
Maintenance & Troubleshooting
Upgrading Postgres
Minor Upgrade
You can perform a minor upgrade by switching to a newer Docker image. However, after starting the new version you’ll see warnings like the following:
WARNING:  database "postgres" has a collation version mismatch
DETAIL:  The database was created using collation version 2.31, but the operating system provides version 2.36.
HINT:  Rebuild all objects in this database that use the default collation and run ALTER DATABASE postgres REFRESH COLLATION VERSION, or build PostgreSQL with the right library version.
To fix that, connect to the database container’s shell and execute some SQL commands:
$ docker exec -it firezone-postgres bash

$ psql -U postgres -d firezone
$ reindex database firezone;
$ alter database firezone refresh collation version;

$ psql -U postgres -d postgres
$ reindex database postgres;
$ alter database postgres refresh collation version;

$ psql -U postgres -d template1
$ reindex database template1;
$ alter database template1 refresh collation version;
Major Upgrade
Sadly, the process for performing major upgrades is unnecessarily convolued. It’ not sufficient to simply switch to a newer Docker image. I found these instructions that look promising (untested!).
Interactive Shell in the Firezone Container
Run the following to get an interactive shell in the Firezone container for troubleshooting:
$ docker exec -it firezone sh
Changelog
2024-04-14
- Removed the
versionfromdocker-compose.yml; a warning mentions that it’s obsolete.
2024-03-17
Updated Configuration for Authelia 4.38
The following Authelia settings need to be changed or updated:
- Rename
oidc.clients.idtooidc.clients.client_id. - Rename
oidc.clients.descriptiontooidc.clients.client_name. - Rename
oidc.clients.secrettooidc.clients.client_secret. - Rename
userinfo_signing_algorithmtouserinfo_signed_response_alg. - Add
token_endpoint_auth_method: client_secret_post.


Comments