How to Configure SoftEther, a Free VPN Server for macOS & Windows
This post describes a real-world configuration of the free VPN server SoftEther. It shows how to set up a VPN for macOS and Windows clients on a Hyper-V Windows guest VM.
Our Setup and Requirements
Our situation was as follows:
- Multiple Hyper-V hosts with VMs on an internal network.
- One VM is the VPN gateway. It is configured with two NICs. One is connected to the internal network, the other to the internet.
- The VPN should provide remote access via SSTP for Windows and L2TP for macOS clients.
- It should be possible to connect to the VPN with the clients that come with each operating system. Installing additional client software should not be necessary.
- The VPN should be bridged to the local network so that VPN clients get IP addresses from the internal network’s DHCP server.
- Authentication should be performed against a RADIUS server (we use Duo Authentication Proxy).
HTTPS Certificate
SSTP is based on HTTPS. The good thing about that is that most firewalls and hotel networks should let it through. The bad thing is that we need to deal with certificates. I used a TLS certificate from our internal Active Directory root CA.
Caveat: Unreachable CRL
We are using an internal certificate authority that is not accessible from the internet. As a consequence, the CA’s certificate revocation list (CRL) is not accessible from the internet either.
The Windows SSTP client refuses to connect when it cannot contact the CRL specified in a server certificate. There are two ways around that:
- Set the following registry values on your VPN clients:
HKLM\SYSTEM\CurrentControlSet\Services\SstpSvc\Parameters\NoCertRevocationCheck=1[REG_DWORD] - On the CA, configure a certificate template to not include revocation information in issued certificates.
Requesting the Certificate
Run the following openssl commands on any Windows or Linux machine that has OpenSSL installed. OpenSSL is part of any Splunk installation, for example (even on Windows).
Create a private key:
openssl genrsa -des3 -out c:\temp\vpn\vpn.key 4096
Create a certificate request with the private key:
openssl req -new -key c:\temp\vpn\vpn.key -out c:\temp\vpn\vpn.csr
- Submit the CSR to your CA
- Important: if you want to incorporate multiple server namens in the certificate, specify them in the additional attributes field as follows:
san:dns=server1.domain.com&dns=server2.domain.com.com - You get a P7B file, but SoftEther expects a CER. To convert, double-click the P7B file to open it in the certificates MMC. Locate your certificate, right-click and select All Tasks – Export. Choose the format “Base-64 encoded X.509 (CER)”.
Importing the Certificate in SoftEther
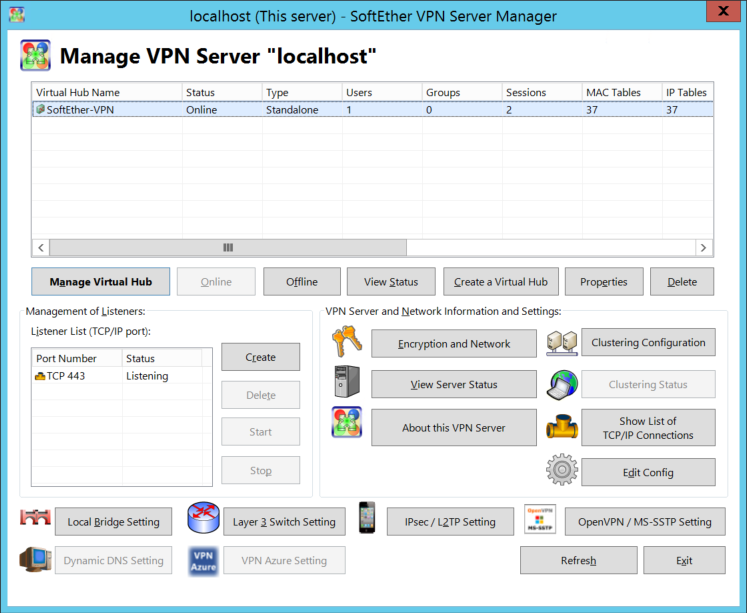
- Open SoftEther VPN Server Manager
- Click “Encryption and Network Settings”
- Click “Import” and specify the location of the CER file
- Specify the location of the certificate’s KEY file
- Enter the key’s passphrase
- While you are in that dialog:
- Disable “Use Keep Alive Internet Connection”
- Switch the encryption algorithm name to ECDHE-RSA-AES256-GCM-SHA384
- Copy your CA’s root certificate to the directory
C:\Program Files\SoftEther VPN Server\chain_certs
Gateway VM Configuration
On the Hyper-V host, go to the gateway VM settings and click “Enable MAC address spoofing” in the “Advanced Features” of the VM’s internal NIC.
SoftEther Configuration
Virtual Hub
Creating a Virtual Hub
- Open SoftEther VPN Server Manager
- Create a virtual hub
User and RADIUS Config
- Open SoftEther VPN Server Manager
- Click “Manage Virtual Hub”
- Click “Manage Users”
- We are managing users in RADIUS, but we need a wildcard entry here to not block everybody
- Add a single user with “User Name” set to an asterisk (*) and “Auth Type” set to “RADIUS Authentication”
- Go back to the “Management of Virtual Hub” dialog
- Click “Authentication Server Setting”
- Enable “Use RADIUS Authentication” and provide the necessary information
- Go back to the main page of SoftEther VPN Server Manager and make sure the virtual hub is online
Blocking Internet Access
In a split tunnel configuration you want your VPN clients to connect directly to the internet, not via the VPN. Split tunneling is a client configuration (see below), but you may want to enforce it by blocking all internet connections originating from VPN clients:
- Open SoftEther VPN Server Manager
- Click “Manage Virtual Hub”
- Click “Manage Access Lists”
- Add the following rules:
- Pass, Priority=10, Memo=Enable LAN access, Contents=(ipv4) DstIPv4=10.1.0.0/16
- Pass, Priority=11, Memo=Enable LAN access (reverse), Contents=(ipv4) SrcIPv4=10.1.0.0/16, DstIPv4=10.1.0.0/16
- Pass, Priority=12, Memo=Allow DHCP requests, Contents=(ipv4) SrcIPv4=0.0.0.0/32, DstIPv4=255.255.255.255/32, Protocol=UDP, DstPort=67-68
- Pass, Priority=13, Memo=Allow DHCP responses, Contents=(ipv4) SrcIPv4=10.1.0.0/16, DstIPv4=255.255.255.255/32, Protocol=UDP, SrcPort=67-68
- Discard, Priority=1000, Memo=Block everything (else), Contents=(ether) \*
Network Bridge
- Open SoftEther VPN Server Manager
- Click “Local Bridge Setting”
- Select your virtual hub
- Select the LAN adatapter connected to your internal network
- Click “Create Local Bridge”
- Exit all dialogs and reboot the SoftEther VM
Protocols and Ports
L2TP
- Open SoftEther VPN Server Manager
- Click “IPsec / L2TP Setting”
- Check “Enable L2TP Server Function (L2TP over IPsec)”
- Uncheck all other options
- Specify an IPsec pre-shared key (PSK)
SSTP
- Open SoftEther VPN Server Manager
- Click “OpenVPN / MS-SSTP Setting”
- Check “Enable MS-SSTP VPN Clone Server Function”
- Uncheck the OpenVPN checkbox (unless you want to use it, of course)
Ports
- Open SoftEther VPN Server Manager
- In the listener list, delete ports 992 (function unknown), 1194 (OpenVPN), and 5555 (SoftEther remote management)
Note: when you connect to SoftEther Server Manager next make sure so specify 443 (the only remaining one) instead of 5555
Firewall
In your firewall, create rules to enable the following ports:
- SSTP: TCP 443
- L2TP over IPSec: UDP 500 and 4500
In the Windows firewall disable or delete the following rules added by SoftEther:
- SoftEther VPN Server
- SoftEther VPN Server Manager
- SoftEther VPN Command-Line Admin Tool
Miscellaneous
Disable DDNS registration of your VPN. In unnecessarily “calls home”.
- Stop the SoftEther VPN Server service and edit the configuration file “vpn_server.config”
- In the DDnsClient section, set Disabled to true
- In the ServerConfiguration section, set DisableNatTraversal to true
- Start the SoftEther VPN Server service
Client Settings
Split Tunneling
Split tunneling refers to a configuration where only those packets are sent from a client to the VPN, that are destined for the VPN’s subnet. Everything else (including internet connections) go through the client’s regular default gateway.
On Windows VPN clients:
- Open the properties of your VPN adapter in classic control panel
- Go to the advanced properties of IPv4 (and IPv6)
- Uncheck “Use default gateway on remote network”
- See Split tunneling option for MS Windows VPN connections


1 Comment
Thank you so much!