Split-Tunnel VPN & WiFi: No Internet via IPv4 Due to Interface Priority
- Networking
- Published Apr 7, 2022
I had a weird issue on my laptop: whenever I connected to our company’s VPN, I lost local internet connectivity. As it turned out, this was caused by incorrect network interface priority metric settings. To spare you and my future self many frustrating hours of troubleshooting, here’s what caused it.

Network Interface Priority Metrics
If your Windows machine has more than one network interface, it needs to know in which order to use them. This order is called the network interface priority aka the network interface metric. Typically, you want the following interface priority order for maximum performance and reliability:
- Ethernet (network cable)
- WiFi (wireless)
- VPN
Spoiler: my issue was caused by VPN having a higher priority than WiFi.
Checking for Incorrect Network Interface Priority Metrics
The easiest way to check if your Windows networking stack uses your device’s network interfaces in the desired order is via the route print command. In my case, the output looked as follows:
C:\>route print
===========================================================================
Interface List
  7...98 fa 9b ca 54 d0 ......Intel(R) Ethernet Connection (6) I219-V
 41...........................vast limits VPN
 31...50 e0 85 79 35 e8 ......Microsoft Wi-Fi Direct Virtual Adapter
 36...52 e0 85 79 35 e7 ......Microsoft Wi-Fi Direct Virtual Adapter #2
  8...50 e0 85 79 35 e7 ......Intel(R) Wireless-AC 9560 160MHz
  6...50 e0 85 79 35 eb ......Bluetooth Device (Personal Area Network)
  1...........................Software Loopback Interface 1
===========================================================================
As you can see, the VPN interface has a higher priority than the WiFi interface (Intel(R) Wireless-AC 9560 160MHz). That’s not good.
Fixing Incorrect Network Interface Priority Metrics Via PowerShell
To fix the interface priority metrics, we first need to list the indexes of the network interfaces like this:
PS C:\> Get-NetIPInterface

ifIndex InterfaceAlias                  AddressFamily NlMtu(Bytes) InterfaceMetric Dhcp     ConnectionState PolicyStore
------- --------------                  ------------- ------------ --------------- ----     --------------- -----------
36      Local Area Connection* 10       IPv6                  1500              25 Disabled Disconnected    ActiveStore
7       Ethernet                        IPv6                  1500               5 Disabled Disconnected    ActiveStore
31      Local Area Connection* 9        IPv6                  1500              25 Disabled Disconnected    ActiveStore
6       Bluetooth Network Connection    IPv6                  1500              65 Disabled Disconnected    ActiveStore
8       Wi-Fi                           IPv6                  1500              35 Enabled  Connected       ActiveStore
1       Loopback Pseudo-Interface 1     IPv6            4294967295              75 Disabled Connected       ActiveStore
36      Local Area Connection* 10       IPv4                  1500              25 Enabled  Disconnected    ActiveStore
7       Ethernet                        IPv4                  1500               5 Enabled  Disconnected    ActiveStore
31      Local Area Connection* 9        IPv4                  1500              25 Enabled  Disconnected    ActiveStore
6       Bluetooth Network Connection    IPv4                  1500              65 Enabled  Disconnected    ActiveStore
8       Wi-Fi                           IPv4                  1500              35 Enabled  Connected       ActiveStore
1       Loopback Pseudo-Interface 1     IPv4            4294967295              75 Disabled Connected       ActiveStore
41      vast limits VPN                 IPv4                  1400              25 Disabled Connected       ActiveStore
Now that we know the interface indexes (first column), we can specify a new interface priority metric for the WiFi interface as shown below. I chose a metric that is just slightly higher (= lower priority) than the metric of the Ethernet interface (5) but lower (= higher priority) than the metric of the VPN interface (25).
PS C:\> Set-NetIPInterface -InterfaceIndex 8 -InterfaceMetric 6
Fixing Incorrect Network Interface Priority Metrics in the UI
To set the WiFi interface priority metric in the UI navigate to properties of your WiFi connection > Internet Protocol Version 6 > Properties > Advanced and configure the following as shown in the screenshot below:
- Automatic metric: unchecked
- Interface metric: set the desired priority (this is the same value that you would specify via PowerShell, see above)
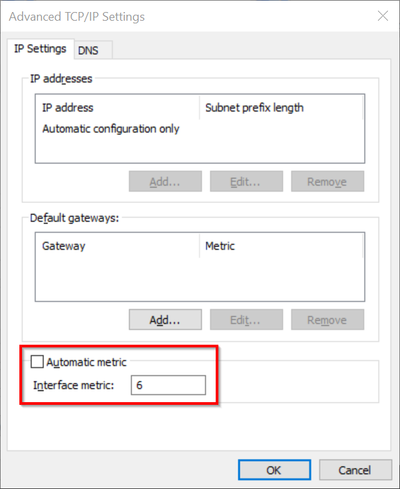
Repeat the process for IPv4.
Verifying the Result
Once the WiFi’s priority is higher than the VPN’s, the output of the route print command should look as follows:
C:\>route print
===========================================================================
Interface List
  7...98 fa 9b ca 54 d0 ......Intel(R) Ethernet Connection (6) I219-V
  8...50 e0 85 79 35 e7 ......Intel(R) Wireless-AC 9560 160MHz
 41...........................vast limits VPN
 31...50 e0 85 79 35 e8 ......Microsoft Wi-Fi Direct Virtual Adapter
 36...52 e0 85 79 35 e7 ......Microsoft Wi-Fi Direct Virtual Adapter #2
  6...50 e0 85 79 35 eb ......Bluetooth Device (Personal Area Network)
  1...........................Software Loopback Interface 1
===========================================================================
This is the desired and correct order: Ethernet first, followed by WiFi, which is in turn followed by VPN. The other interfaces normally don’t matter.
My Network & VPN Configuration
This section briefly lists those network and VPN settings that are relevant to this issue.
Split Tunneling
If you’re like us, you don’t want all your internet traffic to go through your VPN connection. Instead, you only want traffic to use the VPN that needs to go to company network resources. Everything else should go from the endpoint directly to the internet without traversing the VPN. This is called split tunneling.
Checking the Split Tunneling Status With PowerShell
You can check the split tunneling status with PowerShell:
PS C:\> Get-VpnConnection

Name                  : VPN NAME
ServerAddress         : DNS.NAME.OF.VPN
AllUserConnection     : False
Guid                  : {882A6D48-6E51-49A0-B609-944AE9D8F93F}
TunnelType            : Sstp
AuthenticationMethod  : {Pap}
EncryptionLevel       : Optional
L2tpIPsecAuth         :
UseWinlogonCredential : False
EapConfigXmlStream    :
ConnectionStatus      : Connected
RememberCredential    : True
SplitTunneling        : True
DnsSuffix             :
IdleDisconnectSeconds : 0
Checking the Split Tunneling Status in the UI
You can also use the UI to check whether split tunneling is enabled. Navigate to the properties of your VPN connection > Internet Protocol Version 6 > Properties > Advanced and make sure that Use default gateway on remote network is not checked. This is what is should look like:
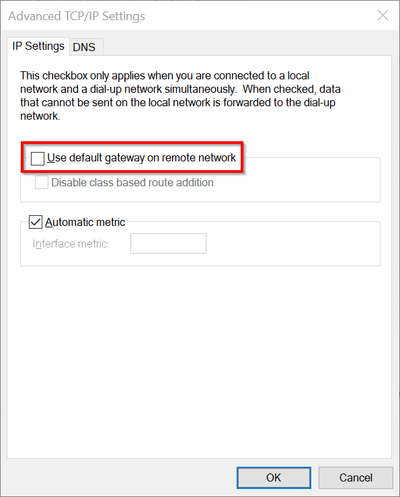
Repeat the process for IPv4.
Enabling Split Tunneling
If split tunneling is currently not enabled, you can activate it with the following PowerShell command:
Set-VpnConnection -Name "VPN NAME" -SplitTunneling $true


Comments