Windows 11: How To Configure Secure DNS (DoH) for All WiFi Networks
- Networking
- Published Jul 1, 2022 Updated Jul 23, 2022
This post explains how to configure DNS over HTTPS (DoH) for all WiFi networks in Windows 11 via the Settings app. Unfortunately, this is less intuitive than it should be; I need a reminder every time I connect to the German railway’s WiFiOnIce, which only seems to work with Deutsche Bahn’s (insecure) DNS server (you can switch to more secure DNS servers once you’ve accepted the terms on their captive portal).
Side note: the secure DNS configuration process can easily be automated with my PowerShell scripts, which you can find on GitHub.
So here we go: following is the easiest way I’ve found so far to configure the DNS server(s) per WiFi adapter, i.e., for all WiFi networks.
Accessing DNS Server Properties for All WiFi Connections
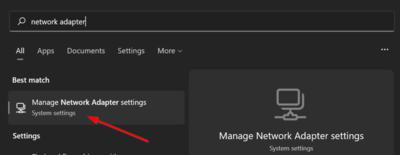
Step 1: Start Menu
Press the Win key to open the Start Menu and type network adapter. One of the results should be Manage Network Adapter settings (see below). Select it and press Enter.
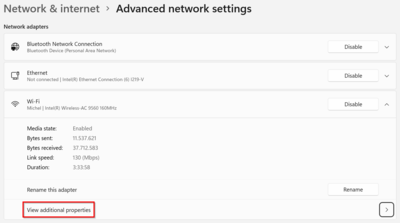
Step 2: Settings App - Advanced Network Settings
You’re now in the Settings app on the page Network & internet > Advanced network settings.
Expand the Wi-Fi row and click View additional properties as shown below:
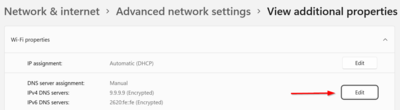
Step 3: Settings App - View Additional Properties
You’re now in the Settings app on the page Network & internet > Advanced network settings > View additional properties.
Expand Wi-Fi properties. Now you’re finally in the right place to adjust the DNS server settings for all WiFi networks (i.e., per WiFi adapter).


Comments