Removing "Eject VMware Virtual disk SCSI Disk Device"
- Virtualization & Containers
- Published Apr 25, 2012 Updated Mar 20, 2013
The HotPlug functionality of VMware ESX(i) 4 and 5 has the negative side effect that it is easily possible to “eject” hardware devices from inside the virtual machine, completely removing the respective device from the VM configuration. This is especially bad if it happens to the network card, and others have already described how to prevent that from happening (e.g. here and here).
Ejectable Disk Device
One thing remains, even when disabling HotPlug by adding the following line to the virtual machine’s properties as recommended by VMware:
devices.hotplug = "false"
The Safely Remove Hardware icon is still shown in the taskbar. If clicked, a popup windows opens with the command Eject VMware Virtual disk SCSI Disk Device as can be seen in this (German) screenshot:
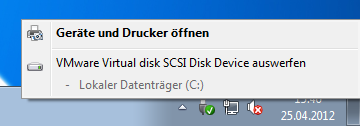
Ejecting a virtual machine’s only disk is a very bad idea, of course, and luckily it does not work because the device is in use. But concluding that all is well is not suffienct if user experience is at all relevant. Simply hiding the Safely Remove Hardware icon through Group Policy is also not an option if the users connect USB devices via XenDesktop’s USB redirection mechanism - because in that case they need the icon.
Making an Ejectable Device Un-Ejectable
The way to get rid of the option to eject the virtual disk is to make Windows believe that it is not hot-pluggable. This can be achieved by modifying the corresponding device capabilities registry value. That, however, is complicated by the facts that only SYSTEM has write access to the registry key and that Windows re-writes the correct value when booting - re-enabling HotPlug. The solution is to execute a computer startup script via Group Policy. Startup scripts are run in SYSTEM context, and since the script runs every time the system is booted we can be sure the device capabilities value is always configured the way we want it to be.
To implement the solution, create a batch file with the following content and run it as a computer startup script:
:: Disable eject hard disk
:: Original value: 6
reg.exe add "HKEY_LOCAL_MACHINE\SYSTEM\CurrentControlSet\Enum\PCI\VEN_1000&DEV_0054&SUBSYS_197615AD&REV_01\4&1f16fef7&0&00A8" /v Capabilities /t REG_DWORD /d 2 /f

:: Disable eject network card
:: Original value: 6
reg.exe add "HKEY_LOCAL_MACHINE\SYSTEM\CurrentControlSet\Enum\PCI\VEN_8086&DEV_100F&SUBSYS_075015AD&REV_01\4&3ad87e0a&0&0088" /v Capabilities /t REG_DWORD /d 2 /f
Note: The second command is for disabling network card ejection. This is an alternative to setting “devices.hotplug=false” in the VMX file.
How Does it Work?
During the boot phase Windows probes the hardware and writes each device’s capabilities to the Capabilities registry value. According to this answer on superuser.com, bit no. 3 equals CM_DEVCAP_REMOVABLE:
//from inc/api/cfgmgr32.h (WINDDK)
#define CM_DEVCAP_LOCKSUPPORTED     (0x00000001)
#define CM_DEVCAP_EJECTSUPPORTED    (0x00000002)
#define CM_DEVCAP_REMOVABLE         (0x00000004)
#define CM_DEVCAP_DOCKDEVICE        (0x00000008)
#define CM_DEVCAP_UNIQUEID          (0x00000010)
#define CM_DEVCAP_SILENTINSTALL     (0x00000020)
#define CM_DEVCAP_RAWDEVICEOK       (0x00000040)
#define CM_DEVCAP_SURPRISEREMOVALOK (0x00000080)
#define CM_DEVCAP_HARDWAREDISABLED  (0x00000100)
#define CM_DEVCAP_NONDYNAMIC        (0x00000200)
All we have to do is make sure the bit is not set. We do that by changing the Capabilities registry value from 6 (bits 2 + 3 set) to 2 (only bit 2 set).




Comments