Installing ESXi 4.1 on HP DL380 G8: No NICs Found

This kept us occupied quite a bit: after having worked with HP’s G7 line of servers for a long time, we ordered our first DL380 G8 for use with VDI. According to HP’s documentation the same custom image can (and must be) used when installing ESXi as with the G7. With that information, setting up the G8 sounded like an easy job: provision it via the existing automation mechanism and be done.

Problem

At first, everything went smoothly: the server booted from the network, loaded the install files and ran the first phase of the ESXi setup. Then it rebooted from its hard disk and continued with stage 2, happily loading the VMKernel - which displays the yellow screen. When the driver loading phase was over, the trouble started. We got this screen:

VMware ESXi install error on HP DL380 G8

The error message is:

------------------------------------------------------------------------------
Error encountered before the user interface was initialized
------------------------------------------------------------------------------
Error (see log for more info):
This system does not have a network interface card that is plugged in, or all
network interface cards are already claimed. Installation cannot continue
as requested.

Switching to the log screen with ALT+F12 gave us this:

DL380 G8 installation error with VMware ESXi 4.1

The relevant message is:

There is no supported nic on this host.

The message is nearly funny - the server had just booted from the network.

Solution

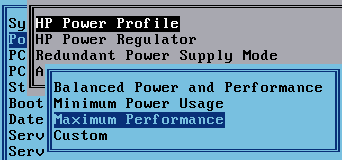
I will spare you the details of our bug hunt. Suffice to say, it resembled a wild goose chase that even involved HP Support. In the end we found out that it is the boot device order. It works like this:

BIOS - works 1

…does not work like this:

BIOS - broken 1

…does not work like this:

BIOS - broken 2

…and works like this:

BIOS - works 2

Did you notice a pattern? Sure you did. If the network card is higher up in the boot order than the hard disk, the error occurs.

Remedy (a Week Later)

After we had opened a support call with HP a technician turned up and replaced both mainboard and NIC. After that, the error was gone. Unfortunately he could not say what might have been the cause.

Comments

Related Posts

Docker (Compose) Cheat Sheet

Docker (Compose) Cheat Sheet
This is a collection of tips and tricks I picked up while learning and working with Docker and Docker Compose on my home server and web server. Container Configuration Environment Variables Where to Define Environment Variables Environment variables are a common way to configure containers. To keep things organized, don’t put them in your Compose file but into dedicated files with the extension env. env_file vs. .env .env file: this “special” file can be used to set environment variable for use in the Compose file. The variables specified in .env are not available in the container. env_file: this section in the Docker Compose file lets you specify files that contain environment variables for use in the container. The variables specified in this section are not available in the Compose file. Bind Mounts vs. Docker Volumes Bind mounts let you control the directory structure. This has the advantage that you know exactly what gets stored where in the host’s file system. It has the disadvantage that you need to create the directory structure before you can start a container. Docker volumes are managed by the Docker engine. They’re stored in /var/lib/docker, “far away” from the Compose file. Personally, I very much prefer bind mounts because of the control they offer. I use subdirectories relative to the Compose file, e.g., ./data:/data. Keeping the container configuration and the container data in one place facilitates backups. Networking Expose vs. Ports Expose serves as documentation which ports a container is accessible on. Note: container ports are always accessible from other containers on the same Docker network. Ports makes container ports accessible to the host. Most of my services are accessible through the Caddy reverse proxy only. Opening ports to the host is, therefore, only rarely necessary. Static IP Address on the Host Network Use the Macvlan Docker network to attach a container directly to the host’s local network. Assign a static IP address by specifying the ip_range parameter in the ipam section of the Docker Compose file. See this configuration for an example. Disable Macvlan Container/Host Isolation Containers on a Macvlan network are isolated from the host. While the container can contact other machines on the local network, communications with the host are blocked. To work around that, create a virtual link with a route that points to the container’s IP address (example). Time Zone Containers should know about your local time zone. To achieve that, make it a habit to pass in /etc/localtime as a read-only volume to every container:
Virtualization & Containers

Latest Posts