Lenovo Yoga 900: SSD Upgrade & Clean Windows Installation
- Hardware, Windows General
- Published Jun 6, 2016 Updated Jul 19, 2016
The Lenovo Yoga 900 packs some amazing hardware in an ultraportable 1.29 kg 13" chassis: high-resolution 3200x1800 screen, Intel Core i7-6500U CPU, 16 GB RAM. The only downsides I found so far: glossy display, maximum SSD size is 512 GB, OS is Windows Home, not Pro. There is not much we can do about the former, but we can change latter two pretty easily. This article explains how to upgrade the SSD and install a clean Windows 10 Pro without any Lenovo bloatware.
SSD Upgrade to 1 TB
NVMe or SATA
The Lenovo Yoga 900 is only available with 256 of 512 GB SSDs. That is a bit on the small side for me, so I decided to buy the device with the 256 GB SSD and replace the drive with a 1 TB SSD myself.
I would have preferred the Samsung SSD 950 Pro, as that currently seems to be the fastest M.2 SSD, but strangely it is not available in Germany at all. So I went for the Transcend MTS800 instead. When buying an M.2 SSD please keep in mind that they are available in different sizes (the Yoga 900 needs the 2280 variety named after its 22mm x 80mm outer dimensions) and protocols: SATA and NVMe. SATA is a bit slower, NVMe offers higher maximum throughput as well as lower latency. The Samsung SSD 950 Pro is an NVMe device, which makes up part of its appeal, but if you cannot buy it…
Before getting an NVMe SSD make sure the machine’s UEFI (BIOS) code is capable of booting from NVMe. Most modern UEFIs should be able to do that. I could not check the Yoga’s because I could not get my hands on an NVMe SSD. The Transcend MTS800 uses SATA.
Replacing the M.2 SSD
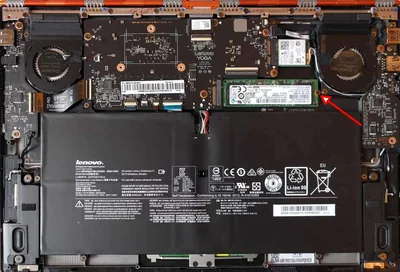
As you can see in the screenshot above, 2280 M.2 SSD are really tiny - about the size of my thumb. The replacement process itself is extremely simple. If you have the right screwdrivers, that is. You need a Torx T4 to remove the 10 screws holding the laptop’s back cover, and a Philips PH00 to remove the screw holding the M.2 SSD (the arrow in the picture above points right to it). Both are really tiny and not typically found in a household.
Installing Windows 10
The actual installation is straightforward, although you need extremely good eyesight to work the disk partitioning dialog on the 276 dpi screen - that part of setup is not scaled yet.
Windows does not offer to sign in with a Microsoft account because it does not detect the WiFi. But that is easily dealt with: download and install the WiFi driver from Lenovo’s driver site. While you are at it, also upgrade the UEFI (BIOS) and install the Intel Chipset and Rapid Storage Technology drivers. Windows Update takes care of the rest.
Settings Sync and Network Type
Once the WiFi driver is installed you can change your account type from local to Microsoft, which by default enables settings synchronization. That, however, did not work for me; settings simply did not synchronize. The Microsoft Accounts troubleshooter only reported “can’t connect to the sync service”. Not very helpful.
As it turned out, my WiFi had been identified as a public network. One of the ongoing nuisances in Windows is that there is no way to change the network type in the obvious place: Network and Sharing Center. The easiest way to switch from public to private is the following workaround:
Run HomeGroup from start menu. If you are on a public network, the dialog that comes up will offer to change the network location. Do it.
With that change, settings sync suddenly worked, too.
Upgrading from Windows 10 Home to Windows 10 Pro
The last change I needed to make was the upgrade from Windows 10 Home to Pro. Because the laptop has a Windows 10 Home license included in the UEFI (BIOS) Windows setup does not bother to ask which edition you want to install. Instead, it goes straight for Windows 10 Home.
Luckily, that can easily be changed as of the 1511 version of Windows 10. In start menu type “Activation” and click “Change product key” in the upcoming dialog.
If you want to switch to a Windows 10 Pro volume license key there is one last obstacle to overcome - after entering the volume licensing key you will get the error code 0xc004f014.
To work around that, use the generic key VK7JG-NPHTM-C97JM-9MPGT-3V66T. Once Windows is upgraded and has rebooted, you will notice Windows is not activated. Repeat the key change procedure, this time using your volume license key. Now it will be accepted.
VGA and DisplayPort via USB Type C
One of the nice things about the Lenovo Y900 is that it has two USB type A ports in addition to one USB type C port. However, due to the low height there is no room for regular VGA or DisplayPort connectors. To connect to projectors or external displays you need additional adapters from USB type C to either VGA or DisplayPort.
USB type C to VGA seems to be easy going. Any adapter should work.
USB type C to DisplayPort, however, is a different matter. The first one I bought did not work. When I connected it, nothing happened. I then found the Lindy USB 3.1 Type C to DisplayPort Adapter. When you connect the Lindy, Windows installs some driver and then the DisplayPort display is available to be used.



Comments