authentik: Authentication, SSO, User Management & Password Reset for Home Networks
- Home Automation, Networking & Self-Hosting
- Published Jan 3, 2023 Updated Jan 25, 2025
This is my second article on how to set up a modern user management and authentication system for services on your internal home network. In the previous article, I used Authelia as IdP. I looked for an alternative and explored authentik because I had some trouble getting OpenID Connect to work with Authelia. I figured it out eventually, but in the meantime, I’d already completed the authentik configuration, so here is the documentation of an alternative SSO implementation.
The solution presented here supports important security features like two-factor authentication and single sign-on, and only requires minimal maintenance due to self-service password reset. This article is part of my series on home automation, networking & self-hosting that shows how to install, configure, and run a home server & network with dockerized or virtualized services.
Preparation
I’m assuming that you’ve set up Docker and the Caddy container as described in the previous articles in this series.
What is authentik?
authentik is an open-source identity provider with an integrated user directory. authentik supports OpenID Connect as well as LDAP and enables use cases such as authentication, enrollment, and self-service.
authentik vs. Authelia/lldap
Authelia/lldap and authentik provide similar services. For the purposes of home automation, both can be used interchangeably. Before we dive into authentik’s configuration, let’s start by looking at some of the pros and cons of authentik as compared to Authelia.
authentik Pros
- Integrated product combining a user directory with an identity and access management server (IAM).
- OpenID Connect support is more mature than Authelia’s.
- Decent web-based admin UI, although a little buggy in places.
authentik Cons
- authentik’s Docker image is much larger than Authelia’s and lldap’s combined (690 MB vs. 108 MB).
- authentik needs more CPU & RAM resources.
Dockerized authentik Directory Structure
This is what the directory structure will look like when we’re done:
rpool/
 └── encrypted/
     └── docker/
         └── authentik/
             ├── certs/
             ├── db/
             ├── media/
             ├── redis/
             ├── templates/
             ├── container-vars.env
             └── docker-compose.yml
We’re placing the configuration on the encrypted ZFS dataset (rpool/encrypted).
Create the directories and set their owners to user/group ID 1000, which are used by dockerized authentik (docs):
mkdir -p /rpool/encrypted/docker/authentik/certs
mkdir -p /rpool/encrypted/docker/authentik/db
mkdir -p /rpool/encrypted/docker/authentik/media
mkdir -p /rpool/encrypted/docker/authentik/redis
mkdir -p /rpool/encrypted/docker/authentik/templates
chown -Rfv 1000:1000 /rpool/encrypted/docker/authentik/certs
chown -Rfv 1000:1000 /rpool/encrypted/docker/authentik/media
chown -Rfv 1000:1000 /rpool/encrypted/docker/authentik/templates
authentik Docker Compose File
Create docker-compose.yml with the following content, which is my modified version of the original:
version: '3.9'

services:

  authentik-postgresql:
    container_name: authentik-postgresql
    hostname: authentik-postgresql
    image: postgres:12-alpine
    restart: unless-stopped
    healthcheck:
      test: ["CMD-SHELL", "pg_isready -d $${POSTGRES_DB} -U $${POSTGRES_USER}"]
      start_period: 20s
      interval: 30s
      retries: 5
      timeout: 5s
    networks:
      - backend         # internal communications
    env_file:
      - container-vars.env
    volumes:
      - ./db:/var/lib/postgresql/data

  authentik-redis:
    container_name: authentik-redis
    hostname: authentik-redis
    image: redis:alpine
    command: --save 60 1 --loglevel warning
    restart: unless-stopped
    healthcheck:
      test: ["CMD-SHELL", "redis-cli ping | grep PONG"]
      start_period: 20s
      interval: 30s
      retries: 5
      timeout: 3s
    networks:
      - backend         # internal communications
    volumes:
      - ./redis:/data

  authentik:
    container_name: authentik
    hostname: authentik
    image: ghcr.io/goauthentik/server:latest
    restart: unless-stopped
    command: server
    networks:
      - backend         # internal communications
      - caddy_caddynet  # external communications
    expose:
      - 9000            # HTTP
      - 9443            # HTTPS
    env_file:
      - container-vars.env
    volumes:
      - ./media:/media
      - ./templates:/templates

  authentik-worker:
    container_name: authentik-worker
    hostname: authentik-worker
    image: ghcr.io/goauthentik/server:latest
    restart: unless-stopped
    command: worker
    networks:
      - backend         # internal communications
    env_file:
      - container-vars.env
    volumes:
      - ./media:/media
      - ./certs:/certs
      - ./templates:/templates

networks:

  backend:
    driver: bridge
  caddy_caddynet:
    external: true
authentik container-vars.env File
Generate Passwords
Generate random alphanumeric strings and store them as container environment variables in container-vars.env:
cd /rpool/encrypted/docker/authentik/
echo "POSTGRES_PASSWORD=$(tr -cd '[:alnum:]' < /dev/urandom | fold -w "64" | head -n 1)" >> container-vars.env
echo "AUTHENTIK_SECRET_KEY=$(tr -cd '[:alnum:]' < /dev/urandom | fold -w "64" | head -n 1)" >> container-vars.env
Additional Container Environment Variables
Edit container-vars.env so that it looks like the following:
# Secrets
POSTGRES_PASSWORD=YOUR_PASSWORD_HERE
AUTHENTIK_SECRET_KEY=YOUR_PASSWORD_HERE

# Postgres
POSTGRES_DB=authentik
POSTGRES_USER=authentik

# authentik
AUTHENTIK_AVATARS=none                               # disable connections to Gravatar
AUTHENTIK_REDIS__HOST=authentik-redis
AUTHENTIK_POSTGRESQL__HOST=authentik-postgresql
AUTHENTIK_POSTGRESQL__USER=authentik
AUTHENTIK_POSTGRESQL__NAME=authentik
AUTHENTIK_POSTGRESQL__PASSWORD=${POSTGRES_PASSWORD}

# Email
AUTHENTIK_EMAIL__HOST=smtp.sendgrid.net              # replace with your SMTP server's FQDN
AUTHENTIK_EMAIL__PORT=587                            # replace with your SMTP server's port
AUTHENTIK_EMAIL__USERNAME=apikey                     # replace with your SMTP server's username
AUTHENTIK_EMAIL__PASSWORD=YOUR_PASSWORD_HERE
AUTHENTIK_EMAIL__FROM="Your Name <name@domain.com>"  # replace with your name/email
AUTHENTIK_EMAIL__USE_TLS=true
Start the authentik Container
Navigate into the directory with docker-compose.yml and run:
docker compose up -d
Inspect the container logs for errors with the command docker compose logs --tail 30 --timestamps.
authentik Let’s Encrypt Certificate via Caddy
Caddyfile
Add the following to Caddyfile (details):
auth.{$MY_DOMAIN} {
	reverse_proxy authentik:9000
	tls {
		dns cloudflare {env.CLOUDFLARE_API_TOKEN}
	}
}
DNS A Record
Add the following A record to your DNS domain:
auth.home.yourdomain.com 192.168.0.4 # replace with your Docker host's IP address
Try to resolve the name on a machine in your network (e.g., nslookup auth.home.yourdomain.com). If that fails, you might need to work around DNS rebind protection in your router.
Reload Caddy’s Configuration
Instruct Caddy to reload its configuration by running:
docker exec -w /etc/caddy caddy caddy reload
You should now be able to access the authentik web interface at https://auth.home.yourdomain.com without getting a certificate warning from your browser.
authentik: Initial Configuration
In your browser, navigate to authentik’s initial setup page https://auth.home.yourdomain.com/if/flow/initial-setup/.
Set the email and password for the default admin user, akadmin. You’re now logged in.
Create Your authentik User Account
In the top-right corner of authentik’s web UI, click Admin interface. Navigate to Directory > Users and create a new user account for yourself (make sure to fill out the email field correctly). Add your account to the group authentik Admins. Once the user is created, set a password.
Add 2FA to Your authentik User Account
Log in with your authentik user account at https://auth.home.yourdomain.com/, click on the cog wheel in the upper-right corner, select MFA Devices and click Enroll > TOTP authenticator. Scan the QR code in your authenticator app (e.g., Authy).
Click Enroll again and now select Static authenticator. authentik displays a dialog with 2FA recovery keys. Copy the keys and store them in your password manager.
Add a Protected Application
The easiest way to integrate authentik with Caddy is via authentik’s domain-level forward authentication. We’ll use the whoami container from this previous article to demonstrate how that works.
In the top-right corner of authentik’s web UI, click Admin interface.
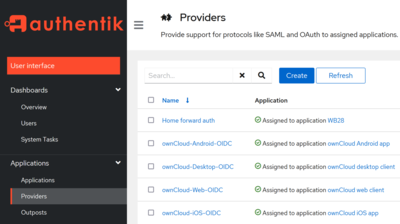
authentik: Create a Proxy Provider
Navigate to Applications > Providers. Create a new Proxy Provider with the following settings:
- Name: Home forward auth
- Authorization flow: default-provider-authorization-explicit-consent
- Type: Forward auth (domain level)
- Authentication URL:
https://auth.home.yourdomain.com - Cookie domain:
home.yourdomain.com
authentik: Create an Application
Navigate to Applications > Applications. Create a new Application with the following settings:
- Name: Home
- Provider: Home forward auth
- Launch URL:
blank://blank(this hides the application in the library page, “my applications”)
authentik: Add Application to Outpost
Navigate to Applications > Outposts. Edit the authentik Embedded Outpost and make sure that the entry for the application Home in the field Applications is selected.
Caddy: Add Forward Authentication
We’ll define a generic snipped that can be used with any application to be protected by authentik. Add the following to Caddyfile (details):
(authentik) {
	# Always forward outpost path to actual outpost
	reverse_proxy /outpost.goauthentik.io/* http://authentik:9000

	# Forward authentication to outpost
	forward_auth http://authentik:9000 {
		uri /outpost.goauthentik.io/auth/caddy

		# Capitalization of the headers is important, otherwise they will be empty
		copy_headers X-Authentik-Username X-Authentik-Groups X-Authentik-Email X-Authentik-Name X-Authentik-Uid X-Authentik-Jwt X-Authentik-Meta-Jwks X-Authentik-Meta-Outpost X-Authentik-Meta-Provider X-Authentik-Meta-App X-Authentik-Meta-Version
	}
}
To protect an application endpoint with authentik, simply add the following directive to its Caddyfile configuration:
import authentik
The complete Caddy configuration for whoami looks as follows:
whoami.{$MY_DOMAIN} {
	import authentik
	reverse_proxy whoami:80
	tls {
		dns cloudflare {env.CLOUDFLARE_API_TOKEN}
	}
}
Caddy: Reload Configuration
Instruct Caddy to reload its configuration by running:
docker exec -w /etc/caddy caddy caddy reload
When you now try to access the whoami application at https://whoami.home.yourdomain.com you’ll get an authentication prompt from authentik.
Resources
- Stetsed’s Selfhosted Blog: authentik with Docker Compose Setup with Caddy Reverse Proxy
Changelog
2023-10-29
- Fixed the name of Authentik’s Redis host in
container-vars.env.


Comments