Compacting Client Hyper-V VHDX Files
Virtual hard disks have the same tendency to grow in size as regular disks have to fill up. Deduplication is a great way to battle this, but unfortunately it is not available for Windows 8 Client Hyper-V. I know that hacks are available describing how to transfer the relevant DLLs from Server 2012 but I value my data too much to try that. The only thing left in order to regain valuable (SSD) disk space is to compact the VHDX. That, however, is more difficult than it should be.
This article shows how to compact Windows VMs. For a description of how to compact Ubuntu Linux VMs take a look at this post.
Start Inside
Before bringing out the heavy guns do the obvious:
- Make sure KB2852386 is installed
- Run Disk Cleanup with admin permissions
These simple things unearth treasures like the following:
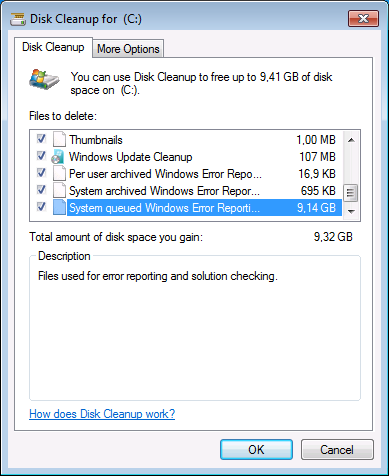
Do a full reboot after running Disk Cleanup because part of the removal happens when the system next starts up.
Zero, Defragment and Shrink
Zero
Run Sysinternals’ Sdelete tool to zero all the deleted bits on disk:
sdelete -s -z c:
Defragment
While defragmenting is not strictly necessary it increases the chances that the shrinking process in the next step is successful.
Shrink
Go to Disk Management and shrink your partition(s) as much as possible. This is the most important part. Without this Hyper-V unfortunately is not able to compact the VHDX significantly.
Compact VHDX from the GUI
When you go to a virtual machine’s settings and edit the hard drive, you are presented with a dialog box offering to compact the disk:
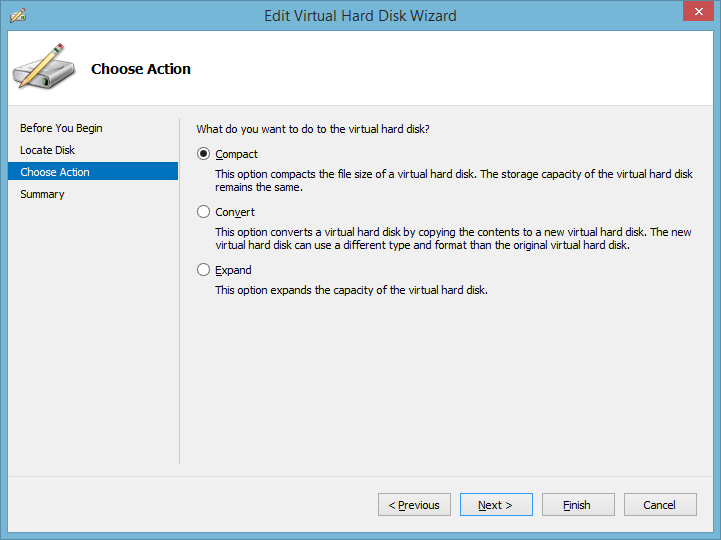
That is exactly what you want. You select it, click next and … the wizard finishes after a few (too few) seconds and the VHDX size remains unchanged.
Compact VHDX from PowerShell
I am not a big fan of dumbing down or even breaking the UI by making relevant functionality only available through PowerShell as seems to be the trend these days. This seems to be such a case. For some strange reason the Compact VHDX UI does nothing and you have to resort to PowerShell to do the job. Sad.
The relevant command is Optimize-VHD. In order for the optimization to succeed the virtual hard disk needs to be mounted first with Mount-VHD (both commands work on VHD and VHDX files).
Automation
You probably have more than one virtual machine on your PC or laptop. In order to shrink them all manually shut them down first. Then run the following command, replacing D:\VMs with the base path for your VHDX files:
gci -File -Filter *.vhd* -Path D:\VMs -Recurse | % {Mount-VHD $_.FullName -ReadOnly; Optimize-VHD $_.FullName -Mode full; Dismount-VHD $_.FullName}
Errors
The PowerShell code may report errors. Possible causes include
- The VHDX is in use (the VM is probably not turned off)
- The VHDX is a differencing disk and the parent disk is not properly connected any more
Analysis & Conclusion
The implementation of dynamically expanding virtual disks in Hyper-V leaves room for improvement, at least when looking at disk space requirements. Reclaiming (host) disk space by compacting the VHDX files succeeds only when there is unpartitioned space at the end of the virtual hard disk. That typically involves shrinking a partition from inside the VM.
A more efficient implementation could make use of the trim command to keep track which parts of a disk are not needed any more and use that information to reduce the size of the VHDX upon request.
Lacking such a more advanced algorithm be prepared to throw disk space at the problem of expanding VHDX files that won’t compact (much). Host-based deduplication would be the answer – if only it were available on client versions of Windows.




17 Comments
Hi Helge
tried this but I think sometimes there may be an issue if there’s a large solid file high up in the Hyper-V VM partition and the defragmenter (at least the one in Windows) leaves it there. Do you know if there is another defrag tool that will free up space so we can successfully shrink the partition?
Thanks!
Hi, thanks for the article.
I’m confused because you stated that you had not used the cmdlet Optimize-VHD for a very simple reason: that did not reduce the size of the VHDX.
However the article *IS* based on Optimize-VHD so I really do not understand your last bullet.
Could you please clarify?
Thanks
Kind Regards
Thanks, fixed.
Hi Helge,
Great article. Just stumbled across it and ran it on a Windows 7 vhdx that was 31GB on Hyper-V but “only” 15GB according to the disk. After about a minute, the size was reduced to 17GB on Hyper-V.
Great stuff as always.
Thanks,
Stephen
Hi, after running your example script I was unable to start any of the VMs. Solution here: http://toddbaginski.com/blog/fixing-a-broken-hyper-v-vhd-chain
Mounting the VHD changes some identifiers and breaks the chain when you have snapshots. But the script seems to work just as well if you remove the mount/dismount commands!
Mounting the VHD as read only first will allow you to run compact from the GUI. Otherwise, as you stated, nothing will happen
A few corrections to this article:
It is not necessary to zero deleted bits. Both Optimize-VHD and the Hyper-V GUI Compact Option will release unused space however you must have the VHDX mounted as Read Only otherwise both tools will do nothing and report no error.
I found Optimize-VHD in Full Mode ran for 20+ minutes and reduced a 911GB VHD down to 600GB. I then ran the Compact option in Hyper-V and it took the 600GB file and reduced it to 250GB but took much much longer.
So I’d suggest new users:
1) Shut down any Virtual Machines using the VHDx
2) Use Disk Management to attach the VHDx as Read Only
3) Open the Hyper-V MMC -> Edit Disk -> Compact and select the VHDx and wait.
4) Unmount the VHDx using Disk Management.
Regarding Dom’s comment, I found that plan didn’t work. The sdelete option takes a long time. A fast effective solution using diskpart can be found here: https://fiddley.wordpress.com/2014/01/27/dynamically-expanding-vhd-not-compacting-in-hyper-v/
Powershell to optimize all the VHDs on VMs that are Off.
Get-vm | where {$_.state -eq “Off”} | Get-VMHardDiskDrive | Select Path |Optimize-VHD
I was frustrated when compacting virtual hard disks didn’t do much from within Hyper V and I resolved to find a better way without using third party tools. It took me a bit of research to learn how to do this but after reviewing lots of options, I settled on the method below. I like the fact that you don’t need to shrink partitions in your vdisk and you don’t even need to zero out unused disk space.
From an elevated command prompt type:
diskpart
select vdisk file=”C:\Hyper-V\sampledrive.vhdx”
attach vdisk readonly
compact vdisk
detach vdisk
exit
This process reduced the size of my Master Image from 24GB to 15GB and takes seconds. It may sound too good to be true but I would be very happy to hear back from you if it worked for you.
Thanks so much. had no idea the compact command was in diskpart. as on my hyper machine client hyper v tools are not provided, neither powertools hyper commands
The diskpart compact did nothing, tried it on a few vhdx files that had a lot of empty space, on Windows 2012R2. The PowerShell compact does nothing either. There must be something that works. Does the file need to be fully defragged first in the guest OS?
I had an Exchange server disk that was using 1.3TB due to log files taking up 1.1TB! I removed those files, making the C: drive of the Exchange server only 200GB, so I wanted to shrink this space down because backups were taking way too long!
Treied all of the above, but none of the above worked for me, so I did this:
Power off the VM
In Computer Management/Disk Management, right-click and choose Attach VHD
Right-click on the partition and choose Shrink Volume
Depending on the use of the VM, I added some headroom (I removed 750GB instead of the 1 TB it was recommending).
After the shrinking was complete (there was no UI), I had 750GB in Unallocated space at the end of the disk.
I right-clicked on the Disk (not any partition on the disk) and chose Detach VHD.
Then I did these steps:
diskpart
select vdisk file=”D:\HV\EXCH\EXCH.vhdx”
attach vdisk readonly
compact vdisk
detach vdisk
exit
Shrunk!
Thank you. Worked a treat
THANK YOU! This worked like a charm on Windows VM’s, but with generation 2 Linux VM’s using XFS running on Hyper-V 2012 R2 I had to follow the guide at http://www.1337admin.org/uncategorized/compacting-virtual-disks-on-generation-2-linux-hyper-v-2012-r2-vms/ I hope this saves someone else a few days of work as well.
Using the hypervisor administrator in 2016 server, the time expensive sdelete step, or zeroing free space is no longer necessary. I just ran disk compact after deleting 150gb without zeroing anything and the size on disk was compacted to the 38GB’s stored on disk and the virtual disk size unchanged. This useless step is all over the web for some reason.
I would suggest adding how to add cleanmgr on server
https://docs.microsoft.com/en-us/windows-server/storage/file-server/disk-cleanup#manually-add-disk-cleanup-to-an-earlier-version-of-windows-server