Faster Trimming & Compacting of Hyper-V Ubuntu VMs

A while ago I described how to compact an Ubuntu VHDX running on Hyper-V using the sfill command. Running sfill, however, can take hours. Luckily, there is a much faster alternative.
ubuntu-vm-after-compacting

Ubuntu Trim and Hyper-V

Ubuntu running in a Hyper-V virtual machine has been supporting the trim command since version 14.04 (details). The OS issues trim commands when files are deleted to tell the disk that the blocks occupied by the files can be used elsewhere.

This mechanism originally developed for SSDs is useful for virtual hard disks, too. The host OS (the hypervisor) cannot know when blocks are ready to be reused unless the VM tells it. That is exactly what the trim command is for!

Trimming from Inside the Ubuntu VM with Fstrim

To tell the hypervisor which blocks can be reused issue the following command:

sudo fstrim -v /

This should not take too long.

Compacting the Ubuntu VM’s Virtual Hard Disk (VHDX)

To actually free the space you got back from the trim command above you need to shut down the Ubuntu VM. Then run the following PowerShell code on the Hyper-V machine hosting the Ubuntu VM:

gci -File -Filter *.vhd* -Path D:\VMs -Recurse | % {Mount-VHD $_.FullName -ReadOnly; Optimize-VHD $_.FullName -Mode full; Dismount-VHD $_.FullName}

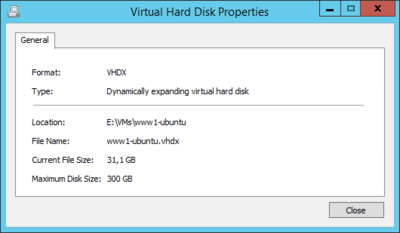
This should not take too long, either. It recursively searches a base path (D:\VMs) and optimizes each VHD or VHDX file it finds. Adjust the base path as needed. That’s it - enjoy the freed disk space! In my case, the size of the VHDX was reduced from 103 to 31 GB. Not bad for a few minutes of work (and downtime).
Comments

Related Posts

Docker (Compose) Cheat Sheet

Docker (Compose) Cheat Sheet
This is a collection of tips and tricks I picked up while learning and working with Docker and Docker Compose on my home server and web server. Container Configuration Environment Variables Where to Define Environment Variables Environment variables are a common way to configure containers. To keep things organized, don’t put them in your Compose file but into dedicated files with the extension env. env_file vs. .env .env file: this “special” file can be used to set environment variable for use in the Compose file. The variables specified in .env are not available in the container. env_file: this section in the Docker Compose file lets you specify files that contain environment variables for use in the container. The variables specified in this section are not available in the Compose file. Bind Mounts vs. Docker Volumes Bind mounts let you control the directory structure. This has the advantage that you know exactly what gets stored where in the host’s file system. It has the disadvantage that you need to create the directory structure before you can start a container. Docker volumes are managed by the Docker engine. They’re stored in /var/lib/docker, “far away” from the Compose file. Personally, I very much prefer bind mounts because of the control they offer. I use subdirectories relative to the Compose file, e.g., ./data:/data. Keeping the container configuration and the container data in one place facilitates backups. Networking Expose vs. Ports Expose serves as documentation which ports a container is accessible on. Note: container ports are always accessible from other containers on the same Docker network. Ports makes container ports accessible to the host. Most of my services are accessible through the Caddy reverse proxy only. Opening ports to the host is, therefore, only rarely necessary. Static IP Address on the Host Network Use the Macvlan Docker network to attach a container directly to the host’s local network. Assign a static IP address by specifying the ip_range parameter in the ipam section of the Docker Compose file. See this configuration for an example. Disable Macvlan Container/Host Isolation Containers on a Macvlan network are isolated from the host. While the container can contact other machines on the local network, communications with the host are blocked. To work around that, create a virtual link with a route that points to the container’s IP address (example). Time Zone Containers should know about your local time zone. To achieve that, make it a habit to pass in /etc/localtime as a read-only volume to every container:
Virtualization & Containers

Latest Posts