Compacting Client Hyper-V VHDX Files

Virtual hard disks have the same tendency to grow in size as regular disks have to fill up. Deduplication is a great way to battle this, but unfortunately it is not available for Windows 8 Client Hyper-V. I know that hacks are available describing how to transfer the relevant DLLs from Server 2012 but I value my data too much to try that. The only thing left in order to regain valuable (SSD) disk space is to compact the VHDX. That, however, is more difficult than it should be.

This article shows how to compact Windows VMs. For a description of how to compact Ubuntu Linux VMs take a look at this post.

Start Inside

Before bringing out the heavy guns do the obvious:

  • Make sure KB2852386 is installed
  • Run Disk Cleanup with admin permissions

These simple things unearth treasures like the following:

Windows 7 Disk Cleanup

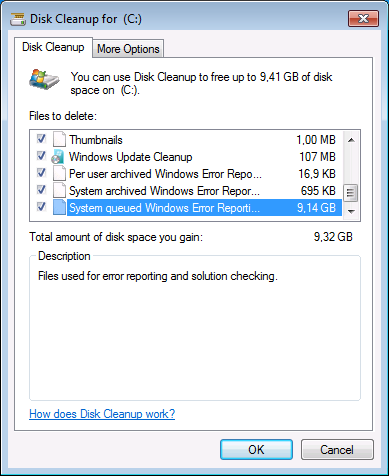
Do a full reboot after running Disk Cleanup because part of the removal happens when the system next starts up.

Zero, Defragment and Shrink

Zero

Run Sysinternals’ Sdelete tool to zero all the deleted bits on disk:

sdelete -s -z c:

Defragment

While defragmenting is not strictly necessary it increases the chances that the shrinking process in the next step is successful.

Shrink

Go to Disk Management and shrink your partition(s) as much as possible. This is the most important part. Without this Hyper-V unfortunately is not able to compact the VHDX significantly.

Compact VHDX from the GUI

When you go to a virtual machine’s settings and edit the hard drive, you are presented with a dialog box offering to compact the disk:

Hyper-V - Edit Virtual Hard Disk - Compact

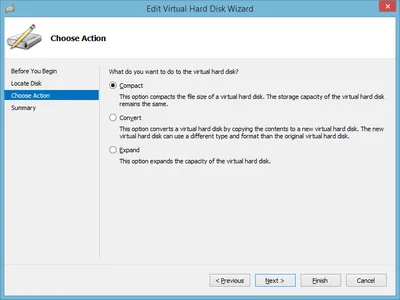
That is exactly what you want. You select it, click next and … the wizard finishes after a few (too few) seconds and the VHDX size remains unchanged.

Compact VHDX from PowerShell

I am not a big fan of dumbing down or even breaking the UI by making relevant functionality only available through PowerShell as seems to be the trend these days. This seems to be such a case. For some strange reason the Compact VHDX UI does nothing and you have to resort to PowerShell to do the job. Sad.

The relevant command is Optimize-VHD. In order for the optimization to succeed the virtual hard disk needs to be mounted first with Mount-VHD (both commands work on VHD and VHDX files).

Automation

You probably have more than one virtual machine on your PC or laptop. In order to shrink them all manually shut them down first. Then run the following command, replacing D:\VMs with the base path for your VHDX files:

gci -File -Filter *.vhd* -Path D:\VMs -Recurse | % {Mount-VHD $_.FullName -ReadOnly; Optimize-VHD $_.FullName -Mode full; Dismount-VHD $_.FullName}

Errors

The PowerShell code may report errors. Possible causes include

  • The VHDX is in use (the VM is probably not turned off)
  • The VHDX is a differencing disk and the parent disk is not properly connected any more

Analysis & Conclusion

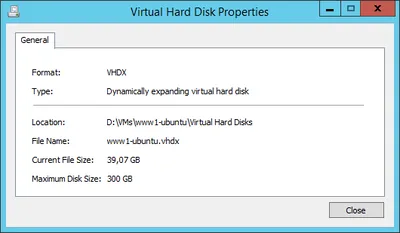
The implementation of dynamically expanding virtual disks in Hyper-V leaves room for improvement, at least when looking at disk space requirements. Reclaiming (host) disk space by compacting the VHDX files succeeds only when there is unpartitioned space at the end of the virtual hard disk. That typically involves shrinking a partition from inside the VM.

A more efficient implementation could make use of the trim command to keep track which parts of a disk are not needed any more and use that information to reduce the size of the VHDX upon request.

Lacking such a more advanced algorithm be prepared to throw disk space at the problem of expanding VHDX files that won’t compact (much). Host-based deduplication would be the answer - if only it were available on client versions of Windows.

Comments

Related Posts

Docker (Compose) Cheat Sheet

Docker (Compose) Cheat Sheet
This is a collection of tips and tricks I picked up while learning and working with Docker and Docker Compose on my home server and web server. Container Configuration Environment Variables Where to Define Environment Variables Environment variables are a common way to configure containers. To keep things organized, don’t put them in your Compose file but into dedicated files with the extension env. env_file vs. .env .env file: this “special” file can be used to set environment variable for use in the Compose file. The variables specified in .env are not available in the container. env_file: this section in the Docker Compose file lets you specify files that contain environment variables for use in the container. The variables specified in this section are not available in the Compose file. Bind Mounts vs. Docker Volumes Bind mounts let you control the directory structure. This has the advantage that you know exactly what gets stored where in the host’s file system. It has the disadvantage that you need to create the directory structure before you can start a container. Docker volumes are managed by the Docker engine. They’re stored in /var/lib/docker, “far away” from the Compose file. Personally, I very much prefer bind mounts because of the control they offer. I use subdirectories relative to the Compose file, e.g., ./data:/data. Keeping the container configuration and the container data in one place facilitates backups. Networking Expose vs. Ports Expose serves as documentation which ports a container is accessible on. Note: container ports are always accessible from other containers on the same Docker network. Ports makes container ports accessible to the host. Most of my services are accessible through the Caddy reverse proxy only. Opening ports to the host is, therefore, only rarely necessary. Static IP Address on the Host Network Use the Macvlan Docker network to attach a container directly to the host’s local network. Assign a static IP address by specifying the ip_range parameter in the ipam section of the Docker Compose file. See this configuration for an example. Disable Macvlan Container/Host Isolation Containers on a Macvlan network are isolated from the host. While the container can contact other machines on the local network, communications with the host are blocked. To work around that, create a virtual link with a route that points to the container’s IP address (example). Time Zone Containers should know about your local time zone. To achieve that, make it a habit to pass in /etc/localtime as a read-only volume to every container:
Virtualization & Containers

Hyper-V on Hetzner's EX51 Hosted Dedicated Servers

Hyper-V on Hetzner's EX51 Hosted Dedicated Servers
Your low-cost high-performance cloud data center building block. This guide explains how to install Windows Server 2012 R2 on Hetzner’s EX51-SSD dedicated servers. That line of servers is very attractive for virtualization as it combines a fast CPU with a good amount of RAM and SSD storage - at a price point of less than €60 per month. Another cool thing: Hetzner lets you install your own operating system. Here’s how.
Virtualization & Containers

Latest Posts

Fast & Silent 5 Watt PC: Minimizing Idle Power Usage

Fast & Silent 5 Watt PC: Minimizing Idle Power Usage
This micro-series explains how to turn the Lenovo ThinkCentre M90t Gen 6 into a smart workstation that consumes only 5 Watts when idle but reaches top Cinebench scores while staying almost imperceptibly silent. In the first post, I showed how to silence the machine by replacing and adding to Lenovo’s CPU cooler. In this second post, I’m listing the exact configuration that achieves the lofty goal of combining minimal idle power consumption with top Cinebench scores.
Hardware

Fast & Silent 5 Watt PC: Lenovo ThinkCentre M90t Modding

Fast & Silent 5 Watt PC: Lenovo ThinkCentre M90t Modding
This micro-series explains how to turn the Lenovo ThinkCentre M90t Gen 6 into a smart workstation that consumes only 5 Watts when idle but reaches top Cinebench scores while staying almost imperceptibly silent. In this first post, I’m showing how to silence the machine by replacing and adding to Lenovo’s CPU cooler. In a second post, I’m listing the exact configuration that achieves the lofty goal of combining minimal idle power consumption with top Cinebench scores.
Hardware