My Hyper-V Server in the Cloud
- Virtualization & Containers
- Published Aug 19, 2014 Updated Jun 29, 2019
There are many possible reasons for wanting a fast server well connected to the internet. Some may want to move their lab from their powerful but heavy laptop to the cloud so they only need to carry around a lightweight ultrabook. Others may want to set up a demonstration system for their software or solutions portfolio. I primarily wanted a fast webserver.
Whatever your reason may be, if you want control and flexibility you need to install your own hypervisor. Not many hosting providers allow you to do that, especially if you want to use your own OS licenses. My other requirements were good support and SSD drives. That considerably narrows down the list of potential hosting companies. Following Nicholas Dille’s example (see his article My Lab in the Cloud) I ended up with Hetzner. Their root server PX70-SSD has very nice specs:
- Intel Xeon E3-1270 v3 quad core
- 32 GB ECC RAM
- 2 x 480 GB Samsung SM 843 entry-level enterprise SSD
- 1 IPv4 address (each additional address costs €1 / month)
- Ability to install custom OS from Hetzner’s or my own ISO files
The PX70-SSD costs €99 / month, which is less than I payed for the managed virtual server at my previous hosting company.
Ordering the Server
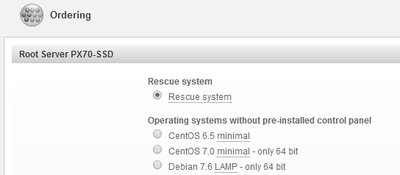
If you want to install your own OS order the server with a rescue system instead of a preinstalled OS:
Once you have access to Hetzner’s backend (called robot):
- Request a remote console (called LARA). This is free for 2 hours, after that €10 per each two hours
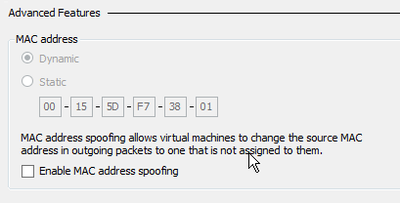
- Request additional IP addresses for the VMs you intend to run. Once you have the IPs note the associated MAC addresses displayed in robot. Assign the MAC addresses to the VMs’ NICs in the VM properties. Assigning MAC addresses from inside a VM does not work unless Hyper-V MAC address spoofing is switched on (it is off by default):
Installing Windows
The obvious approach is to use the ISO mounting capabilities of the remote KVM (which Hetzner calls LARA). Hetzner even hosts Windows ISO images on a file server, so you should get good speeds. Mounting a Windows Server ISO can be done like this:
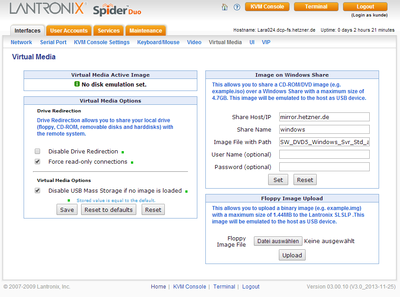
After I had mounted the Windows ISO like that, however, the KVM’s keyboard did not work any more! Obviously installing an OS without a working keyboard can be challenging. Confronted with this problem Hetzner replied that they do not provide support for the virtual media functionality of the LARA console. That left only one option for installing the OS: ask support to copy the ISO file to a USB flash drive and attach that to the server (for a fee of €25).
Update: Commenter Tom writes that going to the Keyboard/Mouse page and changing the setting Host interface to PS/2 solves this problem.
Once Windows was installed I put it into Minimal Interface mode which basically removes the graphical shell and Internet Explorer while leaving most GUI management tools, e.g. Server Manager and the MMC.
SFTP Access
With a server in the cloud you quickly find that you need a way to securely transfer files. The protocol of choice is SFTP, unfortunately not part of Windows. There are two free SFTP servers I am aware of:
SSHWindows has not been updated since 2004 and does not work on Server 2012 R2. However, a new version has been announced so the project might be revived.
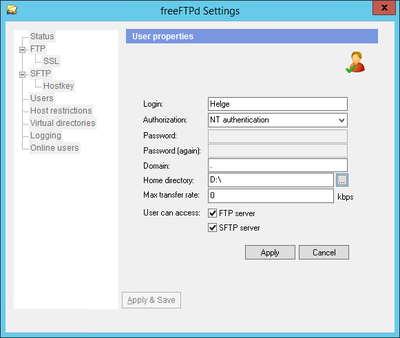
freeSSHd works well enough. The configuration is not difficult, but the UI has a few quirks (see this article). You need to keep in mind that the service restores the last state when restarted, so make sure the SFTP status is started in the UI. When you configure authorized user accounts the domain field must be populated, or logging in will not be possible. In a workgroup environment simply use a dot:
The user logging in can only navigate to subdirectories of the configured home directory. That is a problem when you want to be able to access multiple drives (e.g. C: and D:). To work around that create a link in a location below the home directory pointing to the other drive like this:
D:\>md Links
D:\>mklink /d d:\Links\C C:\
symbolic link created for d:\Links\C <<===>> C:\
Do not forget to manually add a firewall rule!
To increase security I configured the service for manual start - I only start it when I need it.
Two-Factor Authentication
A server directly connected to the internet poses security challenges. Implementing two-factor authentication for RDP access helps mitigate the risk.
Duo Security has free two-factor authentication for a large number of services. If required, support and advanced features can be enabled painlessly by moving to one of the paid plans for one or three USD per user and month. While Duo is pretty flexible in the types of devices that can be used for authentication they do not support plain TOTP as implemented by Google Authenticator or the Authy app. That is unfortunate as it forced me to install Duo’s rather simple app in addition to Authy which I am using for all my other accounts.
Installation is straightforward (documentation for RDP) although it is a little irritating that you have to create two accounts for admins in the mobile app: one for admin access to Duo’s services and the other for access to protected resources.
For each login attempt the Duo service installed locally communicates with Duo’s servers. The obvious question is: can I still log in when Duo’s servers cannot be reached? Finding the answer to that required some digging, but yes, you can still log in if you configure the service to bypass Duo authentication when offline:
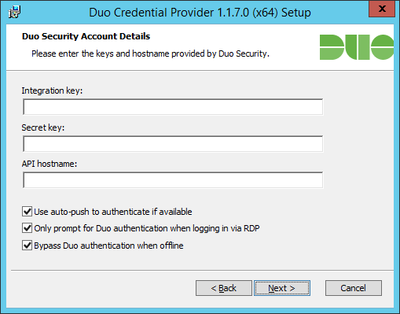
In their documentation Duo call that fail open (do nothing) versus fail close (force two-factor authentication, deny the login when offline).
When you logon to the protected system a login request is pushed automatically to your phone where you can approve it by simply tapping on the Duo entry in the notification area. If your phone is offline you can click Cancel…
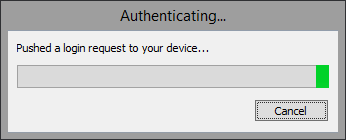
…and type the passcode displayed by the mobile app instead.
Backup
Hetzner provides 100 GB of backup space for all servers from €49 / month upwards (more space is available for a monthly fee). The backup space can be accessed via FTP, but also, more importantly, per SMB (the UNC path is displayed in robot). I am using it to store exported VMs.
Compacting VHDX Files
After running a virtual machine for some time you will notice that dynamically expanding VHDX files continuously grow in size. That is due to the fact that new files created in the VM sometimes get assigned previously unused blocks which causes the hypervisor to enlarge the VHDX. In many cases the files created in the VM are only temporary, but due to platform inefficiencies Hyper-V is not capable of reclaiming the disk space occupied by deleted files’ blocks (see this article for details).
To reclaim the disk space occupied by blocks of deleted files those blocks need to be zeroed. On Ubuntu run the following - inside a VM, in a writeable directory like home:
cat /dev/zero > zero.dat ; sync ; sleep 1 ; sync ; rm -f zero.dat
Then shut down the VM and run the following PowerShell code on the host (after adjusting the path to your VM’s location):
gci -File -Filter *.vhd* -Path D:\VMs -Recurse | % {Mount-VHD $_.FullName -ReadOnly; Optimize-VHD $_.FullName -Mode full; Dismount-VHD $_.FullName}
It is important to use the full mode, because only that scans for zeroed blocks. For the same reason trying to compact the virtual hard disk in Hyper-V Manager does nothing at all - apparently it does not use the full parameter.


Comments