My Beautifully Fast WordPress Webserver
- Website
- Published Aug 27, 2014 Updated Feb 12, 2024
Note: The installation described in this article worked very well for me. However, nine years after publishing this post I replaced this setup with a more modern dockerized installation that is easier to maintain. PHP upgrades, especially, are a lot simpler.
A step-by-step guide explaining how to install, securely configure and performance-tune WordPress on Apache on Linux.
The web is all about speed. If your site is slow, you lose visitors. And administering it is not much fun. In order to get to a fast server, you need to control the hardware. If you currently are on any kind of virtual server or even on shared hosting, in other words on anything where someone other than you is controlling resource allocation, your chances at a fast server are based solely on luck. For that reason I decided to get my own Hyper-V server in the cloud.
To Virtualize or Not
There is, of course, nothing wrong with (web server) virtualization - as long as you do not overcommit resources. Hosting providers, however, tend to do that, which explains why performance is often less than optimal. To illustrate that point compare the system I am describing here with my previous setup, a managed virtual server at a good (and not inexpensive) hosting provider:
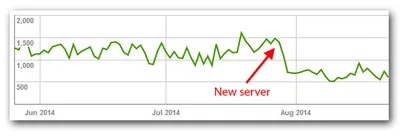
The graphic shows the time spent downloading a page and is taken from an authoritative source: Google Webmaster Tools.
Windows - or Linux?
Being at home more in the Windows than in the Linux world my initial plan was to deploy Server 2012 R2 in the webserver VM. That was until I learned that my personal killer application mod_pagespeed was not available for Windows.
Another thing that weighed strongly in favor of Windows: if you want a software to just work, use it the way its developers intended it to, in its natural habitat. Do not try to be clever. Be pragmatic. Exotic configurations are tested less thoroughly - if at all - and finding help on the internet is a lot easier if there is more than a single person on this planet with your exact configuration.
So Linux it was. As for the distribution, I decided on Ubuntu 14.04 Server LTS. It comes with long-term support (hence the acronym LTS) and is fully supported even on generation 2 Hyper-V VMs without the need to install integration components. Just make sure to disable secure boot (see below).
Installing Ubuntu in a Generation 2 Hyper-V Virtual Machine
Downloading Without a Browser
Download the ISO through PowerShell (IE is not available in minimal interface mode):
$client = new-object system.net.webclient
$client.DownloadFile("http://releases.ubuntu.com/14.04/ubuntu-14.04.1-server-amd64.iso", "ubuntu-14.04.1-server-amd64.iso")
Creating the VM
- Create a new generation 2 VM
- Enable Dynamic Memory
- Disable Secure Boot
- Assign the MAC-Address obtained from Hetzner to the VM’s NIC
I have assigned 6 vCPUs and 8 GB RAM to the VM. That seems to be more than enough for the time being: CPU usage is well below 5% and RAM usage around 1.5 GB.
Installing Ubuntu
- Run the installer
- Select the partitioning scheme Guided - use entire disk
- Reboot after the installer finishes and log in with the account you specified during installation
To simplify management install Midnight Commander, a Norton Commander clone:
sudo apt-get install mc
Set up time synchronization:
sudo apt-get install ntp
Install OpenSSH for remote management and SFTP:
sudo apt-get install openssh-server
Securing Ubuntu
Change the SSH port by editing /etc/ssh/sshd_config:
Port YOUR-SSH-PORT
sudo service ssh reload
Create an SSH keypair on your PC. On Windows that can easily be done with Puttygen. Secure the private key with a passphrase and store it locally. The public key goes to the file ~/.ssh/authorized_keys which needs to be created:
cd ~
mkdir .ssh
chmod 700 .ssh
nano .ssh/authorized_keys
# Paste the public key into the file "authorized_keys". OpenSSH expects the entire key to be on one line
After testing public key authentication disable password authentication by editing /etc/ssh/sshd_config:
# Replace the default "yes" with "no"
PasswordAuthentication no
sudo service ssh reload
Enable the firewall, allowing only SSH traffic:
sudo ufw allow YOUR-SSH-PORT/tcp
sudo ufw logging on
sudo ufw enable
sudo ufw status
Rate-limit SSHd, allowing only 5 connections per IP address in any 30 second interval:
sudo ufw limit YOUR-SSH-PORT/tcp
IP hardening, uncomment the following lines in /etc/sysctl.conf:
net.ipv4.conf.all.accept_redirects = 0
net.ipv6.conf.all.accept_redirects = 0
net.ipv4.conf.all.accept_source_route = 0
net.ipv6.conf.all.accept_source_route = 0
Reload:
sudo sysctl -p
Install logwatch to get regular email reports distilled from the server’s log files. Change the report frequency from daily to weekly:
sudo apt-get install logwatch
mv /etc/cron.daily/00logwatch /etc/cron.weekly/
Edit /etc/cron.weekly/00logwatch, changing the logwatch call so that you are emailed instead of root, HTML is used instead of text and the date range processed is one week instead of a day:
/usr/sbin/logwatch --mailto ADDRESS@DOMAIN.com --format html --range 'between -7 days and -1 days'
Install Sendmail to enable your server applications to send e-mail:
sudo apt-get install sendmail
Configure a reverse DNS entry in Hetzner’s robot so that it points to something meaningful like www.yourserver.com.
Installing and Hardening Apache
Installing LAMP
Install LAMP (Apache, MySQL, PHP):
sudo tasksel install lamp-server
Install additional Apache and PHP modules:
sudo a2enmod rewrite
sudo apt-get install php5-gd
sudo apt-get install php5-curl
sudo service apache2 restart
Hardening PHP
Add the following to disable_functions in etc/php5/apache2/php.ini: exec, system, shell_exec, passthrough
Tuning PHP
PHP’s OPCache is enabled by default, but we can assign more RAM than it does by default. Modify the following lines in the section [opcache] in etc/php5/apache2/php.ini:
opcache.enable=1
opcache.memory_consumption=256
opcache.interned_strings_buffer=10
opcache.max_accelerated_files=10000
Then reload Apache’s configuration:
sudo service apache2 reload
Hardening Apache
Enable HTTP and HTTPS in the firewall:
sudo ufw allow 80/tcp
sudo ufw allow 443/tcp
Edit /etc/apache2/conf-enabled/security.conf to send only minimal information about the server:
ServerTokens Prod
ServerSignature Off
TraceEnable Off
Restart Apache:
sudo service apache2 restart
Mod_security?
Mod_security is a powerful application firewall for Apache. As with all firewalls its usefulness depends entirely on the quality of the rulesets available. The one free quality ruleset, OWASP ModSecurity Core, does not work correctly with WordPress. Two companies I am aware of sell rulesets and claim full WordPress compatibility but those are expensive. So no mod_security for me.
Mod_evasive
Mod_evasive is a kind of rate limiter helping against DDoS attacks.
apt-get install libapache2-mod-evasive
sudo mkdir /var/log/apache2/mod_evasive
sudo chown www-data:www-data /var/log/apache2/mod_evasive/
Edit the configuration file /etc/apache2/mods-enabled/evasive.conf so that it looks like this:
<IfModule mod_evasive20.c>
   DOSHashTableSize    3097
   DOSPageCount        2
   DOSSiteCount        50
   DOSPageInterval     1
   DOSSiteInterval     1
   DOSBlockingPeriod   10

   DOSEmailNotify      YOUR-E-MAIL-ADDRESS
   #DOSSystemCommand    "su - someuser -c '/sbin/... %s ...'"
   DOSLogDir           "/var/log/apache2/mod_evasive"
</IfModule>
Restart Apache:
sudo service apache2 restart
Configuring Apache
Apache Virtual Host Configuration
Delete the default site:
sudo rm /etc/apache2/sites-enabled/000-default.conf
Create a new site configuration (replace helgeklein.com with your domain name):
cd /etc/apache2/sites-available
sudo nano helgeklein.com.conf
Paste the following into the file helgeklein.com.conf:
<VirtualHost *:80>
   ServerName helgeklein.com
   ServerAlias www.helgeklein.com
   DocumentRoot /var/www/helgeklein.com/public_html
   DirectoryIndex index.php index.html
   <Directory /var/www/helgeklein.com/>
      AllowOverride All
      Require all granted
      Options -Indexes
   </Directory>
</VirtualHost>
Enable the new Apache site helgeklein.com.conf:
sudo a2ensite helgeklein.com.conf
sudo service apache2 restart
Website Directory Structure and Filesystem Permissions
Create the directory structure in the file system:
sudo mkdir -p /var/www/helgeklein.com/public_html
Add your account to the webserver’s group (replace helge with your user name):
sudo usermod -a -G www-data helge
Set the directory’s ownership:
sudo chown -R helge:www-data /var/www
Set permissions on files and directories:
find /var/www -type d -print0 | sudo xargs -0 chmod 775
find /var/www -type f -print0 | sudo xargs -0 chmod 664
find /var/www -type f -name 'wp-config.php' -print0 | sudo xargs -0 chmod 640
Note: Do not reset permissions without resetting ownership first, or you break plugins like W3 Total Cache which change the owner for files in their cache directory.
Enable SSL
Add the following to the virtual host configuration file helgeklein.com.conf:
<IfModule mod_ssl.c>
   <VirtualHost *:443>
   ServerName helgeklein.com
   ServerAlias www.helgeklein.com
   DocumentRoot /var/www/helgeklein.com/public_html
   DirectoryIndex index.php index.html
   <Directory /var/www/helgeklein.com/>
      AllowOverride All
      Require all granted
      Options -Indexes
   </Directory>

   SSLEngine on

   SSLCertificateFile   /etc/ssl/certs/www_helgeklein_com.crt
   SSLCertificateKeyFile /etc/ssl/private/www_helgeklein_com.key
   SSLCertificateChainFile /etc/apache2/ssl.crt/DigiCertCA.crt

   SSLProtocol             all -SSLv2 -SSLv3
   SSLCipherSuite          ECDHE-RSA-AES128-GCM-SHA256:ECDHE-ECDSA-AES128-GCM-SHA256:ECDHE-RSA-AES256-GCM-SHA384:ECDHE-ECDSA-AES256-GCM-SHA384:DHE-RSA-AES128-G$
   SSLHonorCipherOrder     on
   SSLCompression          off

   <FilesMatch "\.(cgi|shtml|phtml|php)$">
      SSLOptions +StdEnvVars
   </FilesMatch>
      BrowserMatch "MSIE [2-6]" nokeepalive ssl-unclean-shutdown downgrade-1.0 force-response-1.0
      # MSIE 7 and newer should be able to use keepalive
      BrowserMatch "MSIE [17-9]" ssl-unclean-shutdown
   </VirtualHost>
</IfModule>
Add the following to your main Apache configuration file /etc/apache2/apache2.conf:
<IfModule mod_ssl.c>
   # OCSP Stapling, only in httpd 2.3.3 and later
   SSLUseStapling                   on
   SSLStaplingResponderTimeout      5
   SSLStaplingReturnResponderErrors off
   SSLStaplingCache                 shmcb:/var/run/ocsp(128000)
</IfModule>
Enable the SSL module:
sudo a2enmod ssl
sudo service apache2 restart
Cache-Control Header
Set a cache-control header for static resources. Add the following to /etc/apache2/apache2.conf:
# With the extend_cache filter, mod_pagespeed takes care of the cache lifetime in the browser (it sets it to 1 year).
# Here, we set a short cache lifetime to make mod_pagespeed check for changes frequently.
<FilesMatch "\.(jpg|jpeg|gif|png|js|css)$">
   Header set Cache-control "public, max-age=600"
</FilesMatch>

# Set a cache-control header for static resources not managed by mod_pagespeed
<FilesMatch "\.(ico|svg)$">
   Header set Cache-control "public, max-age=31519500"
</FilesMatch>
HTTP/2
Enable HTTP/2 by adding the following to /etc/apache2/apache2.conf:
Protocols h2 http/1.1
Security Headers
Add the following to your Apache configuration file /etc/apache2/conf-enabled/security.conf (don’t forget to update the report URIs):
#
# All the following additions to the HTTP header require mod_headers
#

# Prevent MSIE from interpreting files as something else than declared by the content type in the HTTP headers.
Header set X-Content-Type-Options "nosniff"

# Prevent other sites from embedding pages from this site as frames. This defends against clickjacking attacks.
Header set X-Frame-Options "sameorigin"

# Block pages from loading when they detect reflected XSS attacks
Header set X-XSS-Protection "1; mode=block; report=https://vastlimits.report-uri.com/r/d/xss/enforce"

#
# Content security policy (CSP)
# Status:
# - mod_pagespeed requires:
#   - script-src 'unsafe-inline' 'unsafe-eval'
#   - style-src 'unsafe-inline'
#
# Content security policy: ENFORCE as strictly as possible without breaking the site
Header set Content-Security-Policy "default-src https:; font-src https: data:; img-src https: data: 'self' about:; script-src 'unsafe-inline' 'unsafe-eval' https: data:; style-src 'unsafe-inline' https:; report-uri https://vastlimits.report-uri.com/r/d/csp/enforce"
# Content security policy: REPORT violations to the ideal secure policy to see what needs to be improved
# Header set Content-Security-Policy-Report-Only "default-src https:; font-src https: data:; img-src https: data: 'self' about:; script-src 'unsafe-inline' 'unsafe-eval' https: data:; style-src 'unsafe-inline' https:; report-uri https://vastlimits.report-uri.com/r/d/csp/reportOnly"

# Only connect to this site and subdomains via HTTPS for the next year and also include in the preload list
Header set Strict-Transport-Security "max-age=31536000; includeSubDomains; preload"

# The origin is sent as referrer to a-priori as-much-secure destination (HTTPS->HTTPS), but isn't sent to a less secure destination (HTTPS->HTTP).
Header set Referrer-Policy no-referrer-when-downgrade

# Certificate Transparency - report violations only
Header set Expect-CT "max-age=0, report-uri=\"https://vastlimits.report-uri.com/r/d/ct/reportOnly\""

# Report on OCSP stapling
Header set Expect-Staple "max-age=0; report-uri=\"https://vastlimits.report-uri.com/r/d/staple/reportOnly\""

# Reporting API
Header set Report-To "{\"group\":\"default\",\"max_age\":31536000,\"endpoints\":[{\"url\":\"https://vastlimits.report-uri.com/a/d/g\"}],\"include_subdomains\":true}"

# Network error logging (generates too much data for the ReportURI free plan)
Header set NEL "{\"report_to\":\"default\",\"max_age\":31536000,\"include_subdomains\":true}"
Log Rotation
Change the default log rotation so that it keeps 30 daily logs instead of 52 weekly ones. Edit /etc/logrotate.d/apache2 so that it looks like this:
/var/log/apache2/*.log {
   daily
   missingok
   rotate 30
   compress
   delaycompress
   dateext
   notifempty
   create 640 root adm
   sharedscripts
   postrotate
   if /etc/init.d/apache2 status > /dev/null ; then \
      /etc/init.d/apache2 reload > /dev/null; \
   fi;
   endscript
   prerotate
      if [ -d /etc/logrotate.d/httpd-prerotate ]; then \
         run-parts /etc/logrotate.d/httpd-prerotate; \
      fi; \
   endscript
}
Configuring MySQL
Securely initialize MySQL:
sudo mysql_install_db
sudo mysql_secure_installation
Set the collation to UTF-8 by adding the following to /etc/mysql/my.cnf:
[mysqld]
collation-server = utf8_general_ci
init-connect='SET NAMES utf8'
character-set-server = utf8
Set the minimum length of words to be indexed to three (default: four) to enable searches for terms like “PDF”.
[mysqld]
ft_min_word_len = 3
Restart MySQL:
sudo /etc/init.d/mysql stop
sudo /etc/init.d/mysql start
Migrating WordPress
This guide assumes that you already have WordPress running on another server and want to transfer it without modification, keeping the domain name.
Create the database for WordPress:
mysql -u root -p
mysql> create database wordpress;
mysql> grant all privileges on wordpress.* to "wordpress"@"localhost" identified by "PASSWORD";
mysql> flush privileges;
mysql> exit
Import into the WordPress database from an SQL dump file dump.sql (created on your old site):
mysql -u root -p
mysql> use wordpress
mysql> source dump.sql
mysql> exit
Copy all the files in the public_html folder (or similar) from the old server to the new server. I did that by creating a backup on the old server and transferring that to the new server.
Edit wp-config.php and update database name, user and password.
If you get this error when WordPress needs to write to the file system: “To perform the requested action, WordPress needs to access to your web server. Please enter your FTP credentials to proceed. If you do not remember your credentials, you should contact your web host” add the following to wp-config.php:
define('FS_METHOD','direct');
Hardening WordPress
Another layer of security for WordPress’ admin area. Additional basic authentication makes it harder to exhaust the server’s resources through many logon attempts in quick succession.
sudo apt-get install apache2-utils
Create a .htpasswd file for Apache authentication with a single user helge:
sudo htpasswd -c /etc/apache2/.htpasswd helge
Note: to add additional users, simply repeat above command without the -c parameter.
Create a .htaccess file in wp-admin with the following content:
AuthType Basic
AuthName "Please log on"
AuthUserFile /etc/apache2/.htpasswd
Require valid-user

<Files admin-ajax.php>
   Require all granted
   Satisfy any
</Files>
Mod_pagespeed: Apache Performance Tuning
Tuning a website for speed can be done at different levels. Optimizing at the (web) server level has the benefit of affecting all sites and applications. Mod_pagespeed runs as an Apache module. HTML/JavaScript minification and image recompression are just some of its tricks, and it gets better with every release.
Installing Mod_pagespeed
sudo wget https://dl-ssl.google.com/dl/linux/direct/mod-pagespeed-stable_current_amd64.deb
sudo dpkg -i mod-pagespeed-*.deb
sudo apt-get -f install
rm mod-pagespeed-*.deb
sudo chown www-data:root /var/cache/mod_pagespeed/
sudo service apache2 restart
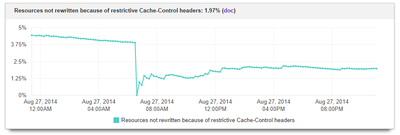
Monitoring Mod_pagespeed
Mod_pagespeed makes detailed statistics like the following available through the URL /pagespeed_admin:
In order to be able to access the admin pages you need to configure /etc/apache2/mods-enabled/pagespeed.conf to allow access from your IP address. You also need to turn off the rewrite engine if you are using this in conjunction with WordPress:
<Location /pagespeed_admin>
   <IfModule mod_rewrite.c>
      RewriteEngine Off
   </IfModule>
   Require local
   Require ip YOUR-IP
   SetHandler pagespeed_admin
</Location>
<Location /pagespeed_global_admin>
   <IfModule mod_rewrite.c>
      RewriteEngine Off
   </IfModule>
   Require local
   Require ip YOUR-IP
   SetHandler pagespeed_global_admin
</Location>
Configuring Mod_pagespeed
The default rules (called filters) are just fine and they are updated whenever mod_pagespeed is updated, so in theory your site should get faster over time. The following configuration changes need to be made by editing the file /etc/apache2/mods-enabled/pagespeed.conf.
Enable rewriting of resources that have Cache-Control: no-transform set:
ModPagespeedDisableRewriteOnNoTransform off
Increase the size of the disk cache from 100 MB (default) to 10 GB:
ModPagespeedFileCacheSizeKb 10240000
Enable fetching via HTTPS:
ModPagespeedFetchHttps enable
Enable additional filters:
ModPagespeedEnableFilters collapse_whitespace,extend_cache
Exclude Akismet directories or we get Apache error log entries because of .htaccess and mod_pagespeed:
ModPagespeedDisallow "*/wp-content/plugins/akismet/*"
Access all static files directly instead via http(s). The further down a rule the higher its precedence. One entry per Apache virtual server maps that server’s base URL into the corresponding file system path. Notice how different paths can be specified for specific subdirectories: in older WordPress multisite installations a site’s files virtual directory may map to a subdirectory of blogs.dir.
    ModPagespeedLoadFromFile https://uberagent.com/ /var/www/uberagent.com/public_html/
    ModPagespeedLoadFromFile https://helgeklein.com/ /var/www/helgeklein.com/public_html/
    ModPagespeedLoadFromFile https://vastlimits.com/ /var/www/vastlimits.com/public_html/
    ModPagespeedLoadFromFile https://vcnrw.de/ /var/www/vcnrw.de/public_html/
    ModPagespeedLoadFromFileRuleMatch disallow .*$
    ModPagespeedLoadFromFileRuleMatch allow \.css$
    ModPagespeedLoadFromFileRuleMatch allow \.js$
    ModPagespeedLoadFromFileRuleMatch allow \.gif$
    ModPagespeedLoadFromFileRuleMatch allow \.png$
    ModPagespeedLoadFromFileRuleMatch allow \.jpg$
Turning Dynamic Into Static Pages
Even with mod_pagespeed’s optimizations, our webpages are still built dynamically for every single visitor every single time. That is far from being efficient and significantly reduces the response time. To further enhance page load performance we need to create static pages that can be delivered without executing PHP code. The difficulty lies in the integration with WordPress: whenever you change a page, post or some backend setting the cache needs to be (partly) invalidated. Also the caching method must play nicely with mod_pagespeed.
One product that looks very promising is Varnish, a reverse caching proxy. Unfortunately it does not support SSL, and mod_pagespeed support for Varnish is still experimental. An easier and very well-tested solution is the WordPress plugin W3 Total Cache. W3TC can do many things that are already covered by mod_pagespeed - we just need its ability to create static HTML. On W3TC’s admin page general settings make sure to enable the page cache and disable all other optimizations, notably minify, database cache, object cache, browser cache, CDN and reverse proxy.
Support & Operations
Patching Ubuntu
sudo apt update
sudo apt dist-upgrade
sudo apt autoremove
sudo shutdown -r now
Restricted SFTP Access for Support Users
When you need support for your WordPress theme or a similar web application the vendor may request access to your installation. In such a case you may want to create an account with limited access. The following instructions show how to create a user support-account with access to only what is explicitly mounted in that user’s directory.
Add the following to /etc/ssh/sshd_config:
Match User support-account
   ChrootDirectory /var/sftp/support-account
   AllowTCPForwarding no
   X11Forwarding no
   ForceCommand internal-sftp
   PasswordAuthentication yes
Please note that all directories in the path /var/sftp/support-account need to be user/group owned by root.
# Create a new user without home directory
sudo adduser --no-create-home support-account

# Deny interactive login
sudo usermod support-account -s /bin/false

# Create the directory we mount to below
sudo mkdir -p /var/sftp/support-account/public_html

# Add mount information to /etc/fstab (use your favorite editor)
/var/www/helgeklein.com/public_html/  /var/sftp/support-account/public_html  none  bind  0 0

# Mount everything in fstab:
sudo mount -a

# Reload the SSH service
sudo service ssh reload


Comments