How to Integrate Home Assistant With KNX & ETS
- Home Automation, Networking & Self-Hosting
- Published Aug 2, 2025 Updated Aug 6, 2025
KNX is a core Home Assistant integration that only recently reached the silver quality rating. This means that it is well-maintained and stable. Just what you’re looking for when you’re thinking about extending your home’s functionality.

Planning
Why Integrate Home Assistant With KNX?
My main motivations to integrate Home Assistant with KNX are the following:
Visualization
Home Assistant comes with visualization capabilities that make it possible to build dashboards that present your home’s services and devices in an intuitive manner.
Automation
By linking KNX to Home Assistant your home gains new capabilities and you enable new scenarios that are not possible with KNX alone, for example presence simulation when you’re away (project).
Mobile App
Home Assistant’s UI, including any custom dashboards you may build, are available via the mobile app for Android and iOS.
Remote Control
Home Assistant’s web-based UI is accessible from anywhere as long as you have IP connectivity. With a VPN, for example, you can easily connect from your phone when you’re away and check or control your home’s status.
What Goes Where?
There’s an overlap in functionality between core KNX and Home Assistant. Both make it possible to control lights, for example. When thinking about where to implement a certain feature, consider the following:
All core services should work independently of Home Assistant. This makes your home more resilient as KNX is a distributed system that does not rely on the availability of a single device such as Home Assistant.
Add-on services may be provided by Home Assistant. Anything that’s optional or non-essential can be implemented in Home Assistant, especially if it requires more advanced logic, which is difficult to implement on the KNX level. Example: simulating presence through lighting when you’re away.
Complete KNX Work Before Starting With HA
Before mapping your KNX addresses to Home Assistant entities, make sure to put your KNX house in order! KNX is the foundation we’ll be building on in Home Assistant. Investing in a well-maintained ETS project structure is time well spent.
Connect Home Assistant to KNX
ETS Tunnel for Home Assistant
In ETS, my IP router has the individual address 1.0.0, the eight available tunnels have 1.0.1 through 1.0.8. I’m using the individual address 1.0.1 for Home Assistant.
To make it clear that the first tunnel address is reserved, I renamed it to Tunnel 1 - Home Assistant.
Home Assistant Integration
In Home Assistant, press c to bring up the quick bar, navigate to Integrations and click Add integration in the bottom-right corner. Select the KNX integration and configure it as follows:
- KNX connection:
Tunneling - KNX tunneling type:
Secure tunneling (TCP) - Host: DNS name or IP address of your KNX IP router
- Port: Should probably be the default (
3671) - NAT mode: disabled
- Local IP interface: leave blank
Next, you’re being asked how to configure KNX IP Secure.
Home Assistant KNX IP Secure Configuration
Select Configure IP Secure credentials manually. Enter the following in the dialog Secure tunneling that comes up:
- User ID:
2(tunnel number in ETS + 1) - User password: (password as configured in the ETS tunnel settings)
- Device authentication password (password as configured in the ETS IP router settings)
- Note: Do NOT use the commissioning password, it won’t work.
In the final step you’re asked by Home Assistant to provide a device name and its area.
Once the connection has been successfully established, you should see a new KNX item in the main side bar.
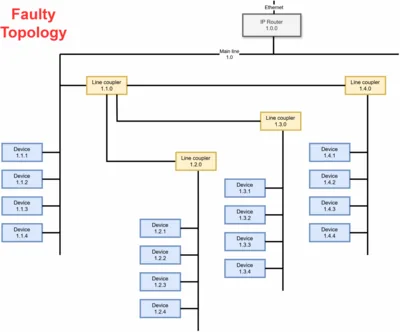
ETS Line Coupler Filter Settings
As you’ll likely want Home Assistant to talk to all devices on your KNX bus and receive their status, you need to loosen the filter settings on your line couplers so that group addresses are always routed (both directions) while individual addresses can be filtered.
Configure the Home Assistant KNX Integration
Upload Your ETS Project File
In the Home Assistant sidebar, click the KNX item (the one with the bus icon). In the main (Info) tab, upload your ETS project file and provide the corresponding password.
Once you’ve done that, your Group Monitor tab should show the names you’ve configured in ETS for your devices and group addresses. You’ll also get a new Project tab that lists your ETS project structure, albeit in a somewhat simplified manner.
Unfortunately, that’s about it. Importing your ETS project file does not generate light entities or any other types of devices in Home Assistant. That needs to be done manually. In other words: after having configured and connected your home’s KNX devices in ETS, you’ll need to do it again in Home Assistant.
Create Lights Entities
UI or YAML?
You can create lights and some other types of Home Assistant entities in the UI by navigating to KNX > Entities > Add. We’re not doing that, though. Instead, we’re going to use the more efficient and ergonomic YAML approach. In the following, I’m assuming that you’ve mapped a drive letter to Home Assistant’s config share as described here.
Create a Config File for KNX Lights
We’ll create a dedicated config file for our KNX light configuration. Add the following to the main config file configuration.yaml:
knx:
  light: !include knx-light.yaml
Create a new file knx-light.yaml in the root of the config file share (next to the file configuration.yaml).
Create Light Entities in YAML
Open knx-light.yaml and create HA light entities as shown in the following example (docs):
# Dimmable KNX light
- name: "Cellar"
  address: "1/0/50"                     # on/off
  state_address: "1/0/51"               # on/off status
  brightness_address: "1/0/52"          # dimming (absolute)
  brightness_state_address: "1/0/53"    # dimming status
Note: The KNX integration only supports absolute dimming via data type DPT 5.001. If you currently only have group addresses for relative dimming configured, e.g. for your Enertex room controllers, you’ll need to add group addresses for absolute dimming, too.
Save the modified configuration files and check the configuration in Developer tools > YAML. Then reload the KNX configuration on the same page.
Once reloaded, navigate to Logs to verify if there were any KNX issues.
Unique IDs and Entity IDs
Internally, HA entities are represented by unique_ids. These are auto-generated, mostly from an entity’s group address field address (docs). If unique IDs cannot be generated, you probably used the same group address(es) on multiple entities.
Entity IDs, on the other hand, are auto-generated from the name you provided in your YAML configuration. In the example above, the light’s entity ID would be light.cellar.
Create Cover Entities
Create a Config File for KNX Covers
We’ll create a dedicated config file for our KNX cover configuration. Add a new include to the main config file configuration.yaml as shown below:
knx:
  cover: !include knx-cover.yaml
  light: !include knx-light.yaml
Create a new file knx-cover.yaml in the root of the config file share (next to the file configuration.yaml).
Create Cover Entities in YAML
Open knx-cover.yaml and create HA cover entities as shown in the following example (docs):
# KNX cover
- name: "Living room"
  move_long_address: "3/1/0"            # move up/down
  stop_address: "3/1/1"                 # stop moving
  position_state_address: "3/1/2"       # position status
  travelling_time_up: 16                # time in seconds to move up
  travelling_time_down: 15              # time in seconds to move down
  device_class: "shade"                 # optional, e.g. "shade", "shutter", "awning"
Notes:
- The cover’s travelling time needs to be measured accurately. If it’s not, the position in percent as calculated by Home Assistant will be wrong. You can and should use the same values as in the ETS configuration of your KNX blind/shutter actuators.
- See the docs for a list of valid device classes.
Save the modified configuration files and check the configuration in Developer tools > YAML. Then reload the KNX configuration on the same page.
Once reloaded, navigate to Logs to verify if there were any KNX issues.
Assign Entities to Areas
Preparation: Create Floors and Areas
If you haven’t done so already, navigate to Areas and create floors, one for each level in your building. Then create areas, one per room, assigning each area to their respective floor.
YAML? Manually!
Unfortunately, there is no way to assign entities to areas in YAML (feature request). You can find your newly created KNX entities by navigating to Entities > Ungrouped (or searching for knx). From there, you’ll have to assign areas manually.
Tips and Recommendations
Don’t Map KNX Group Addresses for Entire Rooms
You may have KNX group addresses that control all the lights in a room. On the KNX side, this makes sense as it provides a quick way to switch everything on or off.
In Home Assistant, these group addresses are not needed, though. As you’re assigning each (light or other) entity to an HA area, you can (and should) use Home Assistant native functionality to turn everything in a certain area on or off.


Comments