Dockerized Ubiquiti UniFi Network Server Setup With Automatic HTTPS
- Home Automation, Networking & Self-Hosting
- Published Feb 11, 2024 Updated Jan 25, 2025
This article explains how to set up Ubiquiti UniFi Network Server, a management software for UniFi devices such as access points. This post is part of my series on home automation, networking & self-hosting that shows how to install, configure, and run a home server & network with dockerized or virtualized services.
Why Ubiquiti Access Points?
It should become clear why I chose Ubiquiti UniFi access points for my home once we look at my requirements:
- One ceiling-mounted device per floor with a slim and discreet design
- Low power consumption
- Management via on-premises controller (no cloud management service)
- Reasonably priced
Ubiquiti aces all of the above requirements. One especially notable thing is the relatively low power consumption of their access points compared to competing products. As far as I know, only AVM’s Fritz!Box devices are even more efficient.
Controller: UniFi Network Server
Ubiquiti calls its controller software UniFi Network Server. It’s available for Linux, Windows, and macOS and is updated regularly (see releases). We’re using the Linux version in a Docker container.
It’s important to note that UniFi Network Server doesn’t have to be running all the time. It’s sufficient to turn it on when you want to change the configuration of or distribute updates to your access points.
Which Docker Image?
There are two popular Docker images of the UniFi Network Server controller software I’m aware of: linuxserver.io / docker-unifi-network-application and jacobalberty. I first tried the latter but couldn’t get it to work. All I saw of the admin UI was a 404 error. I then switched to the linuxserver.io image, which worked as expected.
UniFi Network Server Installation
Preparation
I’m assuming that you’ve set up Docker and the Caddy container as described in the previous articles in this series.
Dockerized UniFi Network Server Directory Structure
This is what the directory structure will look like when we’re done:
rpool/
 └── encrypted/
     └── docker/
         └── unifi/
             ├── db/
             ├── data/
             ├── container-vars.env
             └── docker-compose.yml
We’re placing the configuration on the encrypted ZFS dataset (rpool/encrypted).
Create the new directories. Set ownership of UniFi directories to user/group ID 1000, which are used by the dockerized application.
mkdir -p /rpool/encrypted/docker/unifi/db
mkdir -p /rpool/encrypted/docker/unifi/data
chown -Rfv 1000:1000 /rpool/encrypted/docker/unifi/data
UniFi Network Server Docker Compose File
Create docker-compose.yml with the following content:
services:

  unifi:
    container_name: unifi
    hostname: unifi
    image: lscr.io/linuxserver/unifi-network-application:latest
    restart: unless-stopped
    networks:
      - backend            # backend communications
      - caddy_caddynet     # frontend communications
    ports:
      - 8443:8443          # web admin UI
      - 3478:3478/udp      # STUN
      - 10001:10001/udp    # AP discovery
      - 8080:8080          # device communication
#      - 1900:1900/udp     # only required for Make controller discoverable on L2 network option
#      - 8843:8843         # guest portal HTTPS redirect port (optional)
#      - 8880:8880         # guest portal HTTP redirect port (optional)
#      - 6789:6789         # mobile throughput test (optional)
#      - 5514:5514/udp     # remote syslog (optional)
    env_file:
      - container-vars.env
    volumes:
      - /etc/localtime:/etc/localtime:ro
      - ./data:/config
    depends_on:
      - unify-mongodb

  unify-mongodb:
    container_name: unify-mongodb
    hostname: unify-mongodb
    image: mongo:4.4
    restart: unless-stopped
    networks:
      - backend
    volumes:
      - /etc/localtime:/etc/localtime:ro
      - ./db:/data/db
      - ./db-init/init-mongo.js:/docker-entrypoint-initdb.d/init-mongo.js:ro

networks:
  caddy_caddynet:
    external: true
  backend:
    driver: bridge
MongoDB Database Initialization Script
Generate a random string to be used as the database password:
tr -cd '[:alnum:]' < /dev/urandom | fold -w "20" | head -n 1
Create db-init/init-mongo.js with the following content, replacing YOUR_PASSWORD with the password you just generated:
db.getSiblingDB("unifi").createUser({user: "unifi", pwd: "YOUR_PASSWORD", roles: [{role: "dbOwner", db: "unifi"}]});
db.getSiblingDB("unifi_stat").createUser({user: "unifi", pwd: "YOUR_PASSWORD", roles: [{role: "dbOwner", db: "unifi_stat"}]});
UniFi Network Server container-vars.env File
Create container-vars.env with the following content, replacing YOUR_PASSWORD with the password you generated above:
PUID=1000
PGID=1000
MONGO_USER=unifi
MONGO_PASS=YOUR_PASSWORD
MONGO_HOST=unify-mongodb
MONGO_PORT=27017
MONGO_DBNAME=unifi
Start the UniFi Network Server Container
Navigate into the directory with docker-compose.yml and run:
docker compose up -d
Inspect the container logs for errors with the command docker compose logs --tail 30 --timestamps.
Let’s Encrypt Certificate for UniFi Network Server via Caddy
Caddyfile
Add the following to Caddyfile (details):
unifi.{$MY_DOMAIN} {
	reverse_proxy unifi:8443 {
		transport http {
			tls_insecure_skip_verify
		}
	}
	tls {
		dns cloudflare {env.CLOUDFLARE_API_TOKEN}
	}
}
DNS A Record
Add the following A record to your DNS domain (details):
unifi.home.yourdomain.com 192.168.0.4 # replace with your Docker host's IP address
Try to resolve the name on a machine in your network (e.g., nslookup unifi.home.yourdomain.com).
Reload Caddy’s Configuration
Instruct Caddy to reload its configuration by running:
docker exec -w /etc/caddy caddy caddy reload
You should now be able to access the UniFi Network Server web interface at https://unifi.home.yourdomain.com without getting a certificate warning from your browser.
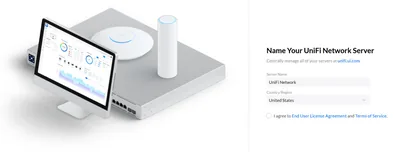
Initial Setup
When you first access your UniFi network server’s web interface, you’re presented with the screen shown at the top of this page, asking for a server name and your region.
Local Management Only
The next screen asks for your UI account. If you don’t want or need management from the cloud, click Advanced Setup at the bottom of the screen instead. You can now set local access credentials.
Change the Inform Host
The inform host is a DNS name or IP address where adopted UniFi devices contact their management server. In a Docker setup like ours, it defaults to an internal IP address like 172.27.0.3, which is not reachable from outside Docker. To change the inform host, navigate to Settings > System > Advanced, enable the Override checkbox next to Inform Host, and enter your server’s DNS name in the input box that appears: unifi.home.yourdomain.com.
Changelog
2024-04-14
- Removed the
versionfromdocker-compose.yml; a warning mentions that it’s obsolete.


Comments