Configuring Citrix ShareFile Sync from PowerShell
When you have a cloud-based file sharing service it makes a lot of sense to synchronize part or all of the data with your desktop computer. Citrix ShareFile offers the Sync for Windows tool for that purpose. However, once you open its configuration screen you notice that has a severe restriction: it can only synchronize to a single local folder. In many cases it would make much more sense to synchronize different cloud folders to different locations on your hard disk. When I complained to the product manager Peter Schulz about this I learned about a hidden gem: the single folder restriction is only present in the UI; the underlying sync engine is much more flexible. And the best thing is: the sync engine can be configured from PowerShell. Here is how.
Getting Started
The sync engine is 32-bit only, so make sure to use the 32-bit version of PowerShell for this. On 64-bit Windows it is located here:
C:\Windows\SysWOW64\WindowsPowerShell\v1.0\powershell.exe
Import the ShareFile sync engine module:
Import-Module "C:\Program Files\Citrix\ShareFile\Sync\SFSyncEngine.dll"
Listing Available Commands
What can we do with the ShareFile sync engine PowerShell module? Let’s ask it:
PS D:\> Get-Command -Module SFSyncEngine

CommandType     Name                                               ModuleName
-----------     ----                                               ----------
Cmdlet          Add-SyncJob                                        SFSyncEngine
Cmdlet          Get-FileLink                                       SFSyncEngine
Cmdlet          Get-FolderIdByName                                 SFSyncEngine
Cmdlet          Get-FolderLink                                     SFSyncEngine
Cmdlet          Get-HomeFolderId                                   SFSyncEngine
Cmdlet          Get-SyncJobs                                       SFSyncEngine
Cmdlet          Get-SyncJobState                                   SFSyncEngine
Cmdlet          Remove-SyncJob                                     SFSyncEngine
Listing Existing Sync Jobs
Let’s see which sync jobs are currently configured:
PS D:\> Get-SyncJobs -all

Id                 : 3
Account            : helgeklein.sharefile.com
FolderId           : foh61d44-2494-43c7-a61b-xxxxxxxxxxxx
User               : [email protected]
DeviceId           :
LocalFolderPath    : D:\Daten\ShareFile\My Files & Folders
Application        : SFSyncEngine.SyncApp
Mode               : sync_up_down
Persist            : True
AuthenticationType : oauth_sharefile
CachedJobState     : job_idle
As you can see, there is only one sync job with the ID 3 configured that syncs files from the tab My Files & Folders to the local directory D:\Daten\ShareFile\My Files & Folders.
Adding a Sync Job
I have a folder ingenuously called Shared folder in ShareFile which I want to sync to the local directory D:\Daten\Sync to ShareFile. Please note that the local directory is not a subdirectory of the base folder D:\Daten\ShareFile configured in the UI. Configuring target paths per sync folder is something you cannot currently do in the UI.
Folders are identified by their FolderId. Before we can add the sync job we need to get the id of Shared folder. To do that go to the folder in the web UI, right-click Get Direct Link and then click Copy link address:
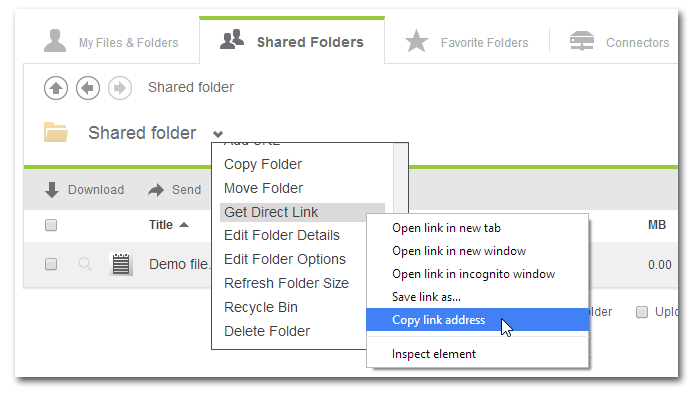
The link looks similar to this (deliberately obfuscated):
https://helgeklein.sharefile.com/getdirectfolderlink.aspx?id=foc86c19-d904-434a-9d67-xxxxxxxxxxxx
With that information we can add the sync job:
PS D:\> Add-SyncJob -ApplicationId 1 -ApplicationName "PowerShell" -Account helgeklein.sharefile.com
-RemoteFolderName "foc86c19-d904-434a-9d67-xxxxxxxxxxxx" -LocalFolderPath "D:\Daten\Sync to ShareFile"
-AuthType 4 -UserName [email protected] -SyncDirection 2 -Password "MY SHAREFILE PASSWORD"

Id                 : 12
Account            : helgeklein.sharefile.com
FolderId           : foc86c19-d904-434a-9d67-xxxxxxxxxxxx
User               : [email protected]
DeviceId           :
LocalFolderPath    : D:\Daten\Sync to ShareFile
Application        : SFSyncEngine.SyncApp
Mode               : sync_up_down
Persist            : True
AuthenticationType : oauth_sharefile
CachedJobState     : job_idle
Please not that it might be necessary to specify an AuthType of 0 instead of 4, as Remko Weijnen found.
The password can alternatively be specified as a secure string:
PS D:\> $securePwd = Get-Credential [email protected]

PS D:\> Add-SyncJob -ApplicationId 1 -ApplicationName "PowerShell" -Account helgeklein.sharefile.com
-RemoteFolderName "foc86c19-d904-434a-9d67-xxxxxxxxxxxx" -LocalFolderPath "D:\Daten\Sync to ShareFile"
-AuthType 4 -UserName [email protected] -SyncDirection 2 -Password $securePwd.Password
The local folder will be created if it does not exist yet and the ShareFile sync engine will immediately download the cloud folder’s content to the local disk.
A description of the values used for AuthType and SyncDirection can be found below.
Removing a Sync Job
Removing a sync job is easy. Just use the job id that was displayed when creating the job:
Remove-SyncJob 12
Useful Constants
SyncDirection
The parameter SyncDirection accepts numerical constants whose meaning I found by trial and error:
0: sync_up
1: sync_down
2: sync_up_down
AuthType
The parameter AuthType accepts numerical constants whose meaning I found by trial and error:
0: sharefile
1: saml
2: win_ad
3: last_old_auth
4: oauth_sharefile [this is what the UI uses]
5: oauth_saml
6: oauth_win_ad
7: oauth_win_sso
8: oauth_saml_forms
Troubleshooting
If something goes wrong, especially when creating sync jobs, the job’s state might change to job_queued. A detailed log can be found in %temp%\ShareFile\SyncEngine2*.log.


4 Comments
Great solution! Thanks for sharing.
I came across your blog when looking for a way to use PowerShell to strip attachments off of inbound emails on an Exchange server, put those files in ShareFile, and send the email through to the recipient with a link to the attachment in ShareFile rather than attached to the message. Would you have any suggestions on how to do this?
Isn’t that what the Outlook Plugin does?
Hi,
We’re on Citrix’s “latest” product. Our university’s flavour of ShareFile uses a Single-Sign-On (SSO) service.
For information, I noticed that the default syncs created by the limited desktop app actually used oauth_saml_forms .
We had to set AuthType to 8 to get this to work on our system. Also, our login was not our email address, but rather DSabc123456 , where DS is our university domain name and abc123456 is our username.
I am wondering if you know whether these syncs are user-independent? For example, if I restart my PC and someone else logs in, will the sync job still exist? Or do we need to start scheduling scripts and so on and so forth? If you know about this, adding it to the article would be helpful too.
Warm regards,
Anton
Similarly, if we were to schedule – what happens if we create duplicate jobs or similar?