Vaultwarden Setup Guide With Automatic HTTPS
- Home Automation, Networking & Self-Hosting
- Published Sep 4, 2023 Updated Jan 25, 2025
This article explains how to set up Vaultwarden with automatic HTTPS certificates (via Caddy). This post is part of my series on home automation, networking & self-hosting that shows how to install, configure, and run a home server & network with dockerized or virtualized services.
What is Vaultwarden?
Vaultwarden is a more efficient re-implementation of the Bitwarden server API aimed at self-hosting. Vaultwarden is compatible with Bitwarden clients.
Side note: Apparently, Bitwarden recently created a slimmed-down version of their Docker deployment: Unified (currently in beta). While Unified “only” requires a single container and supports SQLite (as is the case with Vaultwarden), Bitwarden Unified still needs “at least 200 MB RAM”, whereas my Vaultwarden instance only consumes 10 MB.
Vaultwarden Installation
Preparation
I’m assuming that you’ve set up Docker and the Caddy container as described in the previous articles in this series.
Dockerized Vaultwarden Directory Structure
This is what the directory structure will look like when we’re done:
rpool/
 └── encrypted/
     └── docker/
         └── vaultwarden/
             ├── data/
             ├── container-vars.env
             └── docker-compose.yml
We’re placing the configuration on the encrypted ZFS dataset (rpool/encrypted).
Create the new directories:
mkdir -p /rpool/encrypted/docker/vaultwarden/data
Vaultwarden Docker Compose File
Create docker-compose.yml with the following content:
services:

  vaultwarden:
    container_name: vaultwarden
    hostname: vaultwarden
    image: vaultwarden/server:latest
    restart: unless-stopped
    networks:
      caddy_caddynet:
    expose:
      - 80                 # Web UI
      - 443                # Web UI
    env_file:
      - container-vars.env
    volumes:
      - /etc/localtime:/etc/localtime:ro
      - ./data:/data

networks:
  caddy_caddynet:
    external: true
Set a Password & Create an Admin Token
To enable the admin page, we need to specify a (hashed) admin password via an environment variable (docs).
Generate a secure password and make sure to store it safely. Run the following command to create the admin token via a temporary Vaultwarden container, specifying your new password when asked:
docker run --rm -it vaultwarden/server /vaultwarden hash
Copy the output line that starts with ADMIN_TOKEN='$argon2id$v= to be pasted into container-vars.env (see below).
Vaultwarden container-vars.env File
Create container-vars.env with the following content:
# Paste your ADMIN_TOKEN in the line below
Start the Vaultwarden Container
Navigate into the directory with docker-compose.yml and run:
docker compose up -d
Inspect the container logs for errors with the command docker compose logs --tail 30 --timestamps.
Let’s Encrypt Certificate for Vaultwarden via Caddy
Caddyfile
Add the following to Caddyfile (details):
vault.{$MY_DOMAIN} {
	reverse_proxy vaultwarden:80 {
		# Send the true remote IP to Rocket, so that vaultwarden can put this in the log, so that fail2ban can ban the correct IP.
		header_up X-Real-IP {remote_host}
	}
	tls {
		dns cloudflare {env.CLOUDFLARE_API_TOKEN}
	}
}
DNS A Record
Add the following A record to your DNS domain:
vault.home.yourdomain.com 192.168.0.4 # replace with your Docker host's IP address
Try to resolve the name on a machine in your network (e.g., nslookup vault.home.yourdomain.com).
Reload Caddy’s Configuration
Instruct Caddy to reload its configuration by running:
docker exec -w /etc/caddy caddy caddy reload
You should now be able to access the Vaultwarden web interface at https://vault.home.yourdomain.com without getting a certificate warning from your browser.
Initial Vaultwarden Admin Configuration
We’re configuring Vaultwarden via its admin page (docs). In your browser, navigate to https://vault.home.yourdomain.com/admin and specify the admin password you generated above.
Settings
General Settings
- Domain:
https://vault.home.yourdomain.com - Allow new signups: unchecked
- Allow password hints: unchecked
- Invitation organization name:
Home
SMTP Email Settings
If you’re using the free Sendgrid plan like I do (details), create a new API key:
- API key name:
Vaultwarden - API key permissions: Restricted access, only
Mail sendenabled
Configure the following email settings in Vaultwarden:
- Host:
smtp.sendgrid.net - Port:
587 - From address:
name@domain.com(replace with your email) - From name:
Your name(replace with your name) - Username:
apikey - Password:
YOUR_API_KEY
Click Save. Go back to SMTP Email Settings > Test SMTP, enter your email address, and click Send test email.
Invite Users
Still in the admin UI, navigate to Users and invite yourself as the first user.
User Configuration
Accept Invitation
To accept the invitation you got from your admin (see above), follow the instructions in the email you should have received:
- Make sure to create a new account, specifying a unique master password.
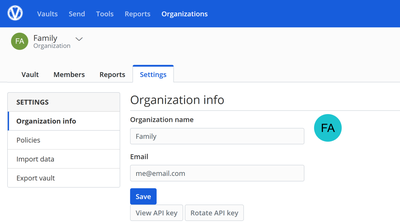
Create Organization
Once logged in with your new account, you may want to create an organization for your family so that you can share a vault with passwords. To do that, click New organization, specify a name and any email (the email field is a leftover billing email from Bitwarden).
Mobile Apps
As a re-implementation of the open-source Bitwarden server and its API, Vaultwarden is compatible with Bitwarden clients. Vaultwarden, therefore, doesn’t come with its own mobile apps but relies on Bitwarden’s Android and iOS apps instead.
Add Vaultwarden in Addition to a Bitwarden Instance
I already had a Bitwarden cloud account in my Bitwarden mobile app. Adding my self-hosted Vaultwarden instance, too, was easy once I figured out where to do it.
In the app’s upper-right corner, tap your account icon and then tap Add account. Specify the email address of your Vaultwarden account and make sure to select Self-hosted in the dropdown Logging in on. In the self-hosted settings that come up, specify only the server URL: https://vault.home.yourdomain.com.
Switching Between Bitwarden and Vaultwarden Accounts
To switch between accounts in the mobile Bitwarden app, tap the account icon in the upper right corner. A menu pops up that lists your configured accounts. Tap the account you want to switch to.
Changelog
2024-04-14
- Removed the
versionfromdocker-compose.yml; a warning mentions that it’s obsolete.


Comments