Login VSI: Custom Command Line with CSV File for RDP Connections
- Performance/Sizing
- Published Feb 20, 2013 Updated Feb 21, 2013
Getting Login VSI to launch sessions on multiple RD session hosts is possible with the connection type Custom command line with CSV, but it is more difficult than it should be - especially if you want to launch the RDP sessions in windowed rather than full screen mode.
This is the configuration I put together after snooping around with Process Monitor (there is no documentation for RDPConnect.exe):
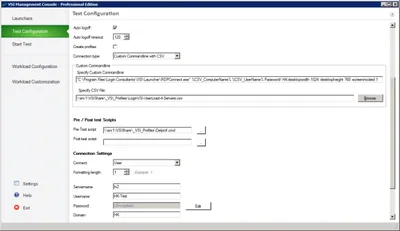
Command Line
Let’s take a look at the command line first:
"C:\Program Files\Login Consultants\VSI\Launcher\RDPConnect.exe" %CSV_ComputerName% %CSV_UserName% Password! HK-desktopwidth 1024 -desktopheight 768 -screenmodeid 1
As recommended in the documentation I use RDPConnect.exe to launch sessions because that way passwords can be passed easily. RDPConnect supports many command-line switches. Those are not documented but can be determined easily by running the tool with the parameter “-?”. This is the output:
RDPConnect.exe <SERVER> <USERNAME> <PASSWORD>
[-domain <DOMAIN>]
[-screenmodeid <SCREEN MODE ID>]
[-usemultimon <USE MULTIMON>]
[-desktopwidth <DESKTOPWIDTH>]
[-desktopheight <DESKTOPHEIGHT>]
[-sessionbpp <SESSION BPP>]
[-winposstr <WINPOSSTR>]
[-compression <COMPRESSION>]
[-keyboardhook <KEYBOARDHOOK>]
[-audiocapturemode <AUDIOCAPTUREMODE>]
[-videoplaybackmode <VIDEOPLAYBACKMODE>]
[-connectiontype <CONNECTION TYPE>]
[-displayconnectionbar <DISPLAYCONNECTIONBAR>]
[-disablewallpaper <DISABLE WALLPAPER>]
[-allowfontsmoothing <ALLOW FONT SMOOTHING>]
[-allowdesktopcomposition <ALLOW DESKTOP COMPOSITION>]
[-disablefullwindowdrag <DISABLE FULL WINDOW DRAG>]
[-disablemenuanims <DISABLE MENU ANIMS>]
[-disablethemes <DISABLE THEMES>]
[-disablecursorsetting <DISABLE CURSOR SETTING>]
[-bitmapcachepersistenable <BITMAPCACHEPERSISTENABLE>]
[-audiomode <AUDIOMODE>]
[-redirectprinters <REDIRECTPRINTERS>]
[-redirectcomports <REDIRECTCOMPORTS>]
[-redirectsmartcards <REDIRECTSMARTCARDS>]
[-redirectclipboard <REDIRECTCLIPBOARD>]
[-redirectposdevices <REDIRECTPOSDEVICES>]
[-redirectdirectx <REDIRECTDIRECTX>]
[-drivestoredirect <DRIVESTOREDIRECT>]
[-autoreconnectionenabled <AUTORECONNECTION ENABLED>]
[-authenticationlevel <AUTHENTICATION LEVEL>]
[-promptforcredentials <PROMPT FOR CREDENTIALS>]
[-negotiatesecuritylayer <NEGOTIATE SECURITY LAYER>]
[-remoteapplicationmode <REMOTEAPPLICATIONMODE>]
[-alternateshell <ALTERNATE SHELL>]
[-shellworkingdirectory <SHELL WORKING DIRECTORY>]
[-gatewayhostname <GATEWAYHOSTNAME>]
[-gatewayusagemethod <GATEWAYUSAGEMETHOD>]
[-gatewaycredentialssource <GATEWAYCREDENTIALSSOURCE>]
[-gatewayprofileusagemethod <GATEWAYPROFILEUSAGEMETHOD>]
[-promptcredentialonce <PROMPTCREDENTIALONCE>]
[-useredirectionservername <USE REDIRECTION SERVER NAME>]
The first two parameters, computer and user name, are read from the CSV file (see below) and passed in as variables. The third parameter is the password (I used the default “Password!”). The fourth parameter is where it starts to get interesting: this is the domain name (“HK”) directly followed by the next parameter “-desktopwidth 1024” (right, no blank there - funny, eh?). Anyway, the last parameters set the size of the RDP window. Modify the numbers to your heart’s content. If you want a session to run in full screen, remove everything after the password.
CSV File
If you want to have flexibility with regards to which users Login VSI connects to which machines, you need a CSV file containing the variable parts. In this case, needing only variables for computer and user names, the file’s content is simple:
ComputerName,UserName
ts1,HK-Test1
ts2,HK-Test2
ts3,HK-Test3
ts4,HK-Test4
The first row contains the column names, the rest of the file is made up of the data. This simple file tells VSI to connect user HK-Test1 to server ts1, HK-Test2 to server ts2 and so on. The column names are automatically converted into variables. The thing to remember is that it automatically prepends “CSV_”, hence the names CSV_ComputerName and CSV_UserName.
Cleaning Up - Deleting Profiles
Since I want to start with a fresh environment for each new test, I wrote a little batch file that deletes the test users’ profiles with the help of my tool Delprof2. The content of the simple Pre-Test script Delprof2.cmd looks like this:
\\srv1\VSIShare\_VSI_Profiles\DelProf2.exe -u -c:ts1 -id:hk-test* -i
\\srv1\VSIShare\_VSI_Profiles\DelProf2.exe -u -c:ts2 -id:hk-test* -i
\\srv1\VSIShare\_VSI_Profiles\DelProf2.exe -u -c:ts3 -id:hk-test* -i
\\srv1\VSIShare\_VSI_Profiles\DelProf2.exe -u -c:ts4 -id:hk-test* -i
Delprof2 is executed four times, once per target. The command line option -id:hk-test* instructs it to delete all profiles that start with “hk-test”.


Comments