Hyper-V on Hetzner's EX51 Hosted Dedicated Servers
- Virtualization & Containers
- Published Mar 1, 2016 Updated Apr 5, 2019
Your low-cost high-performance cloud data center building block.
This guide explains how to install Windows Server 2012 R2 on Hetzner’s EX51-SSD dedicated servers. That line of servers is very attractive for virtualization as it combines a fast CPU with a good amount of RAM and SSD storage - at a price point of less than €60 per month. Another cool thing: Hetzner lets you install your own operating system. Here’s how.
Hardware
These are the main components of the EX51-SSD servers:
- Mainboard: Fujutsu D3401-H1
- CPU: Intel Core i7-6700
- RAM: 64 GB
- SSD: 2 x Crucial MX200 500 GB
Ordering Multiple Servers
If you want to order multiple servers to be able to Live Migrate virtual machines you can ask Hetzner to equip each server with a second NIC connected to a dedicated 5-port Ethernet switch for a small one-time fee.
Currently there is one little thing making Live Migrations less useful than they should be: although you can easily order multiple public IP addresses per server for your VMs, you cannot use those VMs on any other server. They are tied to the server they were assigned to. If you were to Live Migrate a VM with a public IP address to another host, it would not be reachable any more. When I asked Hetzner’s support for a way around this unfortunate limitation, I was promised a new custom VLAN feature for the end of Feburary. With custom VLANs it will be possible to define a group of servers that share a pool of IP addresses. Let’s hope it is available soon!
During the ordering process you are asked to choose an operating system. Select “rescue system” in order to install your own.
Connecting to the Console
Hetzner have slightly antiquated KVM remote consoles called LARA they connect to a server on request (documentation). You get three hours of free guaranteed usage (which you might need, especially the first time around!). If you find that you need more contact Hetzner support. Each additional three hours cost €10.
Installing Windows
Hetzner has some OS images at http://download.hetzner.de/bootimages/windows/. You can find credentials to access that site in the email you get from Hetzner telling you that LARA is ready.
If you need something else you can either map a drive to any SMB share on the internet or upload to your backup space. The latter, however, is only reachable from within the Hetzner network, so you must already have a working server there. As I already had a server at Hetzner’s data center I chose to upload an ISO to my backup space.
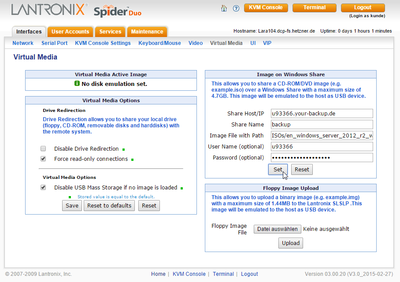
LARA’s web interface states that only ISO files up to 4.7 GB in size are supported. That may or may not be true. When I attempted to use a 5 GB ISO things seemed to work but the installation froze at 90% (which may also have been due to a timeout, see below).
Configure the ISO mount on the Virtual Media page. In my case it looked like this:
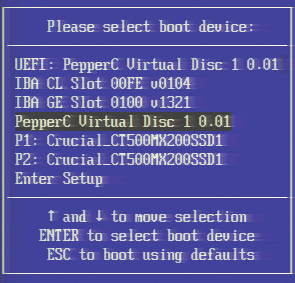
Reboot the server and press F12 to bring up the boot device selection menu. Select “PepperC Virtual Disc” without (!) UEFI:
If keyboard and mouse are not working try to change the Host Interface setting on the Keyboard/Mouse page.
The Getting files ready for installation phase of Windows setup takes so long (more than an hour) that the connection to LARA may time out, freezing the installation. It may be possible to prevent that from happening by clicking around the LARA web console every ten minutes or so. It certainly does not hurt.
Installing the Ethernet Driver
Unfortunately Server 2012 R2 does not come with a driver for the server’s onboard NIC. To install the Ethernet driver without an internet connection follow these steps:
- Download ProWinx64.exe on a different computer
- Create an ISO file containing ProWinx64.exe with ISO Recorder
- Unmount the Windows ISO on LARA’s Virtual Media page
- Mount the ISO driver file you created from the Lantronix KVM Console by clicking the floppy icon and then Connect ISO
- You will see a new drive in Explorer
- Run ProWinx64.exe and install the Ethernet drivers
Enable RDP Access
Configure Remote Desktop in Server Manager. Enable RDP access in Windows Firewall’s public network profile. Test logging on via RDP. Now you do not need the LARA remote console any more.
What Else?
I recommend to install Intel’s Chipset Device Software (INF Update Utility).
For more information on things like two-factor authentication please see the article My Hyper-V Server in the Cloud.


Comments