Customizing and Installing the Lenovo W540
- Hardware
- Published Jun 17, 2014 Updated Mar 18, 2018
Having made the switch from my trusty Lenovo T520 to the W540 here is my account of what works well and what does not. If you wonder what made me choose the W540: read this.
Hardware
M.2 SSD
The W540 has two M.2 slots. One hosts the WiFi adapter, the other the WWAN adapter if you ordered that. If you did not the slot remains empty and can be used for an M.2 SSD. Although that is not officially supported (Lenovo only supports 16 GB caching SSDs for magnetic hard drives which I am not exactly a big fan of), using a 128 GB M.2 SSD as a boot drive should work just fine. The problem is that only really tiny SSDs of the 2242 (22 mm by 42 mm) form factor fit into the slot and those are scarce.
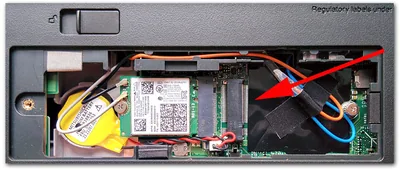
Since the laptop can be equipped with two 2.5" drives I went for that option instead (see below).
Second 2.5" Drive
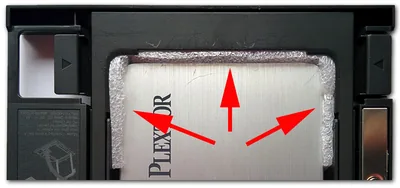
The W540 comes with a DVD drive, which is totally useless to me. Fortunately that drive can be replaced with the Ultrabay Slim HD Bay Adapter IV which in turn can be equipped with any 2.5" drive up to 9.5 mm in height. However, if you do not buy your drive from Lenovo - which you are unlikely to do unless you have money to spare and do not care about the quality of your SSDs - you will not get the little plastic “thingies” that keep the drive firmly in place in the adapter (which is really a very poor design choice by Lenovo). But you can work around that and manufacture the padding yourself:
Display
Never buy a TN panel! With my previous laptop, a Lenovo T520, I went for the best at the time, a full HD IPS panel and it was worth every penny. These days full HD is only available as a TN panel - if you want something better you need to go the high DPI route. Although Windows 8.1 still has some issues and not all applications are compatible yet it is worth it: the 2880x1620 resolution is amazing and the colors and the viewing angle are great.
Power Supply
When the W540 is ordered with a quad core CPU it is delivered with a 170 W power supply. Strangely enough, the docking station only comes with a 135 W power supply. You might want to switch the two, i.e. use the 135 W when on the move and the 170 W with the docking station. Here is why:
- 135 W power supply:
- weight: 446 g
- size: 14.3 cm * 6.3 cm * 3 cm = 270 cm³
- 170 W power supply:
- weight: 565 g
- size: 15.2 cm * 7.4 cm * 3 cm = 337 cm³
[Measurements are my own]
Software
BIOS Settings
The defaults were largely sensible. This is what I changed:
- Security chip from inactive to active
- Intel Virtualization Technology from disabled to enabled
- Intel Anti-Theft Module Activation from enabled to disabled
- Boot order: main SSD from position 4 (below USB and DVD) to position 1
Creating an UEFI Bootable USB Drive from an ISO
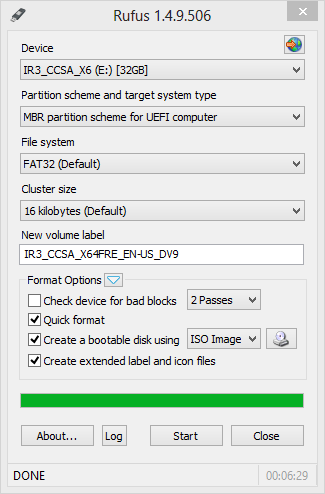
- Use Rufus, it is better and faster than Microsoft’s Windows 7 USB/DVD Download Tool
- Select the USB drive
- Click the CD icon and select the ISO file
- Click start
Rufus’ dialog now should look similar to this:
Performing a clean installation of Windows
The W540 came with Windows 8 Pro preinstalled, but I never use those bloatware-ridden vendor images. With Windows 8 the product key is not printed on a sticker on the device’s underside but stored in the BIOS instead. According to the rare information to be found on this topic a plain vanilla version of Windows may or may not accept that key. In some cases additional certificates have been added to the vendor images without which the BIOS key cannot be used. Long story short: I had to try it out and had to be prepared to supply my own product key.
I tried several things and learned the following:
- Windows 8 and Windows 8.1 (may?) use different keys, so you have to try the other if one does not work
- Installing from a USB3 port may or may not work (e.g. I got a BSOD with BUGCODE_USB3_DRIVER once), so use a USB2 port instead
- Clean ISO files can be downloaded from Microsoft, but the process is not exactly straightforward (description)
Drivers and Updates
After the Windows installation I installed all available updates. Windows Update also provided drivers for most system components. The only drivers and system software I installed manually were the following:
- BIOS update
- Intel Chipset Driver
- Intel Rapid Storage Technology Driver
- Intel Collaborative Processor Performance Control (CPPC) Driver
- Pantone Color Calibration Program
- Synaptics ThinkPad UltraNav Driver
- O2Micro Media Card Reader Driver
After that there remained one device in the other devices category: PCI Simple Communications Controller with the hardware ID PCI\VEN_8086&DEV_8C3A. The vendor ID 8086 is Intel’s and the device is the management engine, which I do not need, so I disabled it.





Comments