Improved Home Network Privacy With NextDNS & DNS over TLS (DoT)
This article is for you if you want to improve privacy and block ads on all devices on your network without installing any software, simply by configuring a modern DNS service, yet with the ability to override settings for individual sites, and with nice dashboards thrown in for good measure.
Why a Privacy Solution Based on DNS?
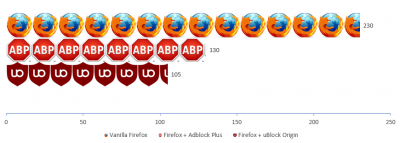
You probably have been using browser ad blockers like uBlock Origin, AdBlock Plus, or Ghostery for some time and with good success. Why something else? After all, browser ad blockers are working great, right!?
They are, indeed. I would not use DNS as a replacement for your ad blocker, I see it as complementary. A DNS solution has advantages that browser-based ad blockers cannot provide:
- DNS covers all devices on the network, including:
- iOS/Android phones or tablets (which do not support OS-level blocking of network requests)
- Smart TVs (which are notorious in their tracking)
- IoT devices
- Guest PCs or phones
- Your wife’s laptop, your children’s gaming rig
- DNS works at a very early stage in the connection, reducing the load on the endpoint
- DNS is one of the few unencrypted protocols left, so you should be working to secure it anyway
Why Not Pi-Hole?
Let me be clear: I love what the Pi-hole project is doing! They provide a fantastic free (!) product that you can install on any device on your network to filter DNS traffic and increase the security of your devices. Those were exactly my goals, too. The only reason I did not choose Pi-hole is that I do not want to set up and maintain yet another machine. I went for a SaaS solution purely out of laziness.
Why Not AdGuard DNS or Some Alternative?
Before I found NextDNS I tested AdGuard DNS, which initially seemed like the perfect solution: it is free and does not require an account, yet blocks most of the undesired stuff on the net. However, there are downsides, too: no configuration options, no dashboards, no statistics. But worst of all: no quick way to get a domain off the list that is blocked by mistake.
The last point turned out to be a deal-breaker when AdGuard DNS suddenly started blocking one of our important business apps and I could not get it unblocked. Being forced to switch back to regular DNS servers I started looking for a more flexible alternative.
Why NextDNS?
Why did I choose NextDNS? My reasons included:
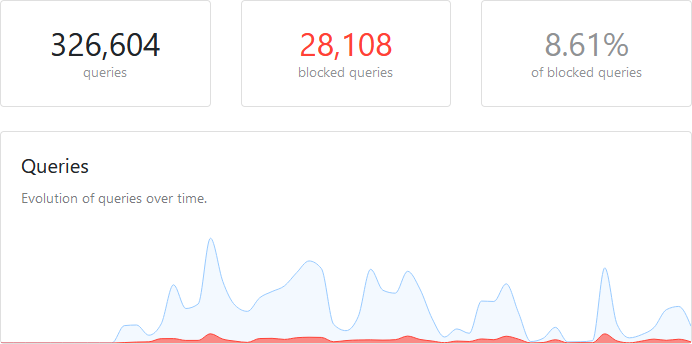
- The service is free for little traffic (up to 300,000 queries/month) and inexpensive for more (USD 20/year)
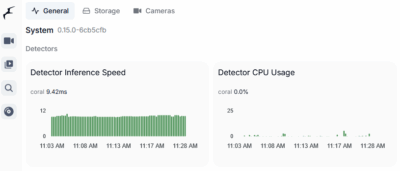
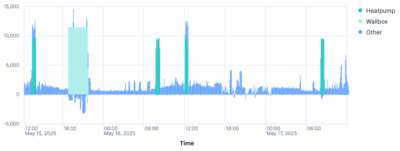
- Nice dashboards, modern UI
- Easy to configure
- Supports home networks with changing IP addresses via dynamic DNS (DDNS)
- Support for all important privacy technologies including DoT (DNS over TLS) and DoH (DNS over HTTPS)
- Extensive configuration options including the abilities to choose filter lists, and to add sites to blacklists or whitelists
How NextDNS Identifies Clients
DNS is a stateless protocol. There is no authentication built-in. Nevertheless, NextDNS needs some way to identify which of the millions of queries arriving at its servers originate from your network in order to apply your customized configuration. If you cannot use DoT (which Fritz!Boxes support as of Fritz!OS 7.20) or DoH, this only leaves your router’s public IP address as an identifiable element. Unless you have a business account, IP addresses change. NextDNS supports a clever alternative, though: it allows you to specify a dynamic DNS name, which makes it perfect for home networks.
In the following sections, I am describing how I set up NextDNS for my home network, connected to the internet by a Fritz!Box router.
Preferred Configuration: DNS over TLS (DoT)
Step 1: Configure NextDNS
Configure NextDNS:
- Create an account
- Log in. You are now on the dashboard My First Configuration
- Note your endpoint’s name in the section Endpoints > DNS-over-TLS. It has the format
YOUR-ID.dns.nextdns.io
Step 2: Configure Your Router to Use NextDNS
Finalize the setup by configuring your router with the NextDNS servers as follows:
- In the Fritz!Box UI, navigate to Internet > Type of Connection > DNS Server > DNS over TLS (DoT)
- Enable the following checkboxes:
- Encrypted name resolution (DNS over TLS)
- Force a certificate
- Allow fallback to non-encrypted name resolution [optional]
- In the box FQDNs of the DoT DNS Servers enter your NextDNS endpoint name (
YOUR-ID.dns.nextdns.io) - Restart the Fritz!Box to clear its DNS resolver cache
Note 1: if DoT is enabled, the DNS servers configured in the section DNSv4 and DNSv6 of the DNS Server page are only used if Allow fallback to non-encrypted name resolution is enabled and the DoT servers are unavailable.
Note 2: if Allow fallback to non-encrypted name resolution is enabled you might want to configure dynamic DNS as described in the alternative configuration below or NextDNS won’t be able to identify queries coming from your account if the Fritz!Box has fallen back to unencrypted DNS.
Alternative Configuration: Unencrypted DNS
Step 1: Fritz!Box Dynamic DNS Without Opening the Router to the Internet
Fritz!Boxes come with a dynamic DNS service built-in: MyFritz. That is not obvious, though. The documentation only mentions MyFritz as a means to access your Fritz!Box via the internet, something I most definitely do not want to do. Quite the opposite: I want to be sure my router or anything behind it cannot be accessed from the internet at all.
That is possible with MyFritz, even easily so. To set up MyFritz as a dynamic DNS service without granting access to the Fritz!Box itself or the network behind it:
- Open the web UI of your Fritz!Box
- Make sure you’re in advanced mode (top-right corner)
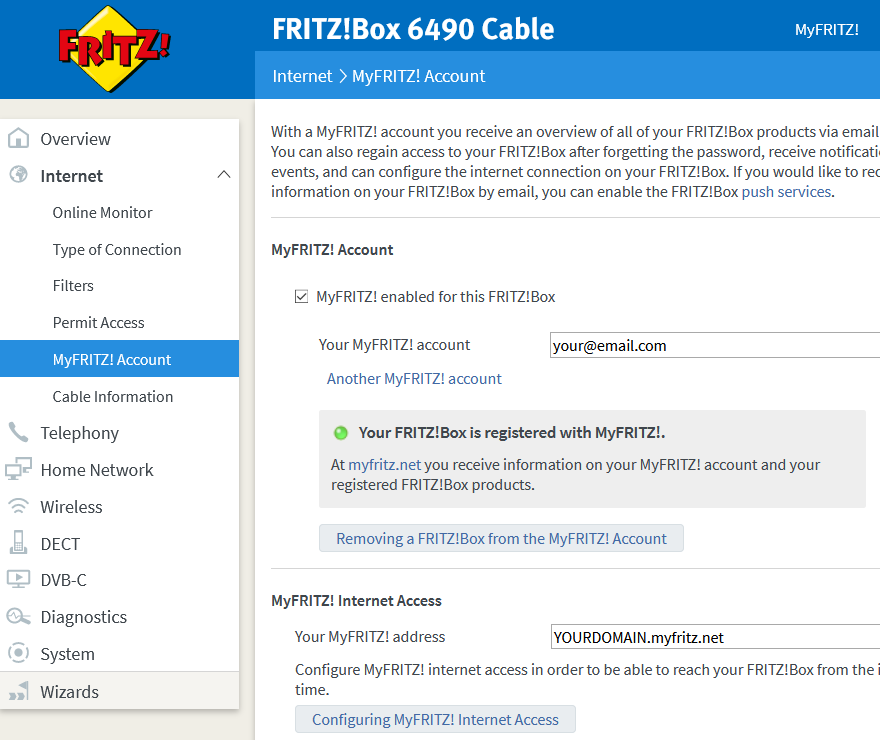
- Go to Internet > MyFritz! Account
- Enable the checkbox MyFRITZ! enabled for this FRITZ!Box
- Register with your email address and confirm the address
- Reload the page Internet > MyFritz! Account
- You’ll see the dynamic DNS address of your Fritz!Box. It has the format:
CRYPTICSTRING.myfritz.net
The resulting page should look similar to the following:
Step 2: Configure NextDNS
Once you have dynamic DNS set up in your router you can proceed to configure the dynamic DNS name in NextDNS:
- Create an account
- Log in. You are now on the dashboard My First Configuration
- Link your network’s public IP address in the section Linked IP > Advanced by entering the dynamic DNS name you registered previously
Step 3: Configure Your Router to Use NextDNS
Now that NextDNS knows your network’s public IP address you can finalize the setup by configuring your router with the NextDNS servers as follows:
- In the Fritz!Box UI, navigate to Internet > Type of Connection > DNS Server
- Enter the following:
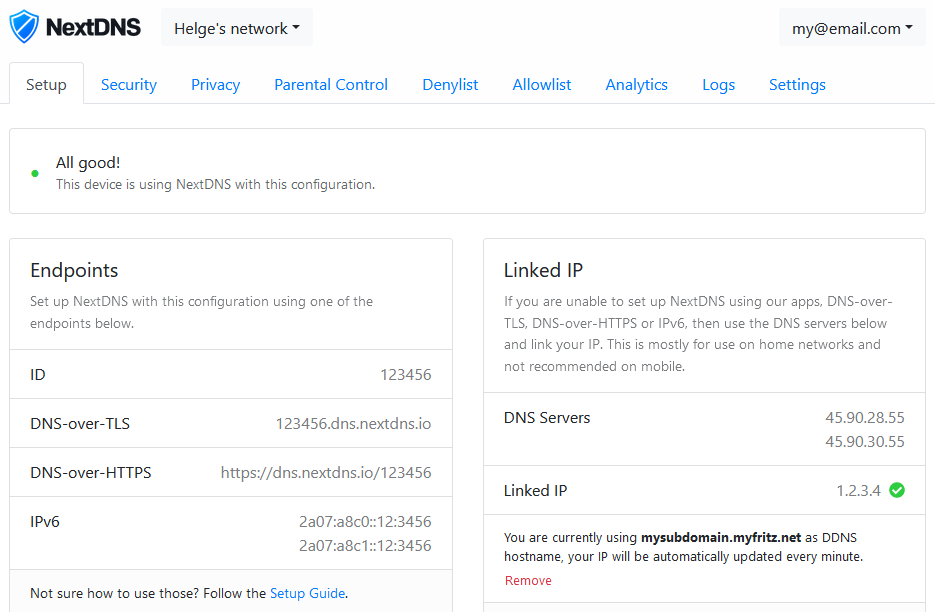
- DNSv4: enter the two DNS servers from the Linked IP section of the NextDNS dashboard
- DNSv6: enter the two DNS servers from the Endpoints section of the NextDNS dashboard
- Restart the Fritz!Box to clear its DNS resolver cache
The NextDNS dashboard should now look similar to the following:
Fritz!OS Versions & DNS over TLS (DoT)
The first version with support for DNS over TLS was 7.20.
Fritz!OS 7.25 comes with the following improvements (source):
- Optimized retry function for DNS over TLS (DoT)
- DNS over TLS (DoT) more robust for remote sites that are missing or do not respond
- DNS over TLS (DoT) more robust through less frequent latency measurement
Fritz!OS & DNS over HTTPS (DoH)
Fritz!OS does not support DNS over HTTPS (DoH).


24 Comments
Thanks Helge! Perfect timing, I was just looking for this, already configured in my home lab (unfortunately no DNS-over-TLS), going to test it out!
Thanks! I’m using Firefox and it was set to using Cloudflare for DNS over HTTPS. I went to Firefox’s settings and entered the custom DNS-over-HTTPS endpoint in the connection settings.
Hi, you forgot to remove your personal NextDNS details from the ipv6 dns server. The last numbers of the ipv6 are your ID (in this case de27fa). You might want to change that.
With best regards
Felix
Thanks, Felix. I did indeed forget to remove my ID there. Unfortunately, there does not seem to be a way to change the ID, so I had to set up a new configuration, port my settings over and recreate the screenshot. I hope I did not miss anything this time.
No, you didn’t forget anything. I just wanted to inform you about this possible security incident, just for the safety of you and the people on your network.
Take care. Btw, nice blog. Glad I discovered it. Greetings from Wuppertal!
Thanks Helge, nice work. I followed your instructions and they helped a great deal (using netgear not MyFritz). Took and little while to get my head rounds the IPv4 and DDNS setup and why/how it was needed but got there and it works a treat.
Helge, nice tip! I’m sure you’ve noticed, FRITZ!OS: 07.21 now includes DNS over TLS support. Use “Router-XXXXXX.dns.nextdns.io” as the server name, replacing XXXXXX with your config ID.
Thanks, Mike. I only got Fritz!OS 7.20 yesterday from my cable provider. Updating the article right now to include instructions for DNS over TLS (DoT).
The other key point is it BLOCKS PROXIES and VPNS!
This is CRUCIAL
I like some other DNS services but they fail to block vpns and so, they are useless for the over 10 year olds.
Some DNS do it but they also block youtube into a safe mode, so the only other option here for flexibility is open dns – which i find kids stil lget to stuff via apps… this has lists you can add liek you would on a pihole or other local dns – i tried this but the kids moaned the dns queries were too slow.
the 300k query you’ll hit in days, but £1.70 is the price of a beer so its good value.
Be nice for someone to test nextdns vs opendns adult and vpn filters to compare
most still let a lot through but ive seen one webpage showing all vpns get blocked with opendns
This is a really useful post. I’m going to use it to setup my Fritzbox with NextDNS. Does this allow for device names to be logged? So I can see what my kids have been doing on the web?
Thanks for this instruction. It only works for me when I deactivate the fallback option. With fallback option turned on – browsing on iPhone fails few times per hour.
Anybody with same issues or a solution?
I’m assuming you’re using a Fritz!OS version prior to 7.25. I had similar issues with 7.20.
Yes, already using 7.26 on my 6591 Cable.
I found out that the issue has been caused by the MyFritz option that I used for DDNS in Next DNS.
I used a non-standard port for MyFritz – which you cannot enter in Next DNS. So after setting back MyFritz to the standard port, it works!
I have followed your instructions with No-IP and a Huawei 818 router. However, I am encountering an error- For security reasons, when adding a Dynamic DNS the IP address returned by the DDNS hostname should be the same as your current IP address. Do you have any advice? Thank you,
Ciprian
Hey, setup worked great for my network with FritzBox 7590. The only thing which isn’t working is that NextDns doesn’t show client names under protocols. So ads are filtered on my devices and also statistics are growing in NextDns but client names doesn’t show up. Any ideas why this isn’t working?
Best regards,
Lukas
Client names are not shown when you configure nextdns on your router. The router is the client itself. If you configure a profile for your mobile devices and use it pe on your smartphone and tablet it shows their name.
Thank you for the response. Definitely a good solution for the mobile devices but if it comes to network devices like smart speaker or something like this, it’s not the best as I only see the router as client in NextDns.
But isn’t a problem of NextDns.
Thanks for the Guide it helps a Lot, got my 6591 running with nextDNS
This is a great manual, thank you.
A question: when I enter the DDNS hostname in nextDNS – the one I get from the MyFritz!-Konto, I receive: “Beim Abrufen der IP-Adresse hinter diesem Hostnamen ist ein Fehler aufgetreten.”
Do you know how I could solve this?
Btw: I am using FRITZ!OS 7.29 . For the Auflösungsnamen – do we use “xxxx.dns.nextdns.io” or “Router-XXXXXX.dns.nextdns.io”
Thank you,
Jan
Same error here. In a Reddit community I found people facing the same issue. Unfortunately there is no one having a solution for it.
Need to correct myself:
It was Apples iCloud Private Relay Service that made the error occure.
Turned it off and swoosh it did the trick!
Wow, many thanks for the clear description. I am using the services combined with my pihole (where I put as DNS IP Address the NextDNS server).
Works very fine!
Just coming accross this post & it looks promising. Since its a bit dated, I wonder if you still use / recommend this?