Building a Fast and Silent Workstation PC
This article describes how to build a fast workstation PC that is almost completely silent (actually the fastest possible in terms of single-thread performance). It is based on a PC build published by German c’t magazine.
Why Single-Thread Performance is (Nearly) the Only Thing That Matters
There are many ways to evaluate CPU performance, but it basically boils down to a simple question: am I interested in single-thread or multi-thread performance?
The latter obviously yields a higher number and many benchmarks focus on the aggregate performance of all the cores in the CPU combined. But in a single-user machine multi-thread performance only rarely matters. The vast majority of software uses but a single thread (aka CPU core) for any significant calculations. That means in practice: if you want things to be done quickly, you need a CPU that has a high single-thread performance.
Multi-thread performance, while probably overrated, is not unimportant. There are quite a few applications out there that do use multiple threads at least part of the time to speed things up.
With the above in mind, we can define our ideal CPU: the highest possible single-thread performance with good multi-thread performance. As it turns out, that CPU is currently Intel’s i7-8700K. No other x86 CPU matches its single-core speed, and with six cores total it is a more than decent multi-core contender, too.
Component Selection
Once I knew I wanted the i7-8700K I went to look for ways to run it at next to zero decibels. This is where c’t magazine comes in, probably the world’s only truly fantastic computer magazine left. c’t regularly publishes PC builds that focus on low noise emissions and energy efficiency. One of the best aspects of their builds is that they ignore unnecessarily complex techniques like water cooling or insulation, opting for noise reduction at the source instead. They basically put the fans in the right place of the chassis and test the hell out of the components to make sure none of them emit any unwanted noise.
Based on their suggestions I assembled the following components for my workstation PC build:
- CPU:
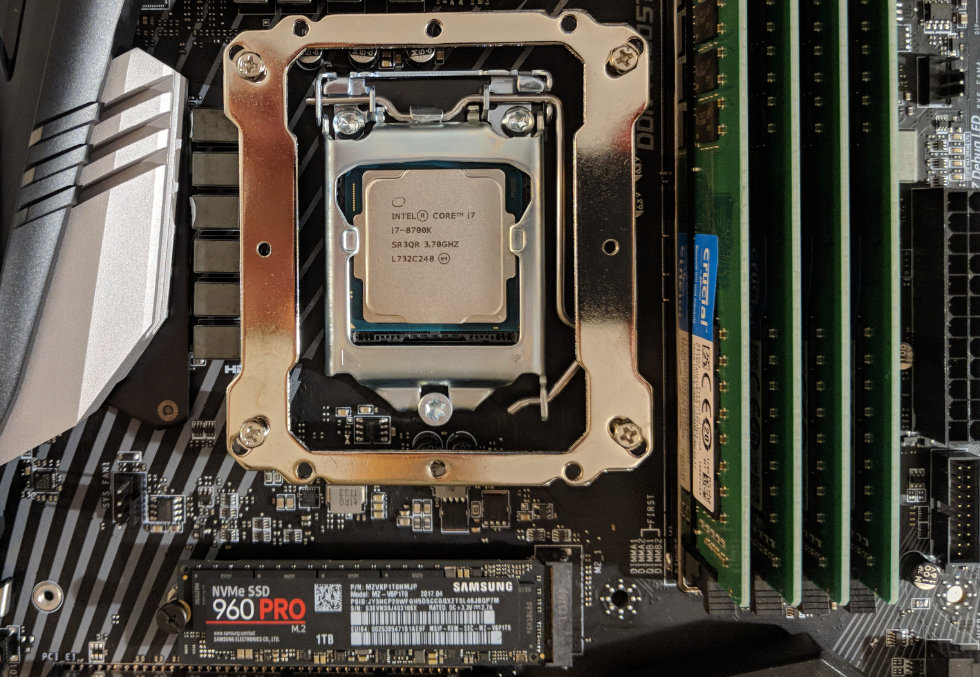
- Intel i7-8700K
- Mainboard:
- MSI Z370 Gaming Pro Carbon (today I would use the Fujitsu D3643-H instead, see below)
- RAM:
- 4 x Crucial DDR4 16 GB PC4-19200 non-ECC (64 GB in total)
- SSD 1:
- Samsung SSD 960 Pro M.2
- SSD 2:
- Samsung SSD 850 Pro (data disk from my previous machine)
- CPU cooler:
- Thermalright Macho Rev.B
- Power supply:
- be quiet! Pure Power 10 400 Watt
- Case:
- be quiet! Pure Base 600
- GPU:
- MSI GeForce GTX 1060 Gaming X 6G 6GB
A “gaming” mainboard would not have been my natural choice. Neither do I really need a dedicated GPU. Unfortunately, none of the currently available mainboards for Intel’s 8th generation (Coffee Lake) CPUs are equipped with two DisplayPorts. As we will see below, this choice of mainboard and GPU negatively affects power consumption.
Update 2018-08-24: with the Fujitsu D3643-H there is now a board available that offers two version 1.2 DisplayPorts (up to 4K resolution at 60 Hz). As with most Fujitsu mainboards, the D3643-H is optimized for low power consumption and high reliability.
Wi-Fi and Bluetooth
If you need Wi-Fi and Bluetooth, I can recommend the Asus PCIe network adapter AC2100 (PCE-AC58BT). It works out of the box without the need to install anything from the CD (!) I found in the box. Just connect the external antenna (excellent signal strength!) and the internal USB cable (required for Bluetooth).
If you need Bluetooth only (without Wi-Fi), take a look at the Hama Bluetooth USB adapter 4.0 + EDR.
Assembling the Components
The actual build is pretty straightforward. However, you should move the front fan (which is basically useless where it is located) to the back of the case’s top, so that the heat is blown out to the top as well as to the back (by the second preinstalled fan). The case’s top plastic cover can easily be shortened with a saw so that it does not cover the new top-blowing fan.
Here is a view from an intermediate stage before the mainboard was put in the case:
BIOS Settings
First of all, update the BIOS to the latest version, then load the defaults. With that in place, configure the following settings:
- Settings > Advanced > Windows OS Configuration > Windows 8.1/10 WHQL Support: enabled
- Overclocking > Misc. > Enhanced Turbo: enabled (this is required for the CPU to reach the max. frequency of 4.7 GHz. Enabling this setting with the A.30 BIOS leads to blue screens when running Nikon Capture NX-D. That issue was still present in the A.60 BIOS but seems to be fixed in the A.70 BIOS)
- Overclocking > CPU Features > Intel C-State: enabled
- Overclocking > CPU Features > Package C-State Limit: C8
- Overclocking > CPU Features > C1E Support: enabled
- Hardware Monitor -> CPU 1: 40°/15%, 60°/30%, 70°/60%, 85°/100%
- Hardware Monitor -> System 1: 30°/4.08V, 60°/5.04V, 70°/7.08V, 85°/12V
- Hardware Monitor -> System 4: 30°/4.08V, 60°/5.04V, 70°/7.08V, 85°/12V
Power Consumption
A modern PC’s power consumption is highly volatile, changing many times per second depending on the workload. The most important value, however, is idle power consumption, because no matter how furiously you work, your machine will be idling a large part of the time.
There have been great improvements in idle power consumption in the past years. As an example, c’t published a build for an 11 Watt PC in December 2016. This i7-8700K build, unfortunately, is not as efficient. The best I observed is a little more than 36 Watts. The typical idle power consumption is around 40 Watts.
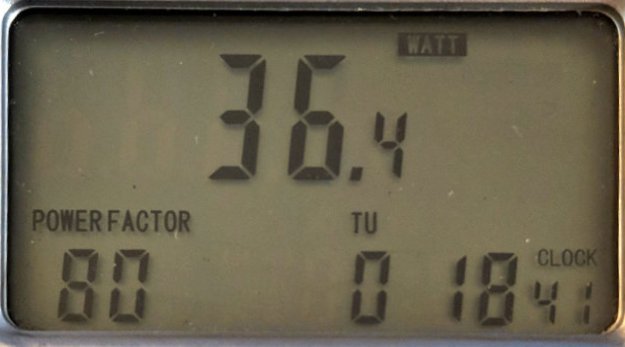
I blame Intel’s Z370 chipset, the only chipset currently available for Intel’s 8th generation (Coffee Lake) CPUs. According to other people’s measurements, the GPU consumes a bit less than 10 Watts when idle. Interestingly, it does not matter whether you connect one or two (4K) displays to the GPU. There is not even a significant change in power consumption if you connect a single display to the mainboard’s Intel graphics instead.
One caveat to be aware of: in sleep mode, the system consumes 12.6 Watts, which is about 12 Watts more than it should. This is the case even with the ErP Ready BIOS setting enabled, which is supposed to make the system conform to the EU’s environmental regulations. I worked around this inefficiency by configuring Windows to hibernate when the power button is pressed instead of sleeping. During hibernation, the system only consumes 0.2 Watts.
Noise Emissions / Silence
I do not have the equipment to measure noise emissions, but I can say that the machine is nearly completely silent. Only when there is no ambient noise at all can a very unobtrusive mid-frequency ventilator humming be heard. This does not even change during prolonged periods of high load.
CPU Performance
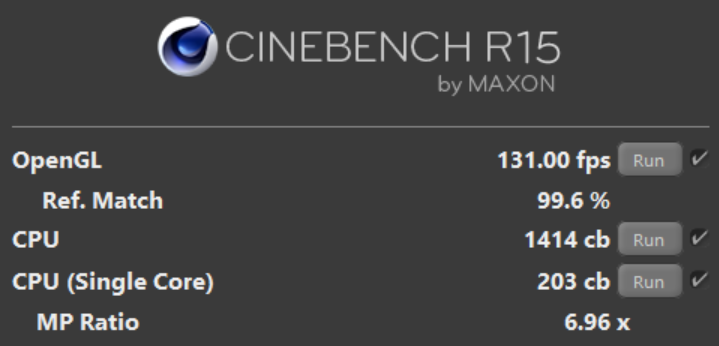
There are many different ways to measure CPU performance. I find Cinebench to be a useful indicator. It has both single-core and multi-core benchmarks. The single-core result of 203 is even slightly higher than expected. The multi-core result of 1414 is only surpassed by some of AMD’s Ryzen CPUs and by Intel’s expensive i9 processors.
Cinebench and Meltdown/Spectre
I had initially run Cinebench before any Meltdown/Spectre OS and firmware patches. Once the machine was fully patched and the BIOS firmware updated, and I had verified that the patches fully mitigated the threats, I ran Cinebench again. Encouragingly, the Meltdown/Spectre mitigation did not affect the Cinebench performance at all. The multi-core benchmark result was even 3% higher.


8 Comments
How about water cooling? Wouldn’t be a good choice for a silent workstation? It’s a little bit on the expensive side of things but I would say that it’s worth it.
The problem with water cooling is the noise of the pump.Probably better to get a CPU cooler with quiet fans or even a passive heat spreader.
Hi,
Very interesting article.
I am about to have built a super fast computer capable of processing
complicated Excel formulas involving in excess of a million rows
and as many as 50 columns wide.
Your comments about single thread versus multi thread peaked my attention
as I am considering buying an Intel i9 7940X 14 core CPU.
I would greatly appreciate your expert views
Thank You
Ian
A very helpful article, thank you!
Do you have any more low-energy mainboard recommendations? Information on the web seems really scarce on this. I live off the grid (completely solar-powered) and want to replace the Macbook with a powerful workstation with, of course, as small an energy footprint as possible.
I’ve been told the Fujitsu D3643-H isn’t on the market yet (coming January ’19 the earliest). I’ve looked into MSI’s eco line which looks promising, but the latest model is already several years old and not powerful enough for what I need.
hi, die instabilitäten resultieren aus der bios-einstellung “Overclocking > Misc. > Enhanced Turbo”, die NICHT benötigt wird, um den maximalen turbo-takt zu erreichen.
That is unfortunately not correct. Only when “Enhanced Turbo” is enabled does the CPU reach 4.7 GHz. If it is set to “Auto”, the CPU never reaches more than 4.5 GHz. With “Auto”, most of the time the maximum is at 4.3 or 4.4 GHz. I am quoting frequency values as shown in Windows Task Manager and Intel Power Gadget.
Cinebench R15 single core values:
Enhanced Turbo = Auto: 189
Enhanced Turbo = Enabled: 201
The minimum frequency is 0.8 GHz independent of the “Enhanced Turbo” setting.
full discussion: https://www.heise.de/forum/p-33593763/
This is a great explanation of CPU performance and the importance of single-thread vs. multi-thread performance! I hadn’t realized how often software relies on a single thread for performance, so focusing on high single-core speeds makes a lot of sense. The Intel i7-8700K sounds like a solid choice, balancing both single-thread and multi-thread performance. It’s interesting to see how specific workloads can change the way we choose a processor. Thanks for breaking it down so clearly!