USMT and Beyond – Practical Tips for Your Migration
This article is part of Helge’s Profile Toolkit, a set of posts explaining the knowledge and tools required to tame Windows user profiles.
This article presents a collection of tips and tricks around user state migration with and without Microsoft’s USMT. I originally compiled this material for my presentation at the 2010 TechDay Online.
Why User State Migration
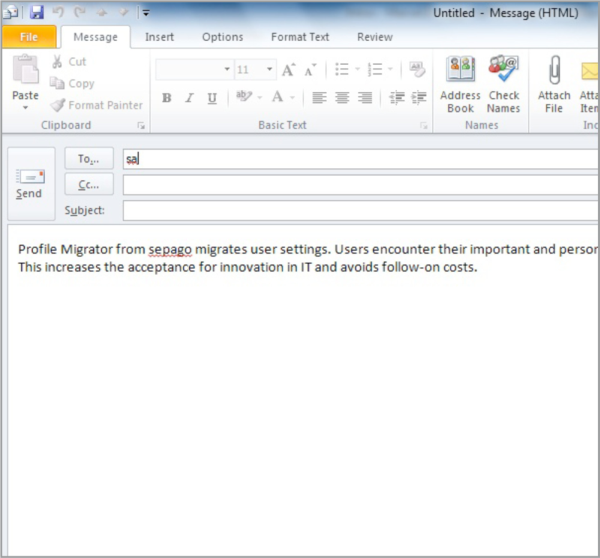
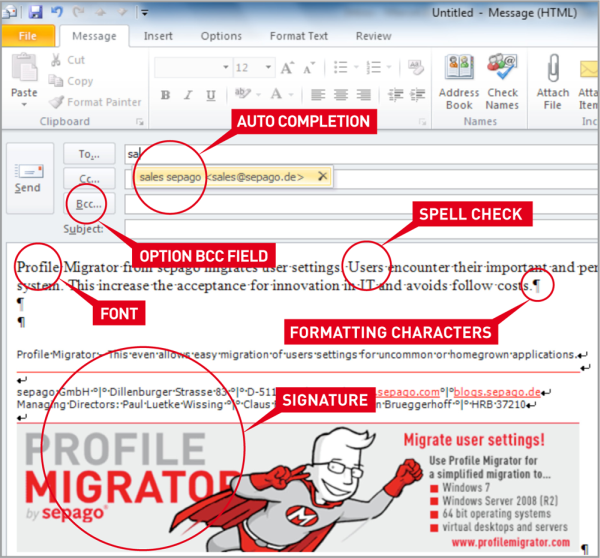
To give you an idea why user state migration might be relevant compare the following two screenshots taken from Outlook 2010.
Without migrated settings the window looks bleak and impersonal:
With migrated settings a comfortable shiver runs down your spine:
Now that everybody is convinced that user state migration is the greatest thing since sliced bread let us move on and see how to actually do it.
User State Migration Tool (USMT)
Microsoft offers the free USMT, a suite of command-line tools for the migration of user data and user settings mainly from XP to Windows 7. USMT not only supports the OS transition but can also upgrade application configurations, notably from Office 2003 to 2007.
There are, however, several limitations: the current version 4.0 neither supports Office XP nor Office 2010. It only works on client versions of Windows, making it useless for Terminal aka Remote Desktop Services or Citrix XenApp. And finally, it can only migrate settings for a very limited number of applications. That by itself is not astonishing given the fact that every migration product needs to have knowledge about an application in order to migrate its configuration. USMT uses XML files to store that application knowledge, not an unusual choice. USMT even lets the administrator create his own XML migration rules, which is actually pretty neat. The problem is that creating these rules is so damn hard (unless you consider manual XML editing a fun experience). See below for an alternative to USMT.
How USMT Works
USMT consists of two main tools, Scanstate.exe and Loadstate.exe. The principle is simple: Scanstate backs up data from the old computer while Loadstate restores it on the new PC. USMT does not care much where intermediate storage is located, it can use a local disk or a file server. Migration rules that tell USMT what to backup/restore and how to do that are stored in XML files that are passed to Scanstate and Loadstate along with other parameters on the command line.
Scanstate and Loadstate
Scanstate and Loadstate are command-line tools – and they need elevated rights. Forgetting that is a common cause of grief among their users.
Scanstate can be used from Windows PE to extract data from an operating system sitting offline on a computer’s hard disk. Loadstate cannot – it must be run on the target OS (typically on Windows 7).
In case of an offline migration, remember to set an environment variable if the bitness of Scanstate differs from the bitness of the source OS:
MIG_OFFLINE_PLATFORM_ARCH={32|64}USMT comes both in 32-bit and 64-bit versions. USMT 64 can perform a scanstate both of a 32-bit and a 64-bit Windows and vice versa.
You might want to preview the list of files to be migrated. Try the switch /genmigxml (works only if you are using MigDocs.xml as it only includes the result from the GenerateDocPatterns function):
Scanstate /genmigxml:Datei.xmlUser and Profile Selection
By default USMT migrates all user profiles it finds on a machine. Often, that is not desired.
To migrate only a single user’s profile excluding all others:
/UI:computer_name\user_name /UE:*\*An alternative approach makes use of the fact that USMT migrates every profile by default but instructs it to ignore profiles from users who have not logged on for a certain number of days:
/UEL:number_of_daysStill one might want to additionally exclude the administrator’s profile. That could be achieved with the switch /UE (User Exclude), but unfortunately /UEL and /UE should not be used together.
Recommendation: Use /UEL with Scanstate to back up every profile used in the past x days, then use /UE with Loadstate to restore what was backed up with the exclusion of certain named profiles:
Scanstate /UEL:30
Loadstate /UE:*\administrator /UE:*\SupportAccount
Outlook Migration
Migration of OST files is not supported by Microsoft. OST files are cache files that are recreated on the target machine.
PST files referenced in the MAPI profile are migrated automatically by default. But PST files not currently used, e.g. archive files, are left behind if there is no custom rule including them. Here is a rule that scans for PST files on all fixed local drives:
<migration urlid="http://www.microsoft.com/migration/1.0/migxmlext/pst">
  <component type="Documents" context="System">
    <displayName>All PSTs from all fixed drives</displayName>
    <role role="Data">
      <rules>
        <include>
          <objectSet>
            <script>MigXmlHelper.GenerateDrivePatterns ("* [*.pst]", "Fixed")</script>
          </objectSet>
        </include>
      </rules>
    </role>
  </component>
</migration>
Above rule would restore PST files in the same location where it found them – which may or may not be desired on the target system. To restore the files below a common base directory modify the rule as follows:
<migration urlid="http://www.microsoft.com/migration/1.0/migxmlext/pst">
  <component type="Documents" context="System">
    <displayName>All PSTs from all fixed drives</displayName>
    <role role="Data">
      <rules>
        <include>
          <objectSet>
            <script>MigXmlHelper.GenerateDrivePatterns ("* [*.pst]", "Fixed")</script>
          </objectSet>
        </include>
        <!-- Change the selection pattern during restore -->
        <locationModify script="MigXmlHelper.Move('C:\PSTFiles')">
          <objectSet>
            <script>MigXmlHelper.GenerateDrivePatterns ("* [*.pst]", "Fixed")</script>
          </objectSet>
        </locationModify>
      </rules>
    </role>
  </component>
</migration>
Custom Migration Rules
As we have seen in the previous examples, USTM offers powerful capabilities in its XML dialect for the creation of custom migration rules. The only downside is the lack of a user-friendly editor that would shield the user from the ugly XML. Microsoft recommends to use a free version of Visual Studio for editing the XML, but that is not only overkill, it also does not save you from having to learn the complex XML dialect used by USMT.
Once you have created your own rule and stored it in an XML file of your choice, you need to include it in the migration by addding it to the command lines of Scanstate and Loadstate:
/I:File.xmlEach rule needs a unique name specified in the XML file with the tag “urlid” (the name does not need to be a URL):
<migration urlid="http://www.microsoft.com/migration/1.0/migxmlext/pst">
  <component type="Documents" context="System">
    <displayName>All PSTs from all fixed drives</displayName>
Rules are executed in one of three contexts:
- User: The rule is executed once per user profile. To be used for data stored in the profile.
- System: The rule is executed once per computer. To be used for data stored outside the profile.
- UserAndSystem: The rule is executed once per user profile and once per computer. Not to be used if at all possible.
Performance / Migration Speed
If you do not want the performance god’s wrath brought on your migration project adhere to these rules:
Select the correct context and avoid UserAndSystem because that causes the harddisk to be scanned multiple times for the same elements.
Use narrow rules – only include required folders in a search:
Very slow (searches all fixed local drives):
<script>MigXmlHelper.GenerateDrivePatterns ("* [*.doc]", "Fixed")</script>Somewhat better (searches the entire drive C:):
<pattern type="File">C:\* [*.doc]</pattern>Good (searches only in C:\Data):
<pattern type="File">C:\Data\* [*.doc]</pattern>Avoid overlapping rules, i.e. multiple rules that partly define the same things. Overlapping rules cause multiple searches (but only one migration operation).
Selecting OS Components to be Migrated
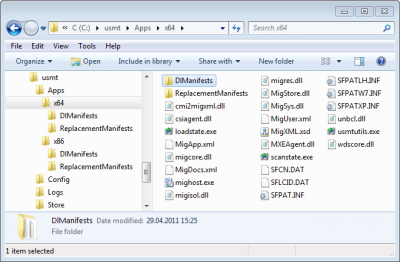
USMT migrates a large number of operating system settings by default (if it does not: make sure you did not forget to copy the folders DlManifests and ReplacementManifests). That, however, is not always desired. For example USMT migrates the theme which has the effect of replacing Aero with the “Classic Theme” on Windows 7. Who wants Windows 7 to look like XP?
To avoid that generate a configuration file on a reference XP system:
Scanstate /genconfig:config.xml /oThen open the generated file config.xml, locate the component “Microsoft-Windows-themeui-DL” and change migrate=”yes” to migrate=”no”. That line should now look like this:
<component displayname="Microsoft-Windows-themeui-DL" migrate="no" ID="http://www.microsoft.com/migration/1.0/migxmlext/cmi/microsoft-windows-themeui-dl/microsoft-windows-themeui-dl/settings"/>Tell Scanstate and Loadstate to use your modified config.xml by adding the following to their command lines:
/config:config.xmlMigration Between Domains
USMT can migrate settings between different user accounts in different domains or between a local and a domain account. If only the domain name changes but the user names stay the same:
loadstate /i:migapp.xml /i:miguser.xml \\fileserver\migration\mystore /progress:prog.log /l:load.log /md:OldDom:NewDomIf both domain and user names change:
loadstate /i:migapp.xml /i:miguser.xml \\fileserver\migration\mystore /progress:prog.log /l:load.log /mu:OldDom\OldUser:NewDom\NewUserPlease note that the accounts must already have been created when Loadstate is run or it will fail with error 71.
EFS-Encrypted Files
USMT migrates all user certificates including EFS certificates (computer certificates do not work, though), but encrypted files are another matter altogether.
By default, Scanstate fails as soon it encounters an EFS-encrypted file and nothing gets migrated. In order to skip encrypted files add “/EFS:skip” to Scanstate’s command line.
USMT can migrate encrypted files by raw-copying the encryped files without ever decrypting them. Specify “/EFS:copyraw” and make sure the users can decrypt the files on the target computer.
Attention: When using “/EFS:copyraw” unencrypted files in a folder with the encrypted attribute set are copied unencrypted to the migration store, but they are encrypted when they are copied to the target system. That by itself is not bad, but the fact that Loadstate cannot use a user’s certificate for encryption is. Because it means that Windows transparently creates a new EFS certificate for the migration user running Loadstate and encrypts the file with that key. As a consequence your users will not be able to decrypt the file!
Logging
Scanstate and Loadstate can both write log files. To enable verbose logging add the following parameters to their command lines:
/l:"path to scanstate or loadstate log file" /v:13If you want to troubleshoot migration rule processing, you need to enable diagnostic logging by setting the environment variable MIG_ENABLE_DIAG to the path of the diag log file. Example:
set MIG_ENABLE_DIAG=diaglog.xmlAlternatives to USMT
Need more than USMT can offer? Favor an easy to use graphical user interface? Have a look at Profile Migrator!
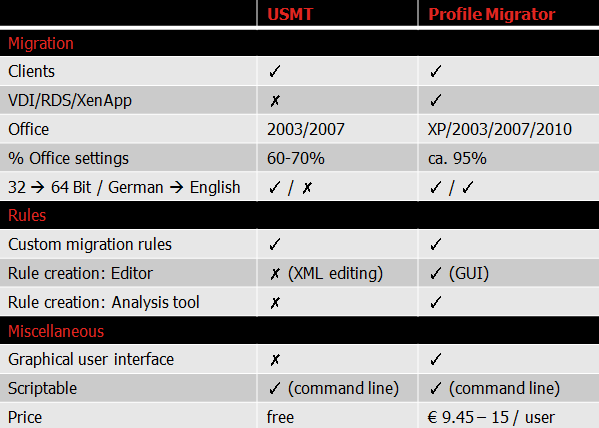
The following table shows the main differences between USMT 4.0 and Profile Migrator 1.1:




3 Comments
Hi!
I am using, together with migdocs xml, the pst.xml presented in section “Outlook Migration” and I’m experiencing an issue with the folder acl.
The folder containing the .pst files after the migration is losing the acl, “authenticated users” are added to the list of users with permissions on the folder and everybody can access it.
Do you know what is causing this behaviour?
Great guide
Please check out Customized and updated XML files for USMT10, free to download, over at http://ehlertech.com/#XMLs
They solve all the issues with Office, mail, Firefox and Chrome favorites (provided Firefox and Chrome are the same version on both PC’s)
Is there to estimate differential snapshot size give a base snapshot exists on the machine?