Syncthing: Continuous File Synchronization Between Personal Devices
- Home Automation, Networking & Self-Hosting
- Published Feb 16, 2025
This article explains how to set up Syncthing in a Docker container and configure synchronization with peers on Windows PCs. This post is part of my series on home automation, networking & self-hosting that shows how to install, configure, and run a home server with dockerized or virtualized services.
What is Syncthing?
Syncthing is a free and open-source software that synchronizes files and folders in a mesh of loosely connected devices. Syncthing runs in the background, continuously syncing modified files to peers as soon as they’re reachable over the local network or even the internet.
How Syncthing Complements Samba
Syncthing keeps my config files synchronized across my devices. Samba is for everything else.
I’m using Syncthing in addition to my Samba file server as it serves a different purpose. Whereas keeping most of my files on a central file server works great, some data needs to be available locally on my machines at all times, even when they’re offline or not connected to my home network. This primarily applies to configuration files but also to the SSH keys for accessing my home server.
Syncthing Installation (Docker)
Installing Syncthing via its Docker image is straightforward. Things to note:
- We’re using the linuxserver.io image as those are typically well-maintained. Also, there is no official Syncthing Docker image.
- We’re storing the synchronized data independent of our Samba file server. This is because we set Samba up for Windows clients only. Files created on Linux lack required extended attributes (as can be inspected with
getfattr).
Preparation
I’m assuming that you’ve set up Docker as described in the previous articles in this series.
Dockerized Syncthing Directory Structure
This is what the directory structure will look like when we’re done:
rpool/
 └── encrypted/
     └── docker/
         └── syncthing/
             ├── config/
             ├── data/
             └── docker-compose.yml
We’re placing the configuration on the encrypted ZFS dataset (rpool/encrypted).
Create the new directories. Set ownership of UniFi directories to user/group ID 1000, which are used by the dockerized application.
mkdir -p /rpool/encrypted/docker/syncthing/config
mkdir -p /rpool/encrypted/docker/syncthing/data
chown -Rfv 1000:1000 /rpool/encrypted/docker/syncthing/config
chown -Rfv 1000:1000 /rpool/encrypted/docker/syncthing/data
Syncthing Docker Compose File
Create docker-compose.yml with the following content:
services:

  syncthing:
    container_name: syncthing
    hostname: syncthing
    image: lscr.io/linuxserver/syncthing:latest
    restart: unless-stopped
    networks:
      - caddy_caddynet
      - frontend
    expose:
      - 8384:8384             # Web UI (access only via the Caddy container)
    ports:
      - 22000:22000/tcp       # TCP-based sync protocol traffic
      - 22000:22000/udp       # QUIC-based sync protocol traffic
      - 21027:21027/udp       # Discovery broadcasts (IPv4) and multicasts (IPv6)
    environment:
      - PUID=1000
      - PGID=1000
    volumes:
      - /etc/localtime:/etc/localtime:ro
      - ./config:/config
      - ./data:/data1

networks:
  caddy_caddynet:
    external: true
  frontend:
    driver: bridge
Start the Syncthing Container
Navigate into the directory with docker-compose.yml and run:
docker compose up -d
Inspect the container logs for errors with the command docker compose logs --tail 30 --timestamps.
Let’s Encrypt Certificate for Syncthing via Caddy
Caddyfile
Add the following to Caddyfile (details):
sync.{$MY_DOMAIN} {
	reverse_proxy syncthing:8384
	tls {
		dns cloudflare {env.CLOUDFLARE_API_TOKEN}
	}
}
DNS A Record
Add the following A record to your DNS domain:
sync.home.yourdomain.com 192.168.0.4 # replace with your Docker host's IP address
Try to resolve the name on a machine in your network (e.g., nslookup files.home.yourdomain.com).
Reload Caddy’s Configuration
Instruct Caddy to reload its configuration by running:
docker exec -w /etc/caddy caddy caddy reload
You should now be able to access the Syncthing web interface at https://sync.home.yourdomain.com without getting a certificate warning from your browser.
Initial Syncthing Configuration (Docker)
Set a GUI Password
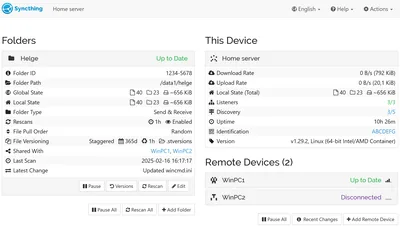
In the Docker container’s web UI, navigate to Actions > Settings > GUI and specify a user name and password.
Device Name
In the Docker container’s web UI, navigate to Actions > Settings > General and specify your Docker host’s computername as device name.
Delete Default Folder
Syncthing creates a shared folder called Default Folder in the config directory. Remove it by clicking Edit > Remove.
Windows Sync Peer Installation
The Syncthing project doesn’t provide an installer. I’m using Syncthing Windows Setup to install Syncthing on my Windows machines. It takes care of all the things you’d expect from a decent installer and configures Syncthing to run as a system service (if installed for all users).
Installation per Machine (for All Users)
To install Syncthing for all users (per machine), specify the /allusers command line parameter.
Firewall Rules
If installed for all users, Syncthing Windows Setup creates a firewall rule automatically to allow inbound connections to all ports opened by the Syncthing executable.
The web UI is not accessible over the network by default because it’s bound to 127.0.0.1 (localhost).
File System Permissions
Following the principle of least privilege, Syncthing Windows Setup does not run the Syncthing service as the all-powerful local system account. Users, therefore, need to make sure SyncthingServiceAcct has change permissions on the folders they want to synchronize. Granting the required permissions can be done with the following command (docs):
icacls "D:\Syncfolder" /grant "SyncthingServiceAcct:(OI)(CI)M" /t
GUI for Syncthing
As an alternative to Syncthing’s web UI (accessed from a browser at http://localhost:8384) you may want to take a look at Syncthing Tray.
Initial Syncthing Configuration (Windows)
Set a GUI Password
In the Windows Syncthing web UI, navigate to Actions > Settings > GUI and specify a user name and password.
Create a Sync Folder
Create a local sync folder. I’m using D:\Sync\USERNAME.
In the Windows Syncthing web UI, click Add Folder and specify the following properties:
- Folder label: choose a descriptive label for the data you’re planning to store
- Folder path:
D:\Sync\USERNAME - File versioning: select
Staggered file versioning
Windows Instance: Connect to the Docker Instance
All that’s left to do is connect the two Syncthing instances.
In the Windows Syncthing web UI, click Add Remote Device and specify the following properties:
- Device ID: copy and paste the ID from the Docker instance
- Introducer: checked
- Unshared Folders: check your folder named
USERNAME - Advanced > Addresses:
quic://sync.home.yourdomain.com:22000
Docker Instance: Accept the Connection
In the Docker Syncthing web UI:
- Accept the connection from the Windows machine.
- Add the folder shared by the Windows machine:
- Folder Path:
/data1/USERNAME - File versioning: select
Staggered file versioning
- Folder Path:
Syncthing Backup
The synchronized data is automatically included in the restic backup of my home server (the Docker host).


Comments