Emby: Dockerized Media Server With Automatic HTTPS
- Home Automation, Networking & Self-Hosting
- Published Mar 1, 2025
This article explains how to set up Emby in a Docker container with automatic HTTPS via Caddy. This post is part of my series on home automation, networking & self-hosting that shows how to install, configure, and run a home server & network with dockerized or virtualized services.
About Emby
What is Emby?
Emby is a media server that presents your videos and other media files in a modern UI from which you can consume movies and music on almost any device (including TVs, mobile devices, and browsers). Emby is broadly comparable to Plex and Kodi.
Emby Installation
Preparation
I’m assuming that you’ve set up Docker and the Caddy container as described in the previous articles in this series.
Media Access: SMB File Share
We’re not storing the media files on the Docker machine on which Emby is running. Instead, all media files are hosted on a NAS device and accessed via SMB.
User Account for Media Access via SMB
Create a user account on the NAS with write access to your media folder. Write access is required for Emby to store metadata and images along the media files.
Mounting the Media SMB File Share on the Docker Host
Emby (sensibly) doesn’t come with its own SMB protocol stack. Instead, it relies on SMB shares being mounted on the Docker host. We’re placing all the necessary configuration in the Docker Compose file so that Docker takes care of mounting the share.
Please note that because of the dependency on the SMB share, the Emby container cannot be started if the share is unavailable.
Dockerized Emby Directory Structure
This is what the directory structure will look like when we’re done:
rpool/
 └── encrypted/
     └── docker/
         └── emby/
             ├── config/
                 └── metadata
             ├── .env
             ├── container-vars.env
             └── docker-compose.yml
We’re placing the configuration on the encrypted ZFS dataset (rpool/encrypted).
Create the new directories and set ownership of the directories to user/group ID 1000, which are used by the dockerized application. Please note the explicit creation of the metadata subdirectory. Emby should be able to create it on its own, but it doesn’t.
mkdir -p /rpool/encrypted/docker/emby/config
mkdir -p /rpool/encrypted/docker/emby/config/metadata
chown -Rfv 1000:1000 /rpool/encrypted/docker/emby/config
Emby Docker Compose File
We’re using the official Emby Docker image. Create docker-compose.yml with the following content:
services:

  emby:
    container_name: emby
    hostname: emby
    image: emby/embyserver:latest
    restart: unless-stopped
    networks:
      - caddy_caddynet     # frontend communications
    ports:
      - 8096:8096          # web UI (HTTP)
    env_file:
      - container-vars.env
    volumes:
      - /etc/localtime:/etc/localtime:ro
      - ./config:/config
      - emby_media:/mnt/emby_media
    devices:
      - /dev/dri:/dev/dri  # Intel/AMD GPU hardware acceeleration (VAAPI)

networks:
  caddy_caddynet:
    external: true

volumes:
  emby_media:
    driver: local
    driver_opts:
      type: cifs
      device: ${NAS_UNC_PATH}
      o: username=${NAS_USERNAME},password=${NAS_PASSWORD},vers=3.0,sec=ntlmsspi,uid=1000,gid=1000
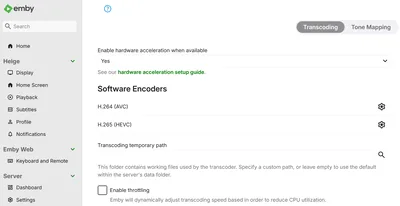
Hardware Acceleration Device GID
To make GPU hardware acceleration available for transcoding in the Emby Docker container, we need to pass the device /dev/dri into the container. In addition to that, we need to make sure the container has access to the device by passing the device GID as an environment variable.
Determine the GID of the (Intel/AMD) GPU with the following command:
# Returns 103 for my Intel GPU
stat -c %g /dev/dri/renderD128
Docker Compose .env file
Environment variables for use in the Docker Compose YAML file need to be specified via a file called .env. Create it with the following content:
# Path to and credentials for media SMB share (read+write access needed)
NAS_UNC_PATH=//your_server/folder
NAS_USERNAME=YOUR_USERNAME
NAS_PASSWORD=YOUR_PASSWORD
Emby container-vars.env File
Create container-vars.env with the following content:
UID=1000       # The UID to run Emby as
GID=1000       # The GID to run Emby as
GIDLIST=103    # Additional GIDs (to provide access to the Docker host's GPU)
Fill in the proper values for the SMB server or NAS where your media files are stored.
Start the Emby Container
Navigate into the directory with docker-compose.yml and run:
docker compose up -d
Inspect the container logs for errors with the command docker compose logs --tail 30 --timestamps.
Let’s Encrypt Certificate for Emby via Caddy
Caddyfile
Add the following to Caddyfile (details):
emby.{$MY_DOMAIN} {
	reverse_proxy emby:8096 {
	}
	tls {
		dns cloudflare {env.CLOUDFLARE_API_TOKEN}
	}
}
DNS A Record
Add the following A record to your DNS domain (details):
emby.home.yourdomain.com 192.168.0.4 # replace with your Docker host's IP address
Try to resolve the name on a machine in your network (e.g., nslookup emby.home.yourdomain.com).
Reload Caddy’s Configuration
Instruct Caddy to reload its configuration by running:
docker exec -w /etc/caddy caddy caddy reload
You should now be able to access the Emby web interface at https://emby.home.yourdomain.com without getting a certificate warning from your browser.
Initial Emby Configuration
Quick Start Guide
- When you access Emby’s web UI for the first time, you’re greeted by a quick start guide.
- Specify a user name and password (SSO via OIDC is not supported, unfortunately).
- Don’t specify media folders just yet.
- Disable automatic port mapping.
Emby Server Settings
Navigate to server settings:
- Sign in with your new Emby user account.
- Click the gear icon in the upper right corner to get to the server setttings.
Navigate to Server > Settings > Automatic Updates:
- Allow the server to restart automatically to apply plugin updates: disable
Navigate to Server:
- Emby Premiere: add your paid Emby Premiere license key if you purchased Emby
Navigate to Library > Advanced:
- Enable external content in suggestions: disable
- Certification country: choose your country
Emby User Settings
Navigate to your user settings by clicking the gear icon in the upper right corner. The user settings are upper area of the menu. Navigate to Playback > Advanced:
- Play next episode automatically: disable
- Enable ‘Are You Still Watching?’ prompt: disable
Navigate to Subtitles:
- Preferred subtitled language: choose the languages that work for you
Navigate to Profile:
- Upload new image: upload a profile image
Media Library
Note: The media library has been mounted via SMB on the Docker host and is available in the container at /mnt/emby_media.
Add a Media Library
Navigate to Server > Library and select New Library:
- Show advanced settings: enable
- Content type: select what’s appropriate, e.g.,
Movies - Display name: choose how you want the library to be named within Emby
Select Folders > Add:
- Folder: select
/mnt/emby_mediaor a subfolder of it
Library Settings:
Configure the library according to your content and your preferences.


Comments