Windows 8 Client Hyper-V: Internet Access Without 2nd NIC
Having a hypervisor built right into the client operating system is a great thing, especially if it is as fast and stable as Client Hyper-V found in Windows 8. The functionality is very good, too, but a single feature is sorely missing: the ability to share the host’s (internet) network connection.
Hyper-V Networking
Hyper-V networking is OK as it is, but it lacks VMware Workstation’s NAT feature. To recap, Hyper-V virtual switches come in the following three flavors:
- External: VMs have physical network connectivity only
- Internal: VMs are not connected to the physical network but can talk to each other and the host
- Private: VMs are not connected to the physical network. They can talk to each other but not to the host
In a typical lab scenario you want the VMs to be able to talk to each other. You also want to access them from your host. Therefore you need a virtual NIC in each VM that is connected to a virtual switch of type internal. However, with this setup your VMs have no internet access. This can significantly slow down installations and it obviously makes updating and many other tasks unnecessarily difficult.
Internet Access for Your VMs
There are a variety of options for connecting your VMs to the internet.
Second Network Card
The most obvious solution is to add a second NIC to each VM and connect that NIC to a virtual switch of type external.
I do not like this approach very much, though. It adds complexity and makes name resolution much more difficult. But perhaps the most serious caveat is that you need to specify which physical NIC the virtual switch is connected to. If you are using Client Hyper-V on a laptop then you probably sometimes connect via Wi-Fi and sometimes via Ethernet (cable). Your external switch would only cover one of those two use cases. And you certainly would not consider adding two external-facing virtual switches, one bound to the Wi-Fi adapter and the other bound to the Ethernet card, would you?
Internet Connection Sharing (ICS)
A solution that is commonly recommended is to use Internet Connection Sharing (ICS), a kind of NAT service that has been part of Windows for a long time.
I have tried to use this for some time but found it to be very unstable and seriously impacting network throughput.
Proxy Server
Update: I used this for a while until I switched to the RRAS solution suggested by several commenters (details below). Although FreeProxy generally works well enough it did cause problems using VPNs through it: the VPN connection itself would typically be established, but accessing resources over the VPN would sometimes be very slow and at other times not work at all. For your reference I am leaving the original description of how to configure the proxy solution as it was, but I recommend the RRAS setup described below.
I have equipped a single VM (which is running all the time anyway) with a second NIC connected to an external virtual switch. The VM is running the free proxy server appropriately named FreeProxy.
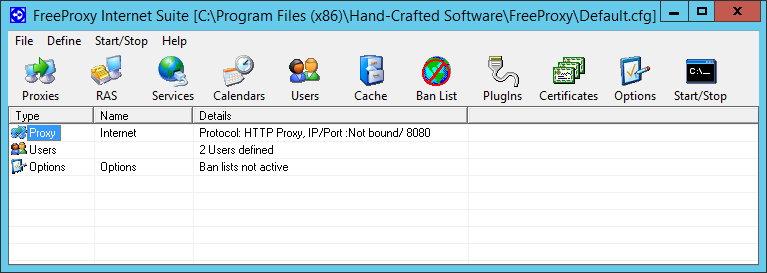
FreeProxy runs as a service and although it is rather old I had no problems getting it to work on Server 2012 R2. It is simple to configure, just make sure you run the configuration utility FreeProxy Control Centre with admin privileges.
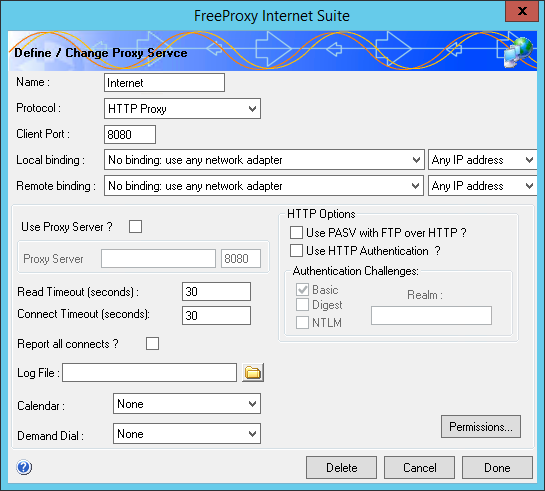
My configuration is as follows. Main UI:
Proxy configuration:
Of course you still need to configure your other VMs to use the proxy. An easy way to do that for Internet Explorer (and Windows Update) is via Group Policy Preferences if you have that available in your lab.
Windows Server Routing with NAT
I was not aware of the fact that Windows Server comes with a NAT component (thanks Thorsten, Dan and Jay for pointing it out in the comments section below). If you have at least one VM with a server version of Windows this is the solution to implement.
As with the proxy solution described above you need one VM with a second NIC connected to an external virtual switch. In order to be able to easily distinguish between the two NICs rename one to “Internal” and the other to “External”.
Setting up NAT is surprisingly simple if you know where to find it. This is how it works on Server 2012 R2:
- Bring up the Add Roles and Features Wizard in Server Manager
- Select the Remote Access role
- Select the Routing role service. A dialog comes up listing a handful of features that must also be installed for routing to work.
- Once the installation is finished click Open the Getting Started Wizard:
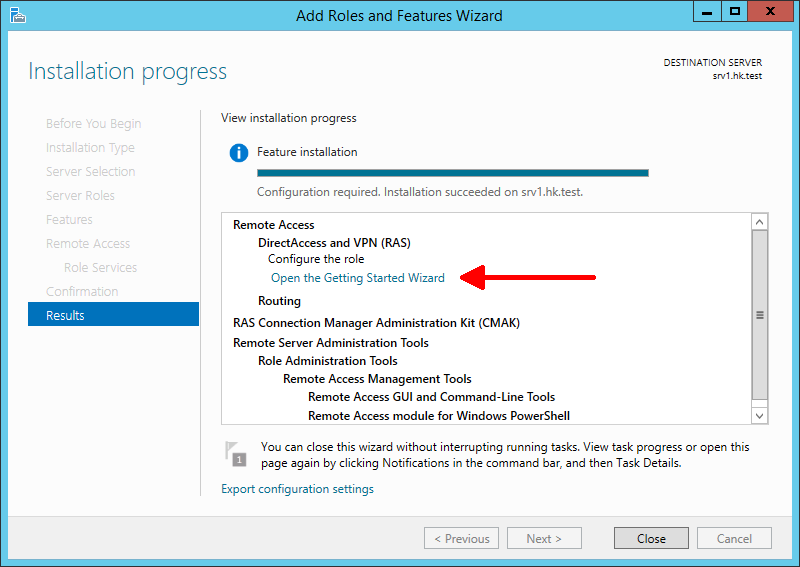
- Click Deploy VPN only. The Routing and Remote Access management console opens.
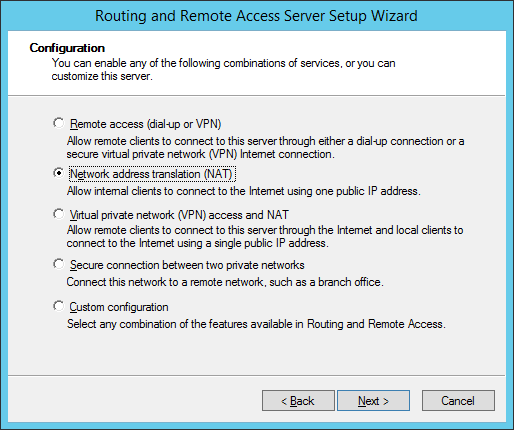
- Right-click your server and select Configure and Enable Routing and Remote Access:
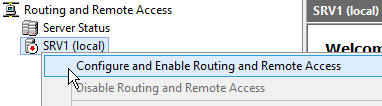
- Select Network Address Translation (NAT):
- Select the external (internet-facing) NIC:
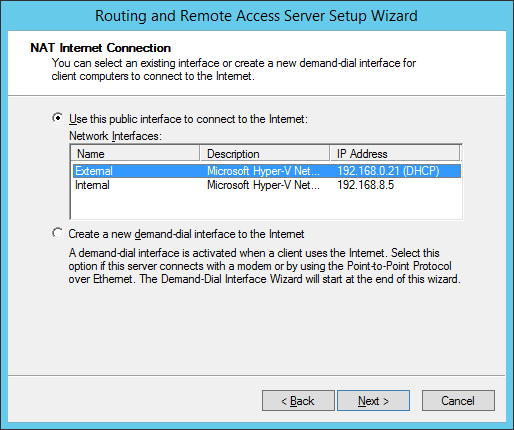
- You are done! Of course you need to point the default gateway on your other VMs to the IP address of the internal NIC of the NAT machine.
I am aware that this solution still requires one external virtual switch per network type (Wi-Fi and Ethernet). At least the external NICs are only needed for the VM that is running the proxy. I am currently using this with a single external switch connected to Ethernet.


4 Comments
I have a slightly different approach: I do not like to depend on 3rd party software (in this case FreeProxy) so I often use the good old “Routing and Remote Access” console. It is still part of Windows Server (current: 2012 R2) although a bit hidden. You got to install the “Remote Access” role, which is primarily meant to install Direct Access. Fastest way: “Install-Windowsfeature Routing -IncludeManagementTools”.
The user interface is ludicrous: ignore the new UI (related to Direct Access and VPN) and search for “Routing and RAS”. This MMC has not really changed since Windows 2000.
The downside of it: you need a server edition as VM. I did not have any stability problems with it. It allows you some tuning that ICS does not.
I’ve also done it by selecting NAT under routing and remote access on a server OS, although I haven’t tried it under Hyper-V. I will be building a new lab in Hyper-V next week though so will have a chance to try it then!
I completely agree with #Thorsten. I have used RRAS since the NT3.51 days(!). RRAS works great also for connecting the host via VPN to another private network, for allowing traffic between the VM and LAN devices to other private networks.
On the host, add NAT to RRAS, configure the internet (public) facing interface as “Public … connected to Internet”, configure the LAN (internal) interface as “Private … connected to private network”, done. Then point the gateway of all VM’s (and LAN machines, as RRAS was originally designed for) to the IP of the hosts’s LAN adapter, done. No fiddling with proxy settings on the VM’s.
And notably less resources (IMHO) than setting up a proxy server.
As noted, RRAS is only available on server editions. ICS is essentially RRAS light, without the GUI. It’s been quite a while, but I figured out that exporting registry settings from a similarily configured server, to an ICS workstation worked fairly well. If I recall correctly, the netsh command can also be used to export from RRAS and fully configure (import to?) ICS.
I recently built up a Hyper-V lab on my new machine and first tried out the ICS method. All went fine until I tried to join a machine to a domain, which failed as the built in dumbed-down DHCP/DNS services that are part of ICS could not be configured to use my own DNS server. So I ended up adding NAT to my DC and now all is working fine. I read some warnings about using multi-homed DCs, but this is just a home test environment and so far everything works.
However, I’ve just had to build a couple of clean VMs for packaging on Win8 Hyper-V on a customer site, where they are using an authenticating proxy, and the VMs I’m building are not connected to the domain. I couldn’t get them to connect to the internet to download Windows Updates etc. So I hooked them up to an Internal switch, enabled ICS, still no go… but then I added FreeProxy into the mix, bound to the virtual adapter and hey presto my VMs have internet access due to some nifty proxy tunnelling! Thanks for the tip.