Frigate: NVR With Object Detection on Raspberry Pi 5 & Coral TPU
- Home Automation, Networking & Self-Hosting
- Published May 24, 2025 Updated Jan 4, 2026
This article explains how to install and configure the Frigate NVR software on a Raspberry Pi 5 with a Coral Edge TPU.
Overview
What is Frigate?
Frigate is a free network video recorder (NVR) software. It collects your surveillance camera video streams (typically via RTSP), performs object detection and stores the resulting clips.
Local Object Detection With a Coral Edge TPU
One of the most important features of an NVR is object detection. You want to review relevant movement only (e.g., people), not leaves blowing in the wind. By offloading object detection to an inexpensive Coral Edge TPU, Frigate achieves excellent detection quality even on low-cost hardware like a Raspberry Pi. As a big plus, everything runs locally without uploading your video streams to the cloud.
Hardware Choices
I selected a Raspberry Pi 5 as the basis for my NVR. The OS goes on a 32 GB SD card while a 512 GB NVMe SSD provides reliable storage for the recordings.
Initially, I went for the PCIe version of the Coral Edge TPU but that turned out to be a bad idea. It requires a driver that doesn’t seem to be maintained anymore and causes errors when updating the OS. The USB version of the Coral Edge TPU is a much better choice. It doesn’t require any custom software on the OS. Everything that is needed is included in the Frigate Docker image.
Installing and Configuring Raspberry Pi OS
Raspberry Pi Imager
- Connect the SD card you want to use for the Raspberry Pi OS to your PC.
- Download, install, and run the Raspberry Pi Imager.
- Select your Pi model, the 64-bit Pi OS and your SD card. Click Next.
- The Use OS customization? dialog comes up.
- Click Edit settings and configure:
- General:
- Hostname:
nvr-int - Username and password: set according to your preference
- Configure wireless LAN: specify your WiFi’s SSID and password
- Set locale settings: set according to your preference
- Hostname:
- Services:
- Enable SSH: checked
- Allow public-key authentication only: selected. Paste your public key into the text box.
- Click Save to close the settings dialog.
- General:
- You’re back in the Use OS customization? dialog. Select yes.
- Let the imager write the OS image to the SD card.
First Boot
- Insert the SD card into the Raspberry’s slot.
- If you use a HAT for SSD storage, put it in place and connect it to the Raspberry Pi.
- Connect the Coral Edge TPU with the included cable to one of the (blue) USB 3.0 ports.
- Connect the power supply, powering on the Raspberry.
- The Raspberry Pi should now be connected to your WiFi network.
- Convert the dynamic DHCP address to static and configure a DNS record for name resolution.
Initial Configuration
Connect via SSH to the Raspberry using the key you specified earlier.
Update the OS:
sudo apt update && sudo apt dist-upgrade
Partition and format the NVMe SSD:
sudo fdisk /dev/nvme0n1
sudo mkfs.ext4 /dev/nvme0n1p1
Create a mount point and mount the NVMe SSD:
sudo mkdir /data
sudo mount /dev/nvme0n1p1 /data
Configure mounting the NVMe SSD into the /data directory at boot by editing /etc/fstab:
/dev/nvme0n1p1 /data ext4 defaults 0 2
Reboot and verify that the SSD is mounted by running lsblk.
Verify that the Coral Edge TPU USB device is connected correctly by running lsusb. The device should show up as Global Unichip Corp. as it’s still uninitialized. Once initialized by Frigate it’ll be listed as Google Inc (docs).
Note: Some guides recommend assigning more RAM to the GPU by adding gpu_mem=512 to /boot/firmware/config.txt. Due to the changed GPU memory allocation scheme of the Raspberry Pi 5, this is not only not necessary anymore, but the setting is completely ignored. The GPU memory as shown by vcgencmd get_mem gpu is always a fixed carveout of 4 MB.
Persistent Logging (Optional)
By default, systemd’s journal (accessed via the journalctl command) is only kept in memory and not written to disk. This makes troubleshooting in case of a crash very difficult as there are no logs from before the current boot.
To switch the logging from volatile to persistent edit /etc/systemd/journald.conf and make the following changes:
# Default (logging to memory)
[Journal]
Storage=volatile

# Alternative (logging to disk)
[Journal]
Storage=persistent
Note: Sensible defaults for retention and size limits are built into the logging system (docs).
Apply the changes by running:
sudo systemctl daemon-reexec
Reboot twice and verify that logs from previous boots are available:
sudo reboot
sudo reboot

journalctl --list-boots
Hardware and Software Watchdog
My Raspberry Pi is plagued by a weird issue that seems to be quite common: loss of Wi-Fi network connectivity after days or weeks of continuous operation. I’m not aware of a solution but there are effective workarounds: hardware and software watchdogs. I’m implementing the configuration described by Dries Buytaert. The following summarizes the changes. See Dries’ blog for details.
Hardware Watchdog
Edit /etc/systemd/system.conf and add:
RuntimeWatchdogSec=10s
ShutdownWatchdogSec=10min
Restart systemd to activate the watchdog:
sudo systemctl daemon-reexec
Once restarted, systemd starts “petting” the hardware watchdog timer. If it ever fails, the Raspberry Pi will reboot.
Software Watchdog
sudo apt update
sudo apt install watchdog
Edit /etc/watchdog.conf and add the following settings:
# Network monitoring
ping = IP_OF_YOUR_ROUTER
ping-count = 5

# Interface monitoring
interface = wlan0

# Basic settings
watchdog-device = none
retry-timeout = 180
realtime = yes
interval = 20
Enable and start the watchdog service:
sudo systemctl enable watchdog
sudo systemctl start watchdog
Installing Frigate
Installing Docker
Frigate comes as a Docker image, so we’ll first install and configure Docker according to my documentation here. Proceed only once Docker is installed.
Dockerized Frigate Directory Structure
This is what the directory structure will look like when we’re done:
data/
 └── docker/
     └── frigate/
         ├── config/
             └── config.yml
         ├── data/
         ├── container-vars.env
         └── docker-compose.yml
Create the new directories:
sudo mkdir -p /data/docker/frigate/config
sudo mkdir -p /data/docker/frigate/data
Frigate Docker Compose File
Create docker-compose.yml with the following content:
services:
  frigate:
    container_name: frigate
    image: ghcr.io/blakeblackshear/frigate:stable
    privileged: true
    restart: unless-stopped
    shm_size: "512mb"
    devices:
      - /dev/bus/usb:/dev/bus/usb
    volumes:
      - /etc/localtime:/etc/localtime:ro
      - /data/docker/frigate/config:/config
      - /data/docker/frigate/data:/media/frigate
      - type: tmpfs
        target: /tmp/cache
        tmpfs:
          size: 1000000000
    ports:
      - "8971:8971"        # WebGUI TLS self-signed cert
      - "8554:8554"        # RTSP feeds
Create Frigate’s config file config/config.yml with the following content:
mqtt:
  enabled: false

detectors:
  coral:
    type: edgetpu
    device: usb

cameras:
  # ADD CAMERA(S) HERE

record:
  enabled: true
  retain:
    days: 0
  alerts:
    retain:
      days: 30
      mode: motion
  detections:
    retain:
      days: 30
      mode: motion

tls:
  enabled: false     # Handled by Caddy

auth:
  enabled: false     # Handled by Caddy

proxy:
  default_role: admin
Note: The above config lacks the camera configuration as that depends on your camera hardware. See the docs for details.
Start the Frigate Container
Navigate into the directory with docker-compose.yml and run:
sudo docker compose up -d
Notes:
- Be patient! It’ll take a while until Frigate is fully initialized.
- When started for the first time, Frigate may have to initialize the Coral. You may have to stop and restart the container after initialization.
Inspect the container logs for errors with the command sudo docker compose logs --tail 100 --timestamps.
Expected Errors During Frigate Startup
[error] 177#177: *1 connect() failed (111: Connection refused) while connecting to upstream, client: 127.0.0.1, server: , request: "GET /api/version HTTP/1.1", subrequest: "/auth", upstream: "http://127.0.0.1:5001/auth", host: "127.0.0.1:5000"

[error] 177#177: *1 auth request unexpected status: 502 while sending to client, client: 127.0.0.1, server: , request: "GET /api/version HTTP/1.1", host: "127.0.0.1:5000"
Log Messages When Startup is Successful
INFO: Attempting to load TPU as usb
INFO: TPU found
INFO: Camera processor started for CAM_NAME
INFO: Capture process started for CAM_NAME
INFO: FastAPI started
Let’s Encrypt Certificate for Frigate via Caddy
Caddyfile
Add the following to Caddyfile (details):
nvr.{$MY_DOMAIN} {
	import auth
	reverse_proxy nvr-int.{$MY_DOMAIN}:8971
	tls {
		dns cloudflare {env.CLOUDFLARE_API_TOKEN}
	}
}
Note: the definition of the auth snippet can be found here.
DNS A Records
Add the following A records to your DNS domain (details):
nvr.home.yourdomain.com 192.168.0.4 # replace with your Docker host's IP address
Try to resolve the name on a machine in your network (e.g., nslookup nvr.home.yourdomain.com).
Reload Caddy’s Configuration
Instruct Caddy to reload its configuration by running:
docker exec -w /etc/caddy caddy caddy reload
You should now be able to access Frigate at https://nvr.home.yourdomain.com without getting a certificate warning from your browser.
Frigate: Verification & Initial Configuration
Verifying Your Installation from the Web UI
If you configured your cameras correctly, you should see a thumbnail live view of each camera feed on the homepage.
Verify that the UI shows System is healthy in the lower-right corner.
Navigate the Settings > System logs. There should be no errors and only the following warning: Did not detect hwaccel, using a GPU for accelerated video decoding is highly recommended. Currently, there doesn’t seem to be hardware acceleration for the GPU of the Raspberry Pi 5 (docs).
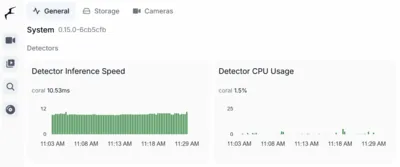
Frigate CPU & RAM Utilization
Navigate to Settings > System metrics and inspect all three tabs (General, Storage, Cameras). Frigate provides nicely detailed performance metrics.
In my setup with two video streams, Frigate uses the following system resources on average:
- Raspberry load average: 0.3 (as measured by
htop) - Raspberry CPU: 6-8% (as measured by Frigate)
- Raspberry memory: 1.6 GB (as measured by
htop) - Coral CPU: 0-5% (as measured by Frigate)
- Coral memory: 3.5% (as measured by Frigate)
Initial Configuration
UI Settings
Navigate to Settings > Configuration > Settings > UI Settings and configure the following:
- Recordings Viewer > Default Playback Rate:
2x - Calendar > First weekday: Monday
Masks and Zones
You may want to define detection masks (also called zones). This prevents Frigate from recording when someone walks on the street, for example.
To define masks, navigate to Settings > Configuration > Settings > Masks/Zones and create a zone.
Switch over to the Camera Settings tab and enable the alerts and detections for the zone you created:
- Alerts: enabled (All person, car objects detected in ZONE on CAM will be shown as Alerts)
- Detections:
- Limit detections to specific zones: enabled (All objects not classified as Alerts that are detected in ZONE on CAM will be shown as Detections.)
Backup
OS & App Configuration
I’m using my Linux config file backup script to back up OS and Frigate config changes to a private GitHub repository. The following is the contents of my backup_src.txt file:
/backup/.ssh
/backup/config/backup_src.txt
/etc/**/*.conf
/etc/ssh/sshd_config
/data/docker/frigate/config/config.yml
/data/docker/frigate/docker-compose.yml
Camera Recordings
It makes a lot of sense to synchronize Frigate’s recordings to a cloud storage service for safekeeping in case a burglar finds the NVR. Ideally, Frigate would have built-in functionality for cloud backup. Until that is the case, we can build it ourselves. See this article for a complete solution.
Changelog
2025-08-20
- Added the config setting
default_role.
2025-05-31
- Added the sections Persistent Logging (Optional) and Hardware and Software Watchdog.


Comments