Controlling Philips Hue Lights From KNX With ISE Smart Connect KNX Hue
- KNX & ETS
- Published Apr 5, 2025
The ISE Smart Connect KNX Hue is a nifty little device that bridges the gap between the KNX and Hue universes. But why bring wireless Hue lights into the mix if you already have lights controlled via wired KNX/DALI? The answer is simple: even in the most well-planned house there are situations where you want to place lights in positions where only a plain socket without KNX or DALI control is available. In such cases, wirelessly controlled Hue bulbs are a flexible solution. However, you still want to be able to control all your lights - KNX, DALI, and Hue - from one place: your KNX room controllers. The ISE Smart Connect KNX Hue enables just that.

Setup
Overview
- Connect the Hue Bridge to the network, install the Hue app on your phone, and add Hue lights in the app.
- Connect the ISE Smart Connect KNX Hue to both the KNX bus and the IP network.
- Secure the ISE Smart Connect KNX Hue.
- Configure the ISE Smart Connect KNX Hue via its web UI.
- Configure the ISE Smart Connect KNX Hue in ETS.
Let’s go through each of the above steps in detail.
Step 1: Connect the Hue Bridge to the Network
- Connect the Hue Bridge to your network.
- The Hue Bridge requests an IP address via DHCP.
- Assign a static IP address to the Hue Bridge on your router.
- After a power cycle the Hue bridge uses the statically assigned IP address.
Step 1.1: In the Hue App, Discover the Bridge
- The Hue app searches for the bridge in the local network using SSDP (specifically: UDP multicasts to the address
239.255.255.250). - Multicasts don’t work across VLANs.
- When using OPNSense as a firewall/router, the UDP Broadcast Relay plugin could help.
- Alternatively, the phone with the Hue app must temporarily be connected to the same VLAN as the bridge. Once the bridge has been discovered, the communication works without multicasts and, therefore, without problems across network boundaries and VLANs.
Step 2: Connect the ISE Smart Connect KNX Hue to the Network
- Connect the ISE Smart Connect KNX Hue to your network.
- The ISE Smart Connect KNX Hue requests an IP address via DHCP.
- Assign a static IP address to the ISE Smart Connect KNX Hue on your router.
- Access the ISE Smart Connect KNX Hue’s website via its IP address and reboot via System > Reboot.
Step 3: Secure the ISE (Automatic HTTPS & Authentication via Caddy)
Notes
The ISE’s web interface offers neither transport encryption nor authentication. It must not be directly accessible from user or even guest VLANs. The way to properly integrate the ISE into a well-designed network is to place it behind a reverse proxy that provides HTTPS encryption and authentication. I’ve used this technique many times for various services on my network. Unfortunately, this approach currently doesn’t work with the ISE (firmware version 4.0.4104.0) because it doesn’t properly switch its web socket protocol from WS to WSS. I’ve notified ISE about this and hope it’ll be fixed in a future firmware version.
Once a fix is available, use the following to secure the web interface of the ISE Smart Connect KNX Hue.
Caddyfile
Add the following to Caddyfile (details):
ise.{$MY_DOMAIN} {
	import auth
	reverse_proxy ise-knx-hue.{$MY_DOMAIN}
	tls {
		dns cloudflare {env.CLOUDFLARE_API_TOKEN}
	}
}
Note: The definition of the auth snippet can be found here.
DNS A Records
Add the following A records to your DNS domain (details):
ise.home.yourdomain.com 192.168.0.4               # replace with your Docker host's IP address
ise-knx-hue.home.yourdomain.com 192.168.1.199     # replace with the ISE's IP address
Try to resolve the names on a machine in your network (e.g., nslookup ise.home.yourdomain.com).
Reload Caddy’s Configuration
Instruct Caddy to reload its configuration by running:
docker exec -w /etc/caddy caddy caddy reload
You should now be able to access the web interface of the ISE Smart Connect KNX Hue at https://ise.home.yourdomain.com without getting a certificate warning from your browser.
Firewall Configuration
With the above reverse proxy configuration, direct network connectivity to the ISE Smart Connect KNX Hue’s web interface is not required anymore. I recommend blocking access to the ISE Smart Connect KNX Hue from your user VLAN via a firewall rule.
Step 4: Configure the ISE Smart Connect KNX Hue via Its Web UI
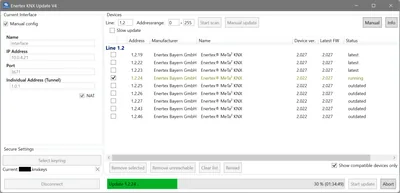
Step 4.1: Firmware Update
In the ISE Smart Connect KNX Hue’s web UI, navigate to System > Firmware Update and install the update if one is available.
Step 4.2: Register the Hue Bridge
In the ISE Smart Connect KNX Hue’s web UI, navigate to Light mapping, click Add Hue Bridge and enter the IP address of your Hue Bridge. The ISE Smart Connect KNX Hue should then import the bridge’s configured lights and show them in the section Configuration of the Hue light mapping.
Step 5: Configure the ISE Smart Connect KNX Hue in ETS
The following example demonstrates the configuration with the ISE’s first lamp. The example makes use of the group addresses 1/5/0 and following. Adjust as needed.
Step 5.1: Assign an Individual KNX Address
- Add the ISE Smart Connect KNX Hue to your ETS project.
- Assign an individual KNX address and the appropriate application program.
Step 5.2: Parameters for the ISE Smart Connect KNX Hue
- In ETS, navigate to the ISE Smart Connect KNX Hue device and select the tab Parameters.
- Select your lamp count (1 through 25).
- This also changes the lamp “slots” shown in the section Configuration of the Hue light mapping of the ISE Smart Connect KNX Hue’s web UI.
Step 5.3: Create KNX Group Addresses
- Create KNX group addresses for your Hue lights. I’m using the following set of group addresses for each individual lamp:
- LAMPNAME on/off: switches the lamp on or off (
1/5/0). - LAMPNAME on/off status: receives the on/off status (for display in room controllers) (
1/5/1). - LAMPNAME dimming: sets the lamps dimming value (
1/5/2). - LAMPNAME dimming status: receives the lamps dimming value (for display in room controllers) (
1/5/3).
- LAMPNAME on/off: switches the lamp on or off (
Step 5.4: Assign KNX Group Addresses to ISE Group Objects
- In ETS, navigate to the ISE Smart Connect KNX Hue device and select the tab Group Objects.
- Select the group object
20(DE: Lampe schalten / EN: switch lamp) and assign the group address1/5/0. - Select the group object
21(DE: Zustand Lampe / EN: lamp status) and assign the group address1/5/1. - Select the group object
22(DE: Relative Helligkeit / EN: relative brightness) and assign the group address1/5/2. - Select the group object
24(DE: Zustand Helligkeit / EN: brightness status) and assign the group address1/5/3.
- Select the group object
Step 5.5: Assign KNX Group Addresses to Room Controller Group Objects
This is the final step that allows you to control your Hue lamps from your KNX room controllers. The instructions vary between room controllers; on my Enertex MeTa² KNX the following is required:
- Navigate to the Enertex MeTa² KNX room controller device.
- On the tab Parameters > Channels, create a new channel for your lamp (e.g.,
13). - Navigate to the tab Group Objects and configure them as follows:
- 1st group object of the lamp’s channel
13(DE: Schalten / EN: switching): assign the group address1/5/0. - 2nd group object of the lamp’s channel
13(DE: Rückmeldung Schalten / EN: feedback switching): assign the group address1/5/1. - 3rd group object of the lamp’s channel
13(DE: Relatives Dimmen / EN: relative dimming): assign the group address1/5/2. - 4th group object of the lamp’s channel
13(DE: Rückmeldung Helligkeitswert / EN: brightness status): assign the group address1/5/3.
Wishlist
- Grouping: A very useful feature is missing: the ability to group Hue lights so that they can be dimmed and controlled as one. This functionality is available with DALI, for example.
More Information
KNX Scenes
The ISE Smart Connect KNX Hue allows you to map KNX scenes to Hue scenes. As far as I know this is read only, i.e., changed lighting states cannot be saved as is possible with KNX actors or DALI gateways.
SSDP Across VLANs With OPNsense
In my attempts to get Hue Bridge discovery working across VLANs, I stumbled upon the following cool article which I’m linking here for future reference:


Comments