DiskLED
DiskLED is a small tool that displays performance counter data using an animated system tray icon. It comes with a graphical configuration dialog that lets you choose from all performance counters available on the local system - you can monitor network throughput just as easily as hard disk activity or memory usage.
Quickstart
- Download DiskLED.
- Unzip it to a folder of your liking. Use any folder, but preferably use one where you have write access with your regular user account, or DiskLED will be unable to save its configuration file (yep, it stores it in the location of the EXE file).
- Run DiskLED. If you are on a non-English system, it will show an error message. Ignore that for now (just click on OK as you always do ;-)
- Double-click the icon in the system tray (next to the time). If you do not see an additional icon, configure Explorer to show DiskLED’s icon.
- A configuration dialog pops up. Read on below for how to configure DiskLED.
Configuration
This is what DiskLED’s configuration dialog looks like:
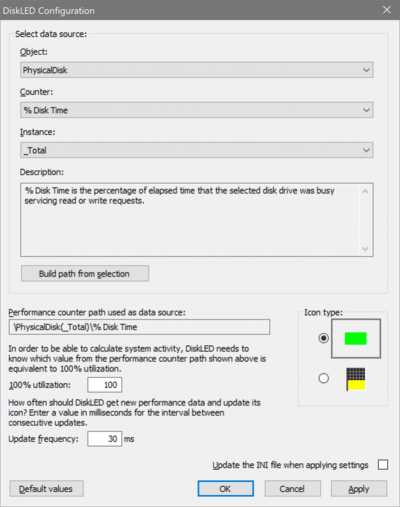
Selecting a Different Data Source
- Select a performance object. The default is PhysicalDisk.
- Select a performance counter. The default is % Disk Time.
- Select an instance (if the object is a disk, the instance specifies which disk to monitor). The default is _Total (sum of all disks).
- Click on “Build path from selection”. This validates the selection and writes the resulting performance counter path into the dialog box below.
- Configure other settings, such as the icon to display.
- It might also be a good idea to tell DiskLED how to interpret the values from the selected performance counter. Let us say you chose the counter “Current Disk Queue Length”. That counter returns the number of requests for disk activity currently on hold because the disk is busy. DiskLED has no way of knowing which queue length value is low, and which value is high. You tell it by entering the appropriate maximum value corresponding to 100% utilization. In case of “Current Disk Queue Length” that would be 2 (on systems with one hard disk, no RAID etc.).
- If you just want to play around with performance counters, do not check “Update the INI file” but click on apply instead. The new settings take effect immediately.
- Once you are satisfied with the configuration, check “Update the INI file” and then click on apply or OK. You are done.
- It might be a good idea to have DiskLED start up automatically when logging on to Windows.
Requirements, Gotchas and Notes
- DiskLED does not require admin rights.
- No installation necessary. DiskLED runs from whatever location you put it in.
- DiskLED is much more accurate than typical hardware LEDs.
- DiskLED looks for its configuration (INI) file in the folder where you put the executable. If it cannot find the INI file there, it uses built-in default settings. Those settings are localized (they depend on the OS language). So, if you get the following error message when starting DiskLED “InitPDH: PdhAddCounter failed with: 0xc0000bb8” and the tool only displays a red exclamation mark in the system tray: double-click that exclamation mark and select a performance counter in your system’s language.
- If you do not see any icon (nothing happens) after starting DiskLED: if you are running Windows 7 or Server 2008 R2 make sure that you have configured Explorer to show all icons in the system tray, or configure Explorer to show DiskLED’s icon.
- DiskLED should run on any Windows client or server operating system beginning with Windows XP.
License
DiskLED is freeware. The source code is available here.
Comments