Enertex KNX IP Secure Router: Initial Configuration Without 2nd Interface
- KNX & ETS
- Published Jun 7, 2025
I recently replaced my MDT IP router SCN-IP100.03 with its Enertex counterpart KNX IP Secure Router. Why? Download speed over secure tunneling connections! Updating the firmware of one of my room controllers took 95 minutes with the MDT router. The same process is finished in 25 minutes with the Enertex router.
The reason for the speed difference is simple: the MDT router handles the encryption in software, the Enertex device in hardware. The MDT achieves the same download speed as the Enertex - but only if you disable secure tunneling (also called KNX IP Secure).

Initial Configuration: Catch-22
The initial configuration of a KNX IP router mainly involves setting the desired individual (physical) address. That, however, typically requires an existing connection to the KNX bus. Enertex mentions a USB interface in their documentation. But what if you don’t have that?
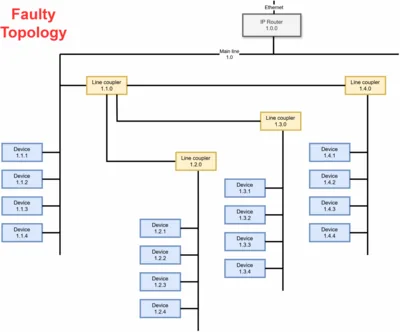
In my specific case, I wanted to replace one IP router for another. Due to limitations/expectations in the KNX architecture, a coupler always has the address 0 on its line. I, therefore, couldn’t simply temporarily configure the new router with a different KNX individual address. I had to rip out the existing router in order to be able to assign its individual address to the new router. But how to download that configuration to the still unconfigured router? After all, the old router was gone.
I came up with a workaround where the Enertex router’s initial configuration is done via Telnet.
Initial Configuration: How-To
Preparation
Connect the Enertex KNX IP router to the KNX bus. It’ll power up and its little display will show an info that the KNX bus connection is OK. Next, connect the device to your IP network. It’ll request an IP address via DHCP. I recommend to assign a static address. The assigned address is shown in the device’s display, too (very useful).
Connect via Telnet
We now have a KNX IP router whose IP side is configured. Let’s take care of the KNX side.
With the IP address configured, we can connect via Telnet. Please note that Telnet is unsecure (because it’s unencrypted), so Telnet is disabled by the router once KNX IP Secure has been enabled (which we’ll do later).
I first tried to connect from my favorite terminal app, Tabby. Unfortunately, password authentication didn’t work, at least not in the default configuration. So I switched to the Windows 11 Telnet tool, which worked instantly as described below.
Open a Windows command prompt and connect via Telnet to your router’s IP_ADDRESS:
telnet IP_ADDRESS
Once the connection has been established, press any key. You’ll see a password prompt:
Password:
Type in the password knxsecure and press Enter. The screen should look as follows:
Password: *********
You’ll see a prompt (#). Type help to see the available commands
Set the individual KNX address to 1.0.0
Set the router’s individual address with the tpconfig command (adjust the individual address as needed):
# tpconfig set 1.0.0
KNX address...: 01.00.000
Set the individual KNX addresses of all eight tunnels with the tunaddr command to 1.0.1 through 1.0.8:
# tunaddr setall 1.0.1
Setting all tunnel KNX addresses...
1: New KNX address: 01.00.001
2: New KNX address: 01.00.002
3: New KNX address: 01.00.003
4: New KNX address: 01.00.004
5: New KNX address: 01.00.005
6: New KNX address: 01.00.006
7: New KNX address: 01.00.007
8: New KNX address: 01.00.008
That’s it for the basic configuration of your new router!
ETS Connection
With the above configuration, we can use the new router as a KNX IP interface in ETS. Add the router as a new connection with the parameters:
- Server: IP_ADDRESS
- Port:
3671 - IP protocol: auto
ETS Device Configuration
Obviously, we want the router to properly show up in ETS. And, of course, we want to enable KNX IP Secure (aka secure tunneling).
Add the router from the catalog. Enter the FSDK (factory default setup key) to set up IP Secure. Configure the individual addresses of the router and all the tunnel devices (the latter cannot be changed later). Use the same individual addresses you configured via Telnet earlier.
Select Download all to fully configure the router.
Additional Configuration Steps
NTP Time Server
From the ETS catalog, add as another device the Enertex IP system devices - additional function to enable the NTP time server functionality of the router.


Comments