ShareX: Free Screen Recording Tool & Mouse Pointer Offset Fix
- Applications
- Published Jul 30, 2021
This is a quick post to remind me of two things: 1) ShareX is the tool of choice for screen recordings on Windows. 2) On high-DPI (4K) screens there is a mouse pointer offset that can easily be fixed.
Capturing Screen Video Recordings With ShareX
- Download and install ShareX.
- Start the application. If you have another screenshot tool like Greenshot running, it may complain about not being able to register hotkeys.
- Start the recording by clicking Capture > Screen recording or by pressing
Shift+Print Screen. - Allow ShareX to download FFmpeg. It’ll be stored in
%USERPROFILE%\Documents\ShareX\Tools - Select the window you want to record (ShareX highlights windows when you hover the mouse over them).
- Perform the steps you want to record.
- Stop the recording by clicking Capture > Screen recording or by pressing
Shift+Print Screen. - ShareX stores the recording as an MP4 file.
Fixing the Mouse Pointer Offset on High-DPI Displays
If you’re recording on a high-DPI display, e.g., a 4K monitor, you’ll notice a mouse pointer offset: the mouse pointer is not where it’s supposed to be in the video.
This is caused by FFmpeg not being fully high-DPI aware as documented here. Luckily it can be fixed easily:
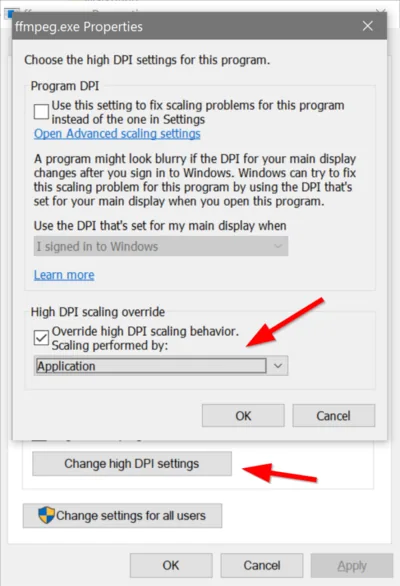
- Locate
FFmpeg.exe(downloaded to%USERPROFILE%\Documents\ShareX\Toolsif you followed the steps above). - Right-click the executable and select Properties in the context menu.
- Click the Compatibility tab and select Change high DPI settings.
- Click Override high DPI scaling behavior. Scaling performed by: Application.
- The result should look similar to the screenshot above.


Comments